By: Team W09-3 Since: Feb 2019 Licence: MIT
- 1. Introduction
- 2. Setting Up
- 3. Design
- 4. Implementation
- 4.1. Mode System
- 4.2. Tables feature
- 4.3. Orders feature
- 4.4. Menu feature
- 4.5. Statistics feature
- 4.6. Logging
- 4.7. Configuration
- 5. Documentation
- 6. Testing
- 7. Dev Ops
- Appendix A: Product Scope
- Appendix B: User Stories
- Appendix C: Use Cases
- Appendix D: Non Functional Requirements
- Appendix E: Glossary
- Appendix F: Instructions for Manual Testing
1. Introduction
RestOrRant (ROR) is a restaurant management application for restaurant managers, waiters and cashiers. ROR is designed for them to perform front-end operations more conveniently and efficiently. It allows them to manage tables, orders, menu and statistical data using the Command Line Interface (CLI).
This Developer Guide allows you as a developer to understand the implementation and design principles used in ROR. This guide serves as a reference for you to set up and further contribute to ROR’s development.
This Developer Guide consists of the following sections:
-
Setting Up - Provides instructions to set up ROR in your computer
-
Design - Provides an overview of the architecture and components of ROR
-
Implementation - Provides implementation and design considerations of ROR’s core features
-
Documentation - Provides instructions to edit and publish documentation
-
Testing - Provides methods to run and troubleshoot tests
-
Dev Ops - Provides tools to help build, test and release ROR
To help you follow this Developer Guide better, here is the legend of the markups and formatting used throughout this document:
|
Command that can be typed |
name |
Reference to the codebase (such as component, class and method names) |
|
Tips and tricks that might be useful |
|
Additional information that is good to know |
|
Important pointers to take note |
2. Setting Up
This section will guide you along the process of setting up ROR in your computer.
2.1. Prerequisites
Before you proceed, there are two prerequisites you will need to fulfill:
-
JDK 9 or later
JDK 10 on Windows will fail to run tests in headless mode due to a JavaFX bug. Windows developers are highly recommended to use JDK 9. -
IntelliJ IDE
IntelliJ by default has Gradle and JavaFx plugins installed.
Do not disable them. If you have disabled them, go to to re-enable them.
2.2. Setting up ROR in your computer
Having satisfied the prerequisites, you can now set up ROR in your computer by following the steps below:
-
Fork this repo, and clone the fork to your computer
-
Open IntelliJ (if you are not in the welcome screen, click to close the existing project dialog first)
-
Set up the correct JDK version for Gradle
-
Click
-
Click New… and find the directory of the JDK
-
-
Click Import Project
-
Locate the build.gradle file and select it. Click OK
-
Click Open as Project
-
Click OK to accept the default settings
-
Open a console and run the command
gradlew processResources(Mac/Linux:./gradlew processResources). It should finish with the BUILD SUCCESSFUL message.
This will generate all resources required by the application and tests. -
Open MainWindow.java and check for any code errors
-
Due to an ongoing issue with some of the newer versions of IntelliJ, code errors may be detected even if the project can be built and run successfully
-
To resolve this, place your cursor over any of the code section highlighted in red. Press ALT+ENTER, and select Add '--add-modules=…' to module compiler options for each error
-
-
Repeat this for the test folder as well (e.g. check HelpWindowTest.java for code errors, and if so, resolve it the same way)
2.3. Verifying the setup
To make sure that your ROR is properly set up:
-
Run the seedu.address.MainApp and try a few commands
-
Run the tests to ensure they all pass.
2.4. Configurations to do before writing code
You should ensure that the following configurations are done to be compatible with ROR.
2.4.1. Configuring the coding style
This project follows oss-generic coding standards. IntelliJ’s default style is mostly compliant with ours but it uses a different import order from ours. To rectify,
-
Go to (Windows/Linux), or (macOS)
-
Select
-
Click on the Imports tab to set the order
-
For Class count to use import with '*' and Names count to use static import with '*': Set to 999 to prevent IntelliJ from contracting the import statements
-
For Import Layout: The order is import static all other imports, import java.*, import javax.*, import org.*, import com.*, import all other imports. Add a blank line between each import
-
Optionally, you can follow the UsingCheckstyle.adoc document to configure Intellij to check style-compliance as you write code.
2.4.2. Updating documentation to match your fork
After forking the repo, the documentation will still have the SE-EDU branding and refer to the se-edu/addressbook-level4 repo.
If you plan to develop this fork as a separate product (i.e. instead of contributing to se-edu/addressbook-level4), you should do the following:
-
Configure the site-wide documentation settings in build.gradle, such as the site-name, to suit your own project.
-
Replace the URL in the attribute repoURL in DeveloperGuide.adoc and UserGuide.adoc with the URL of your fork.
2.4.3. Setting up CI
Set up Travis to perform Continuous Integration (CI) for your fork. See UsingTravis.adoc to learn how to set it up.
After setting up Travis, you can optionally set up coverage reporting for your team fork (see UsingCoveralls.adoc).
| Coverage reporting could be useful for a team repository that hosts the final version but it is not that useful for your personal fork. |
Optionally, you can set up AppVeyor as a second CI (see UsingAppVeyor.adoc).
| Having both Travis and AppVeyor ensures your App works on both Unix-based platforms and Windows-based platforms (Travis is Unix-based and AppVeyor is Windows-based) |
2.4.4. Getting started with coding
When you are ready to start coding, get some sense of the overall design by reading Section 3.1, “Architecture”.
3. Design
Now that you have successfully set up ROR, you are advised to read this section in order to better understand the architecture and its components in ROR. Knowing the structure of ROR and the interactions between its components will allow you to better navigate and modify the code, giving you a headstart in contributing to ROR.
3.1. Architecture
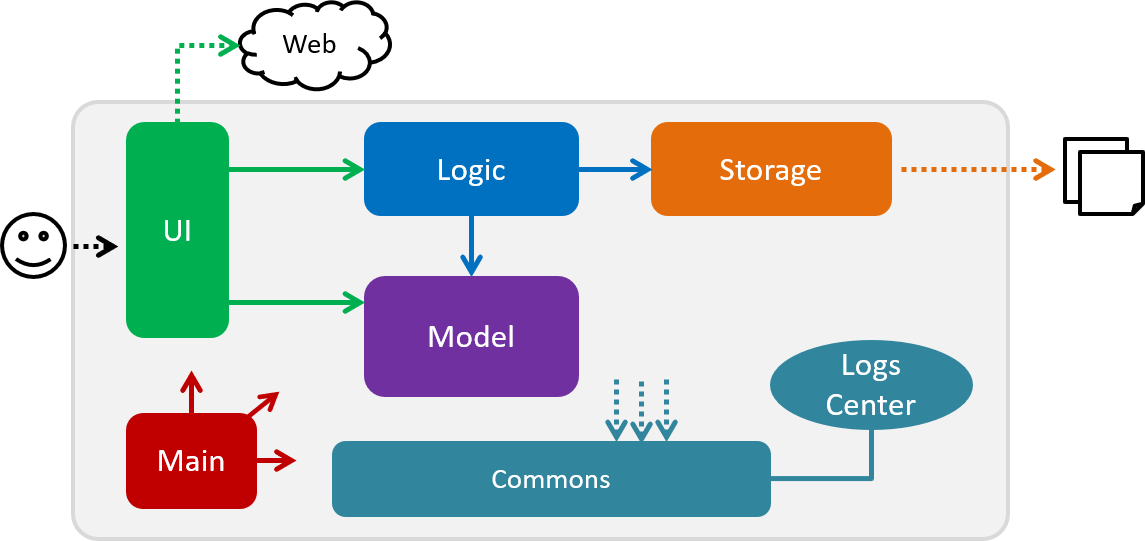
The Architecture Diagram given below explains the high-level design of the ROR App.
| The .pptx files used to create diagrams in this document can be found in the diagrams folder. To update a diagram, modify the diagram in the pptx file, select the objects of the diagram, and choose Save as picture and save your new diagram into the images folder. |
Given below is a quick overview of each component.
Main has only one class called MainApp. It has two functions:
-
At app launch: Initializes the components in the correct sequence, and connects them up with each other.
-
At shut down: Shuts down the components and invokes cleanup method(s) where necessary.
Commons represents a collection of classes used by multiple other components. The following class plays an important role at the architecture level:
-
LogsCenter : Used by many classes to write log messages to the App’s log file.
The rest of the App consists of four components.
Each of the four components
-
Defines its API in an interface with the same name as the Component.
-
Exposes its functionality using a {Component Name}Manager class.
For example, the Logic component (see the class diagram given below) defines its API in the Logic.java interface and exposes its functionality using the LogicManager.java class.

How the architecture components interact with each other
The Sequence Diagram below shows how the components interact with each other for the scenario where the user issues the command addTable 2.
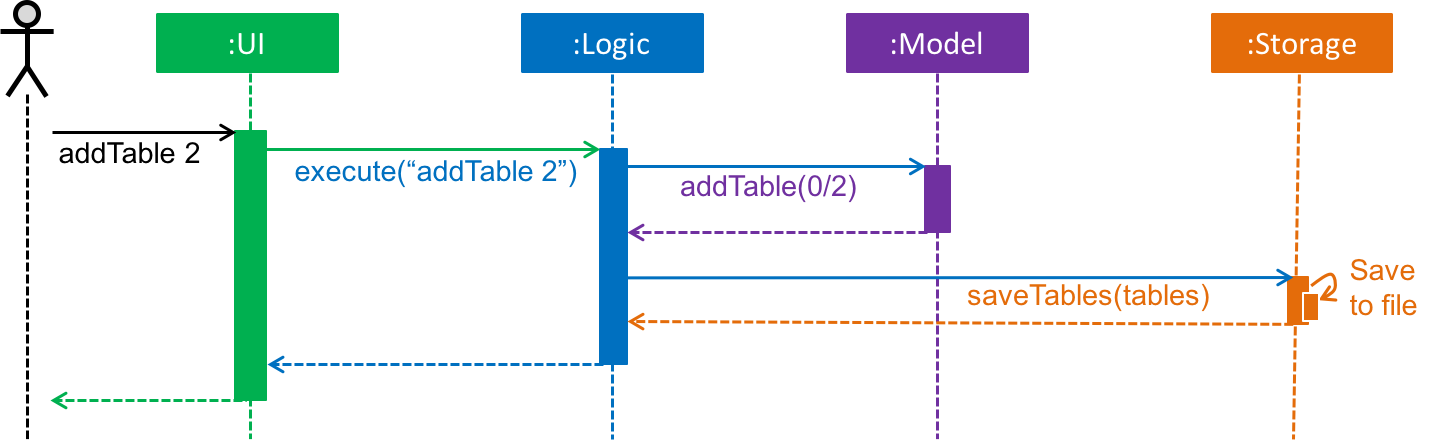
addTable 2 commandThe sections below give more details of each component.
3.2. UI component
The UI component (Figure 4) handles the User Interface of ROR.

API : Ui.java
The UI consists of a MainWindow that is made up of parts such as CommandBox, ResultDisplay and StatusBarFooter. All these, including the MainWindow, inherit from the abstract UiPart class. Not all the parts are displayed to the user at the same time (eg. TableFlowPanel is not shown together with StatisticsFlowPanel). The parts that are shown depends on the mode.
The UI component uses JavaFx UI framework. The layout of these UI parts are defined in matching .fxml files that are in the /blob/master/src/main/resources/view folder. For example, the layout of the MainWindow is specified in MainWindow.fxml.
The UI component:
-
Executes user commands using the Logic component.
-
Listens for changes to Model data so that the UI can be updated with the modified data.
3.3. Logic component
The Logic component (Figure 5) deals with the logic behind the execution of commands.
API : Logic.java
-
Logic uses the RestOrRantParser class to parse the user command.
-
This results in a Command object which is executed by the LogicManager.
-
The command execution can affect the Model (e.g. adding a table).
-
The result of the command execution is encapsulated as a CommandResult object which is passed back to the Ui.
-
In addition, the CommandResult object can also instruct the Ui to perform certain actions, such as displaying help to the user or changing the mode displayed.
Given below is the Sequence Diagram for interactions within the Logic component for the execute("addTable 2") API call.
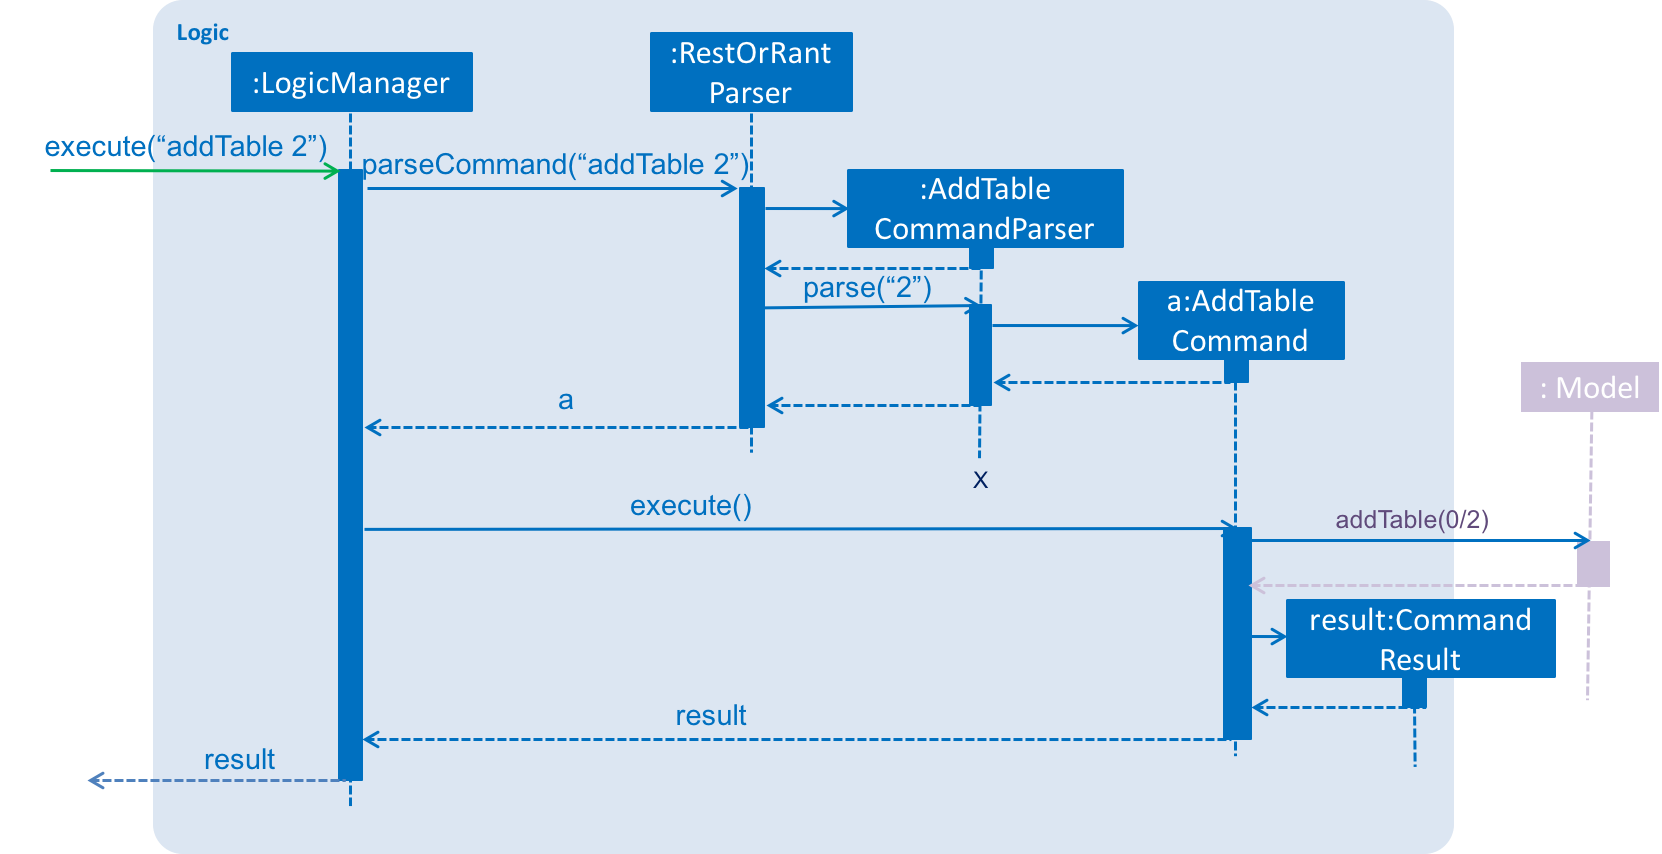
addTable 2 Command3.4. Model component
The Model component (Figure 7) keeps a model of the current state of ROR in memory.
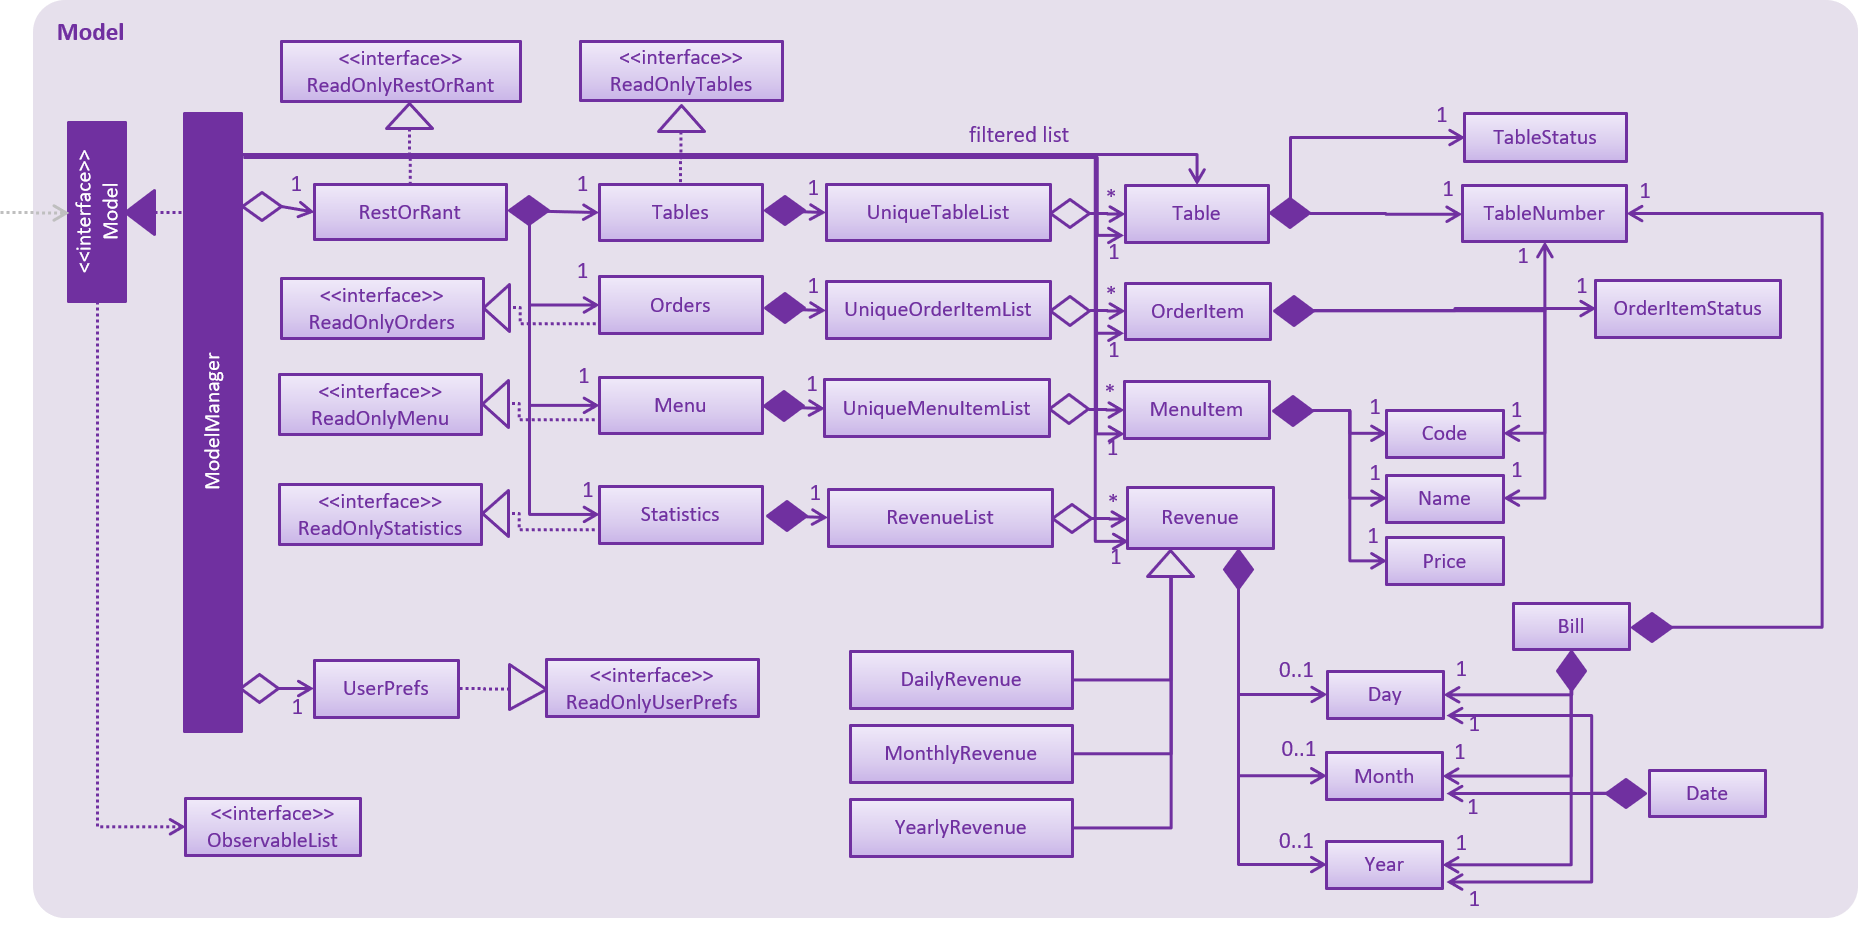
API : Model.java
The Model :
-
stores a UserPref object that represents the user’s preferences.
-
stores the RestOrRant data.
-
exposes an unmodifiable ObservableList<Table>, ObservableList<OrderItem>, ObservableList<MenuItem> and ObservableList<Revenue> that can be 'observed' e.g. the UI can be bound to this list so that the UI automatically updates when the data in the list change.
-
does not depend on any of the other three components.
3.5. Storage component
The Storage component (Figure 8) manages the storing and retrieving of data on local files.
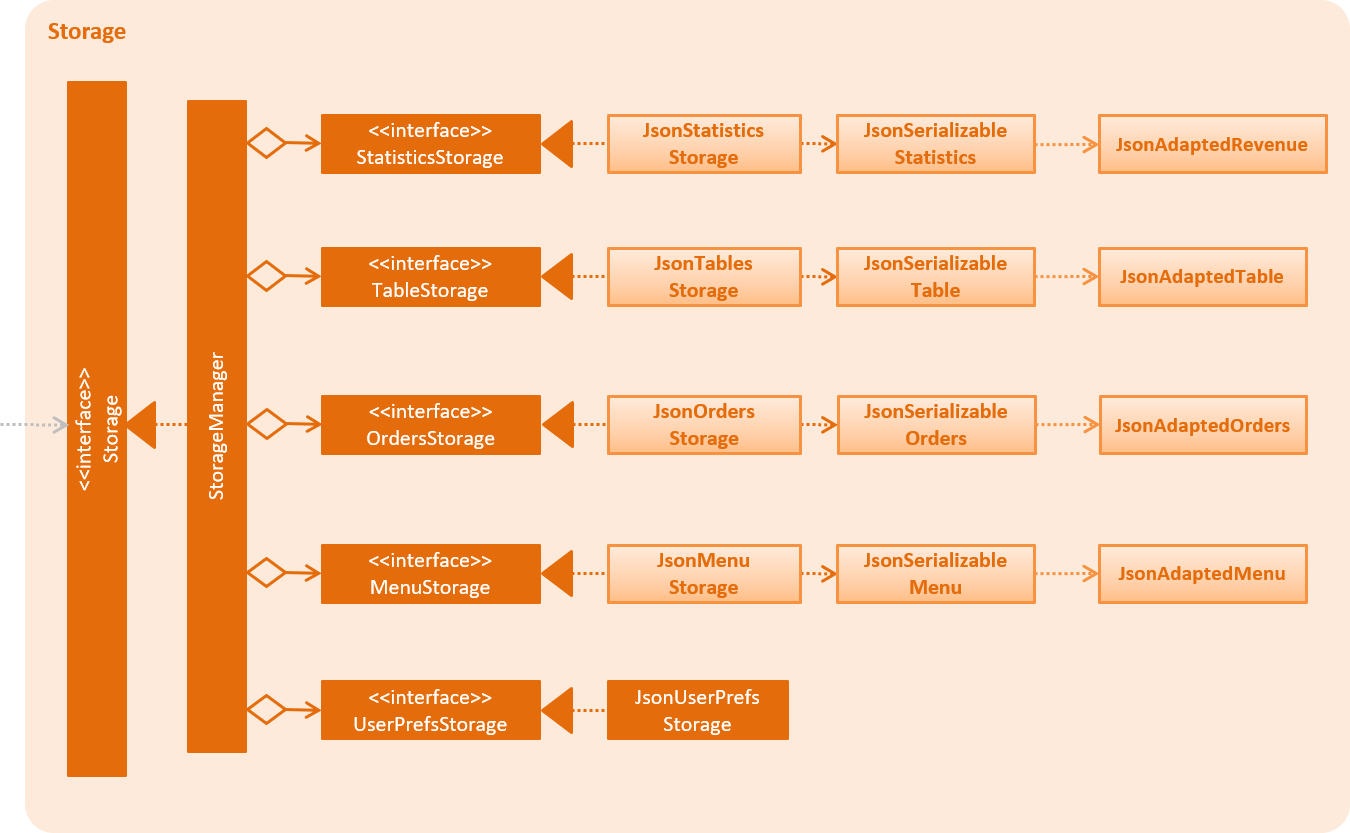
API : Storage.java
The Storage component:
-
saves UserPref objects in json format and reads it back.
-
LogicManager calls for each of Tables, Orders, Menu and Statistics to be saved when they are modified.
-
saves the Tables, Orders, Menu and Statistics data in json format and reads it back.
3.6. Common classes
Classes used by multiple components are in the seedu.address.commons package.
4. Implementation
This section describes some noteworthy details on how our features are implemented.
4.1. Mode System
4.1.1. Modes
As ROR contains many features, users may find it complicated to handle all the features at one go with so many commands to use. Furthermore, users may be overwhelmed if all the restaurant’s information were to be displayed together in one screen.
As such, we have decided to implement a mode system for ROR to organise the available commands into their respective features. ROR provides 4 different modes for the users, each displaying a different set of panels that are relevant to the mode:
-
Restaurant Mode - perform table-related operations across the entire restaurant
-
Table Mode - perform order-related operations for a specific table
-
Menu Mode - perform menu-related operations on the restaurant’s menu
-
Statistics Mode - perform queries to retrieve the restaurant’s statistics
To use the different features, we have also implemented commands for users to switch between the 4 user modes.
There is also a Bill Mode available for your use as a developer, although the existence of this mode is not shared with the users. The Bill Mode displays the receipt and is only used after the bill command is executed in RestOrRant.
Although the bill command is used in Table Mode, it is considered a Statistics feature rather than an Orders feature as it involves calculation for the revenue.
|
4.1.2. Current Implementation
Changing modes in general
The modes of the application are defined using a Mode enum and the current mode of the application is stored as a private attribute mode in LogicManager. Users can switch between modes in ROR using the {XXX}Mode command, such as menuMode and tableMode. When the mode of the application is changed, we need to update the:
-
Logic component so that the mode attribute in LogicManager reflects the new current mode, since this is used to check if a command can be executed,
-
UI component so that the panels display the information that is relevant to the mode.
For all these commands, these updates are done using a new toMode attribute added to the CommandResult object. As an example, the figure below shows the sequence diagram for when a user executes the menuMode command:
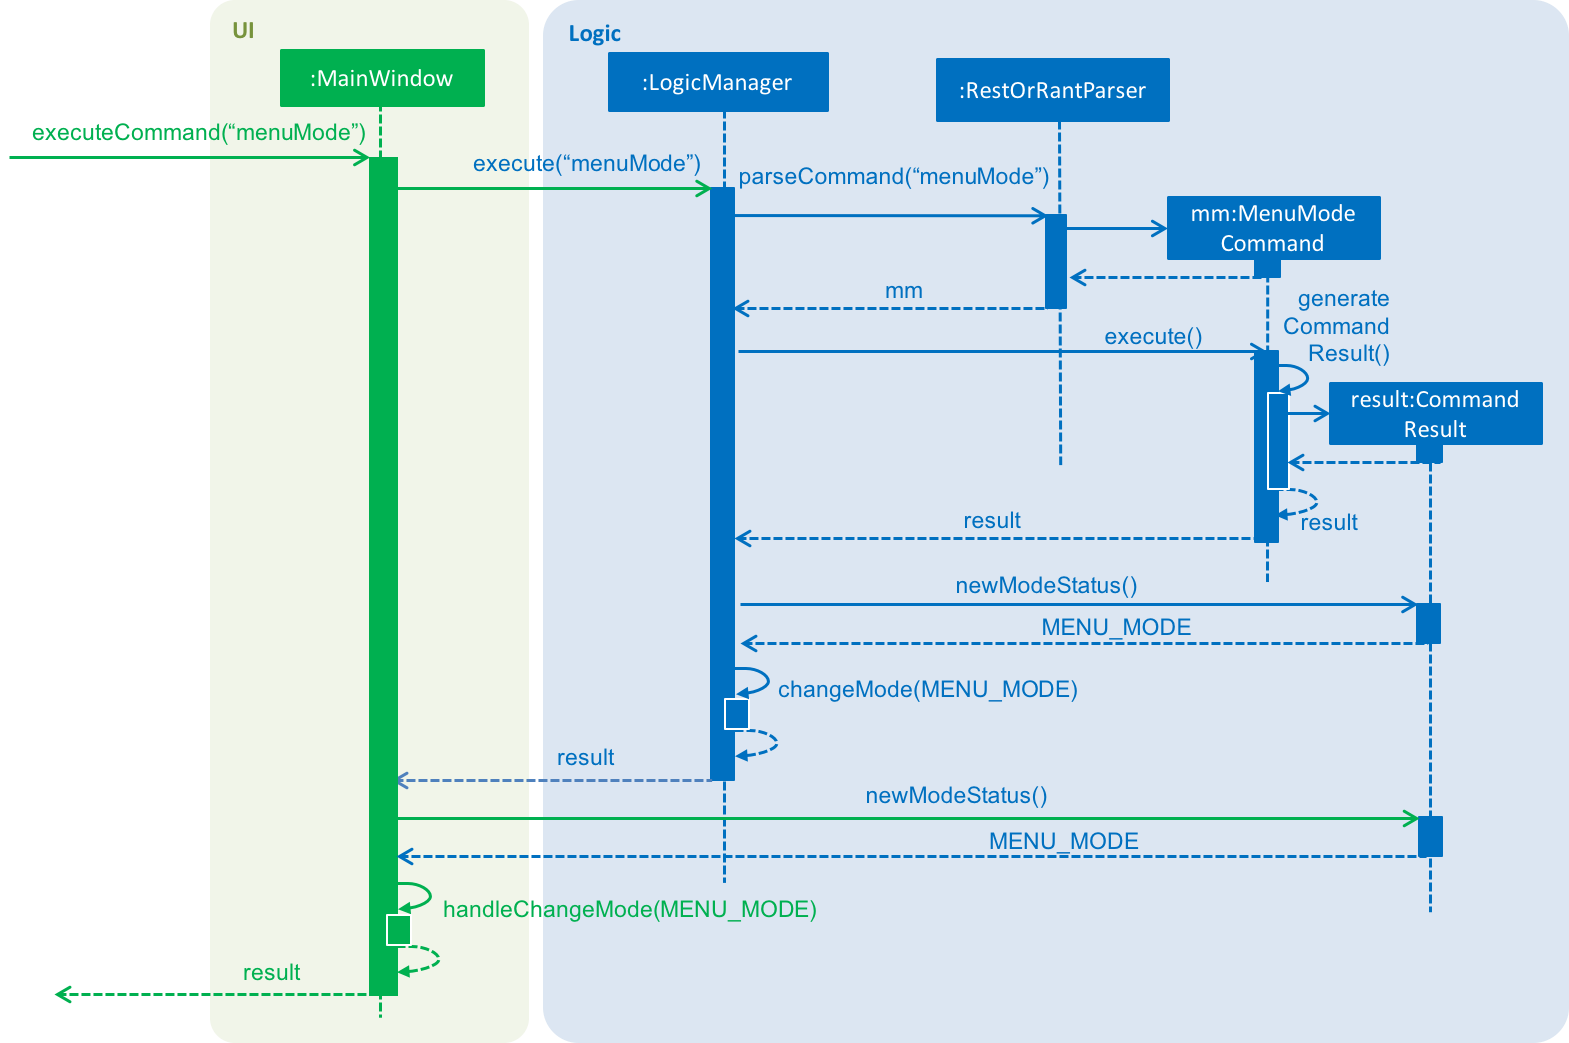
menuMode commandUpon execution of the menuMode command, MenuModeCommand#generateCommandResult() will generate a CommandResult whose toMode attribute is set to MENU_MODE and return it to the LogicManager. Now, the updates can be done for the respective components:
-
Logic component: LogicManager calls CommandResult#newModeStatus() to retrieve the mode to be changed to and updates the current mode stored in its mode attribute by calling LogicManager#changeMode(). The CommandResult is passed to MainWindow in UI.
-
UI component: MainWindow calls CommandResult#newModeStatus() to retrieve the mode to be changed to and updates the display panels by calling MainWindow#handleChangeMode().
| For commands that do not involve a change in mode, CommandResult#newModeStatus() will return null and no updates to the current mode or display will be done. |
Changing to Table Mode for a specific table
All the commands that change modes take no parameters except for Table Mode. When the user wants to perform order-related operations (eg. add an item to the table’s order), the user will first have to switch to Table Mode by typing the tableMode command (or its shortcut TM) followed by the table number of the table that the user wants to perform actions on.
The following sequence diagram shows the relevant parts of what happens when a user executes the tableMode 3 command:
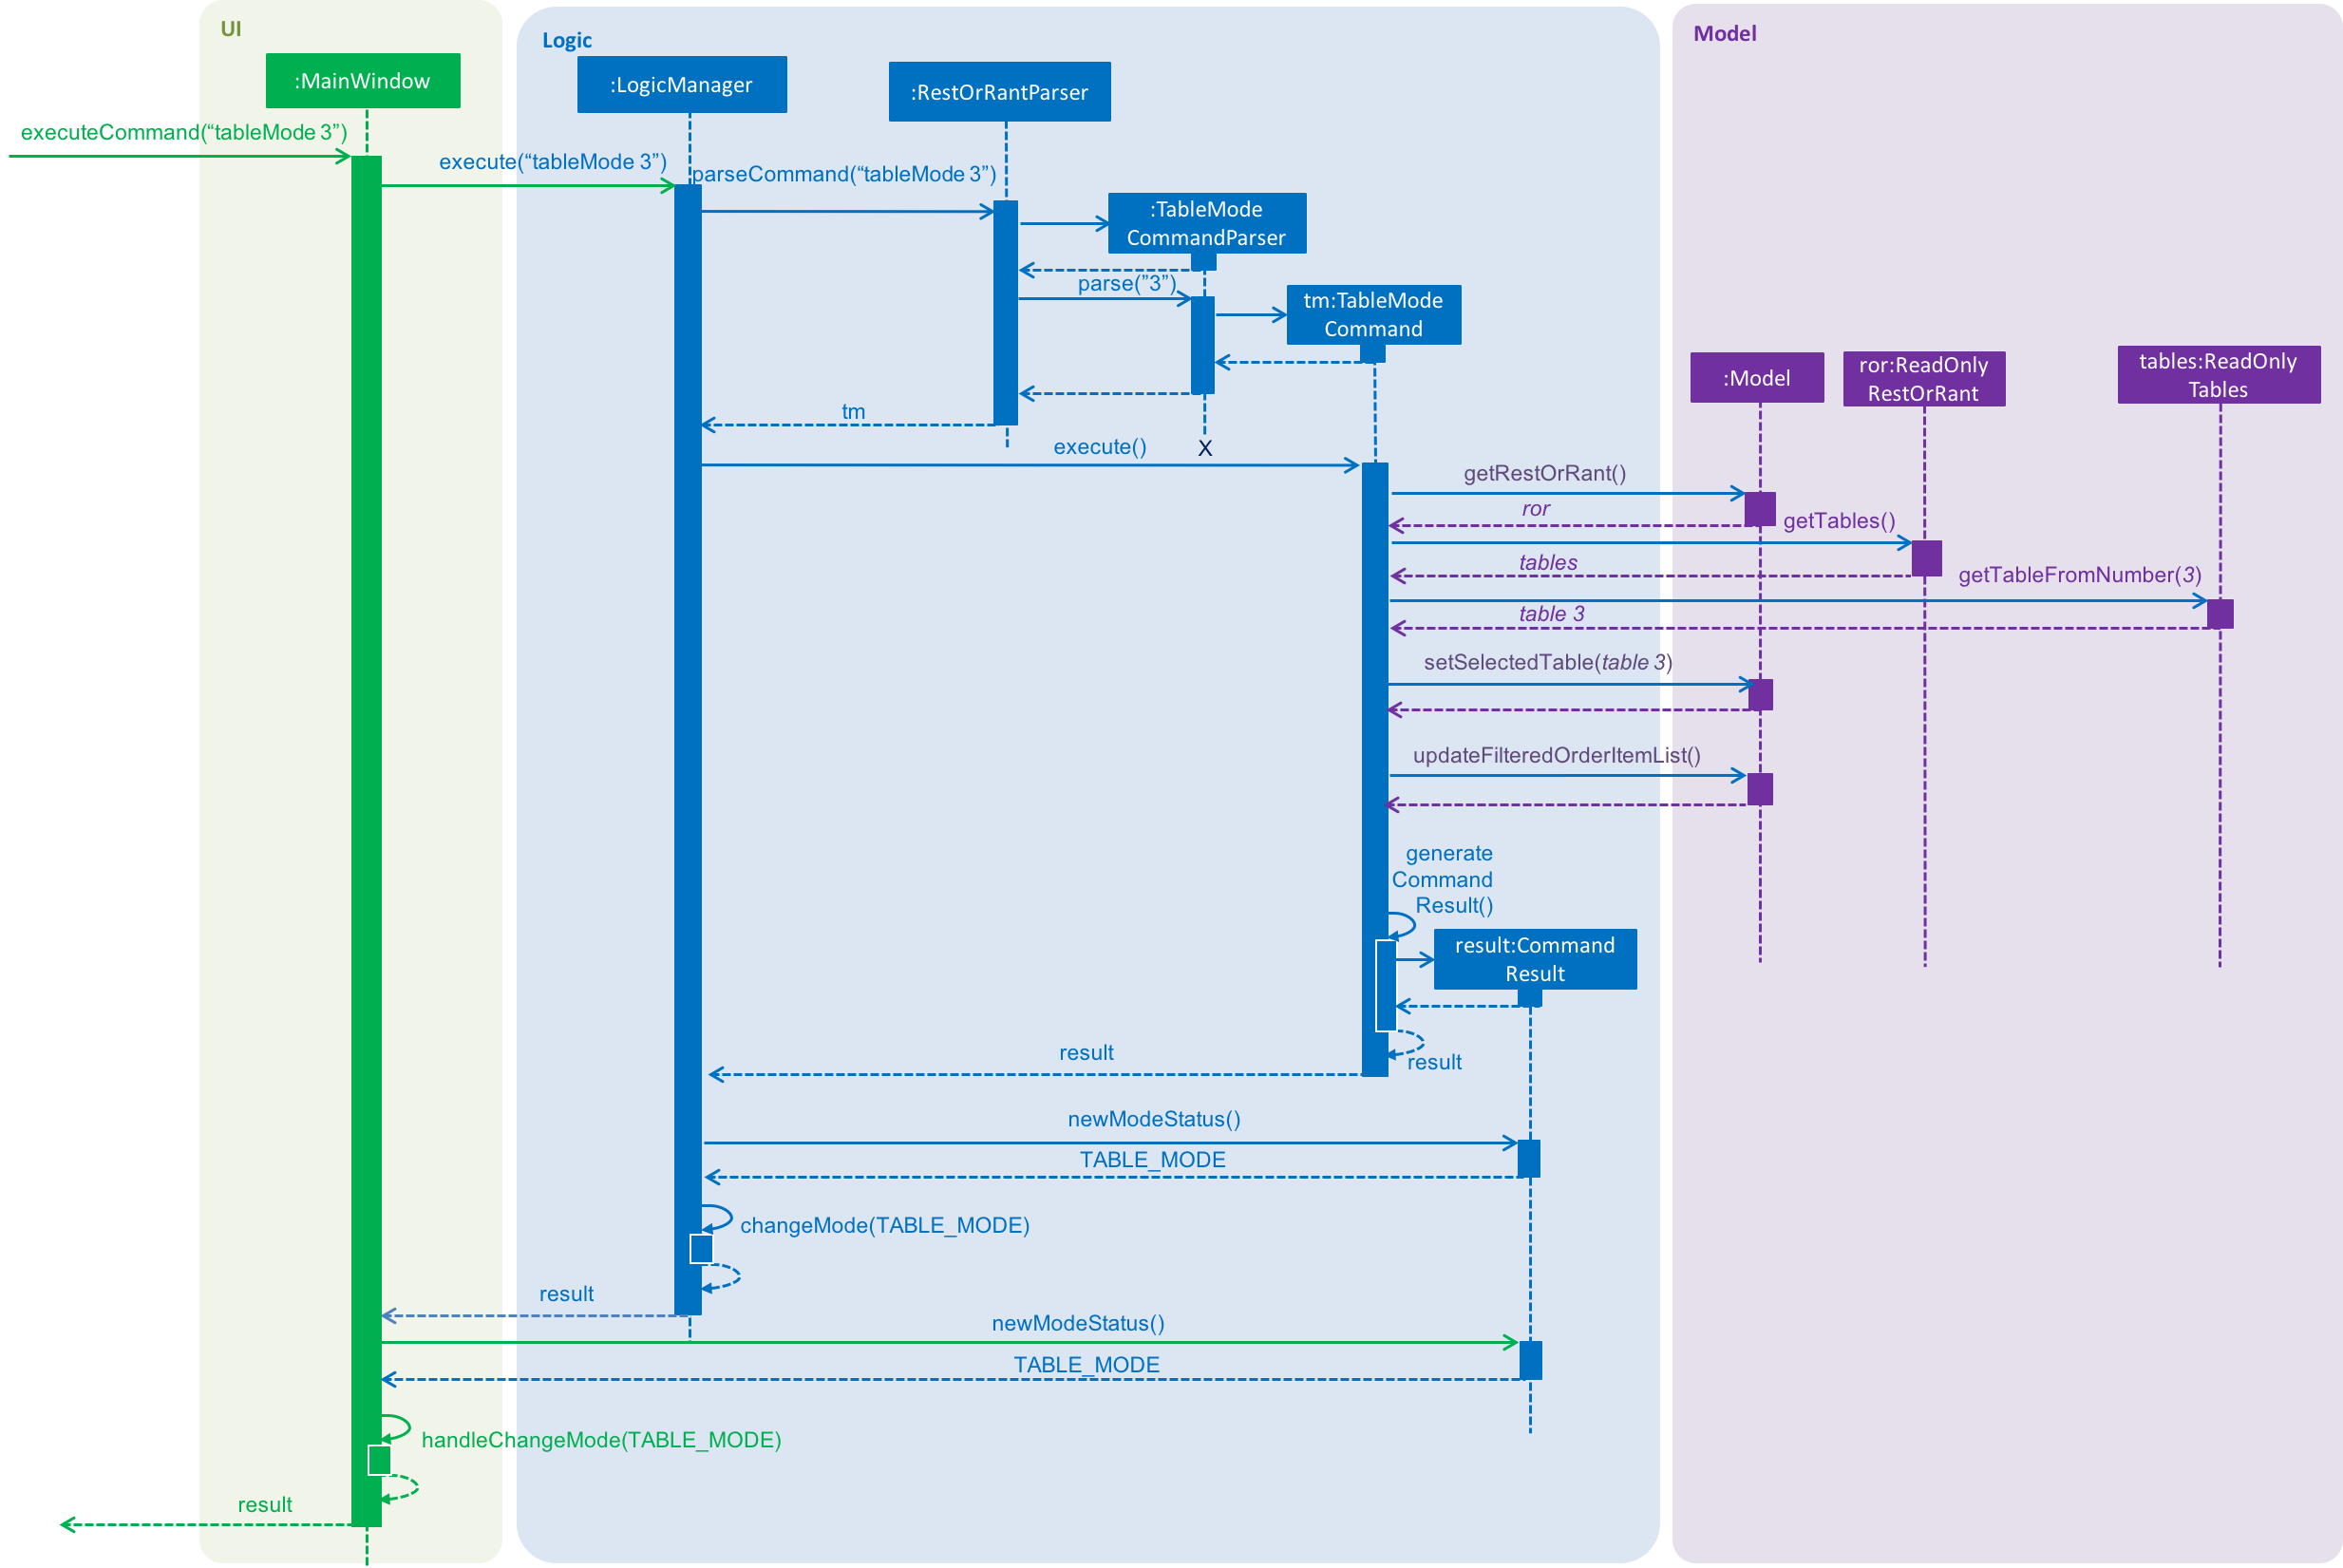
tableMode 3 commandThe Logic and UI component interactions work in a similar way to the other commands that change modes and the implementation is mentioned above. The only difference is the parsing of the argument 3 into a TableNumber object that indicates the table number of the target table to switch to. This TableNumber object is stored as an attribute in TableModeCommand.
Let’s focus on what happens to the Model component when TableModeCommand#execute() is called. The relevant parts of the sequence diagram has been extracted out and shown in the diagram below.
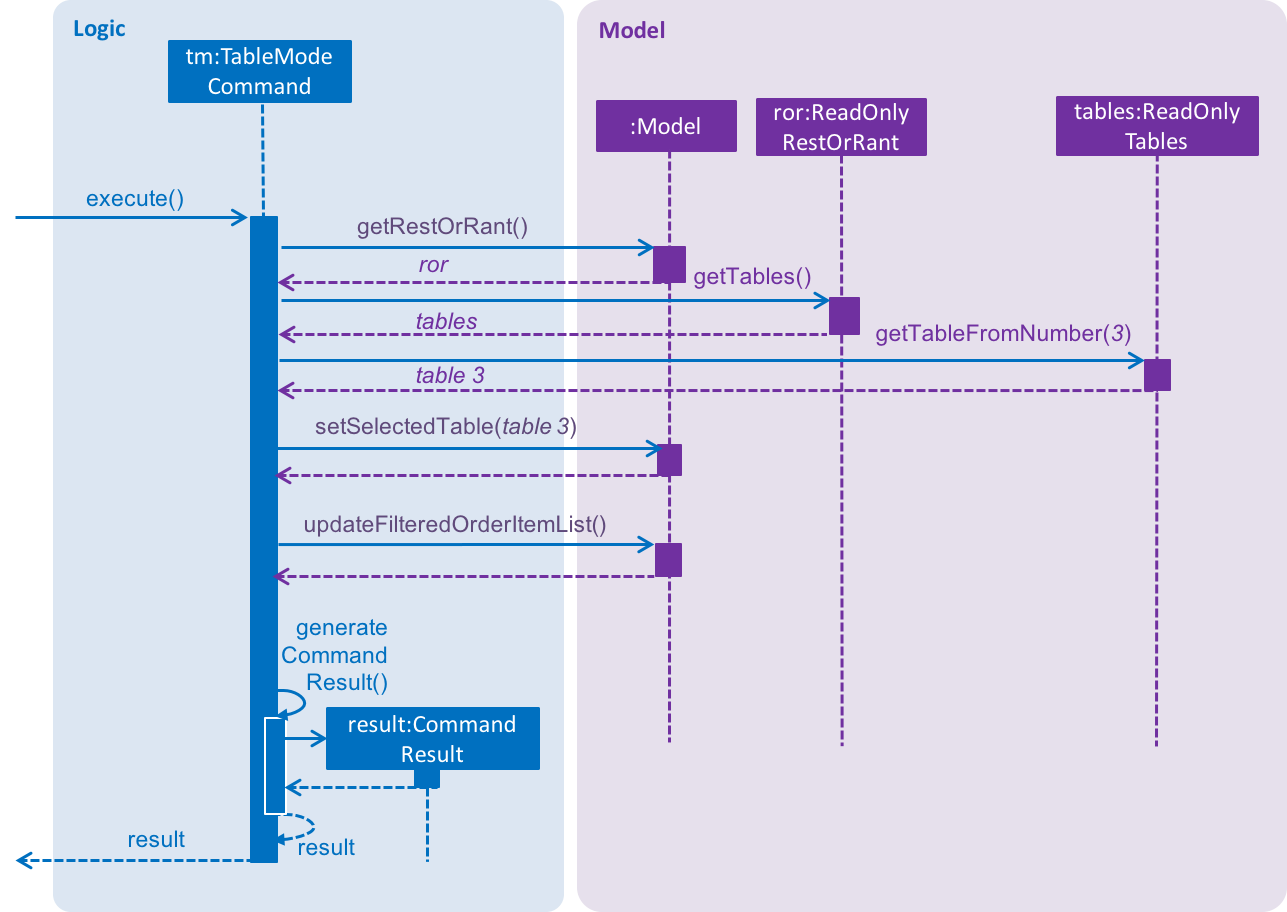
tableMode 3 commandIt first retrieves the Table in RestOrRant that corresponds to its TableNumber attribute. The list of tables are stored within the Tables object in RestOrRant. The read only versions of these objects can be obtained from Model#getRestOrRant() and then ReadOnlyRestOrRant#getTables(). The desired Table object can then be retrieved by passing TableNumber into ReadOnlyTables#getTableFromNumber().
The Table is then set as the selected table in Model using Model#setSelectedTable(). This is to keep track of the current table so that the Table Mode commands like addToOrder and bill can easily perform their operations by getting the table from Model#getSelectedTable().
After which, Model#updateFilteredOrderItemList() is called to update the filtered list such that it only contains order items ordered by the chosen table. This will then update the item list panel in the UI to display only the order items that were ordered by the chosen table.
| TableModeCommand#execute() also checks that the application is not already in Table Mode of the same table number, the table number specified is valid, and the desired table is occupied. |
4.1.3. Design Considerations
| Aspect | Alternative 1 | Alternative 2 |
|---|---|---|
Defining of modes |
Modes are defined using a Mode enum. We decided to choose this option as the enum is an abstraction over the possible modes. Apart from being less prone to errors, it also makes the code more readable as the enum values explicitly state the name of the mode (eg. TABLE_MODE, MENU_MODE) and are stored in Mode variables, making it clear that it refers to a mode and not just any string. |
Modes can be defined with strings (eg. "TableMode") or integers. |
Storing of current mode |
Mode stored in the Logic component (LogicManager). We decided to store the current mode in Logic because we note that most of the work that requires access to the current mode is done here, so providing a quick access will be more efficient. The Model component does not need to know what the current mode is at all, so it would be better to keep the coupling low to facilitate integration. |
Mode stored in the Model component (ModelManager). |
Specifying table number for Table Mode commands |
Table number specified only once when switching to Table Mode, then retrieved from Model#getSelectedTable() for future commands. We decided to go ahead with this implementation as we feel that from a user’s point of view, it would be more convenient to be able to just specify the table number once and then perform a series of operations afterwards. Furthermore, having to parse the table number for every command will also do more work. |
Table number specified for every command (eg. |
4.2. Tables feature
The Table feature allows the users to add, edit and clear tables using the commands addTable, editPax, editSeats and clearTables to ensure that RestOrRant reflects their physical restaurant in terms of the number of tables and each table’s occupancy. Also, the Tables feature provides a quick way to look for an available table that can accommodate the specified number of customers using the spaceFor command. All of the table details are displayed in our UI for easy reference.
4.2.1. Classes for Tables feature in Model
The Tables feature was implemented with the introduction of a new set of classes to Model. A new Tables class encapsulates all the methods and classes related to this feature. It also contains a listener that is used to update the storage when any modification is made to the tables. The Tables object is stored in RestOrRant and it exposes a read-only interface ReadOnlyTables to allow the other components to retrieve table-related information while maintaining data integrity.
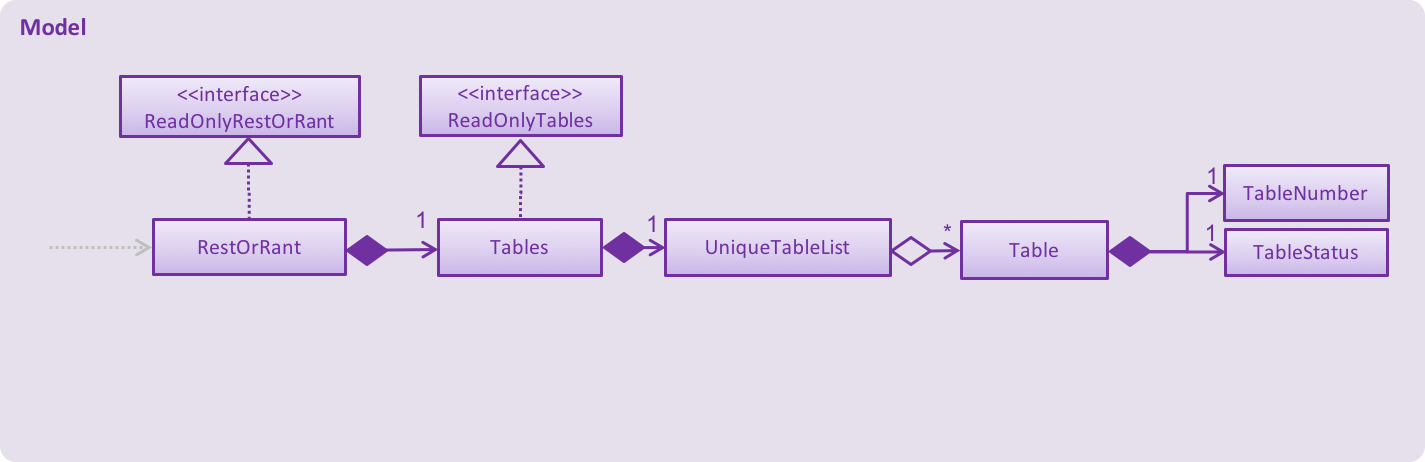
Tables contains a UniqueTableList, which contains a list of all the tables. Each Table object consists of 2 objects:
-
TableNumber indicates the table number of the table
-
TableStatus indicates the occupancy of the table
Table objects are uniquely identified by TableNumber as all tables in a restaurant are uniquely labelled by their table numbers.
The Tables Class Diagram below shows the relationship between the classes.
4.2.2. Adding a table to ROR
The interaction between the components for this function is similar to adding to menu. A key difference in function is that addToMenu only adds 1 menu item each time, but addTable allows multiple tables to be added in a single command.
Tables are stored in a list. When addTable 4 is keyed in, the command is parsed by AddTableCommandParser to check if the arguments are in valid format. They are then converted into a list of String table statuses, which are stored in the AddTableCommand object returned by the parser.
When AddTableCommand#execute() is called, the table statuses in the String list are processed one by one. For each table status, a Table with the appropriate TableStatus and TableNumber is created and stored in the Model.
The TableNumber runs sequentially and is kept track of by the Tables class. This means that there users are not allowed specify the table number for their tables and hence will not in any case add duplicate tables to ROR.
4.2.3. Edit pax at a table
Current Implementation
The edit pax mechanism is facilitated by UniqueTableList. It stores all tables currently in ROR and ensures that there are no duplicated tables. Additionally, it implements UniqueTableList#setTable(targetTable, editedTable), which replaces the target table in the list with the new table with the updated TableStatus.
This operation is exposed in the Model interface as Model#setTable(targetTable, editedTable).
Given below is an example usage scenario and how the edit pax mechanism behaves at each step.
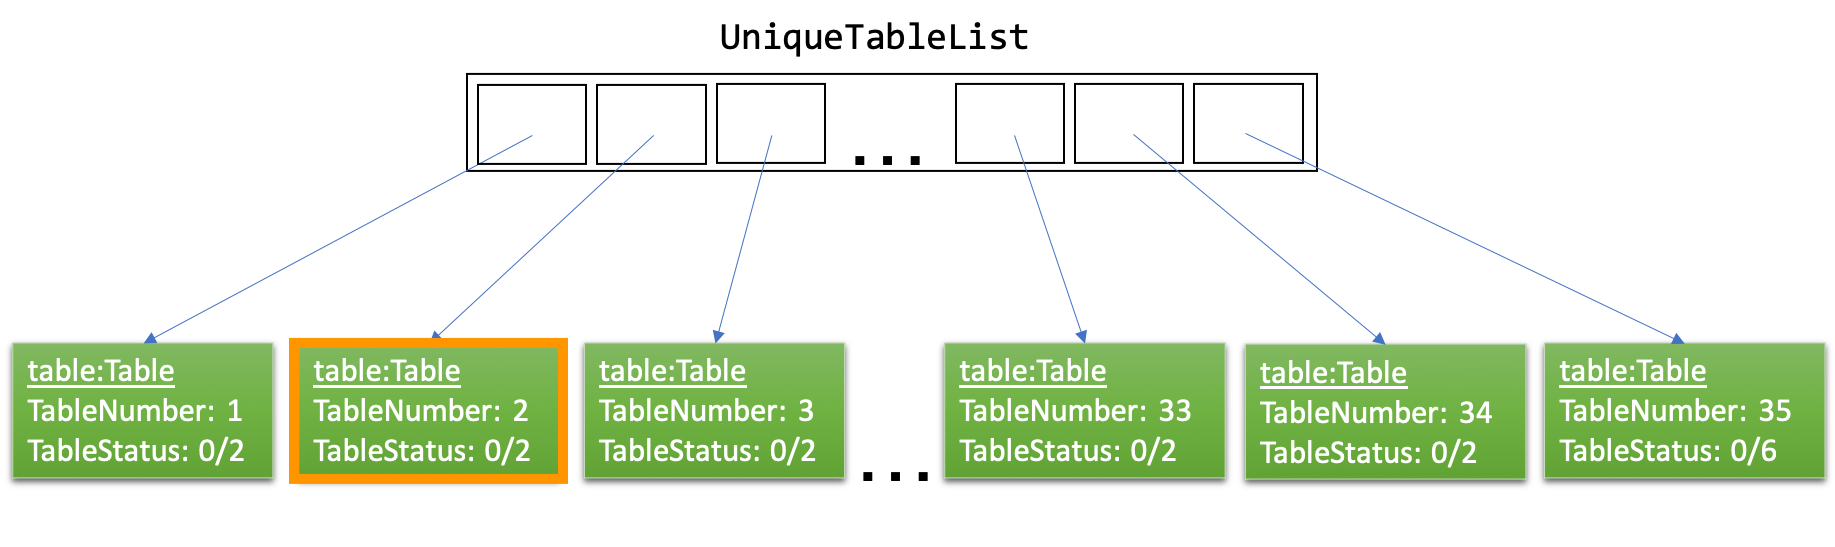
Step 1. Suppose the user launches the application for the first time, the sample data has 35 tables and are stored in the UniqueTableList as shown below. Focus your attention on the Table with the orange markup as this will be our target table in this example.
Step 2. Suppose the user decides to have 2 customers sit at table 2 and executes editPax 2 2 command to update Table 2 with 2 customers. The editPax command calls Model#setTable(targeTable, editedTable), causing the ROR to create a new table with the updated TableStatus and replace the current target table in the UniqueTableList. As shown below, the index of the replaced table now points to a new Table which is highlighted orange.
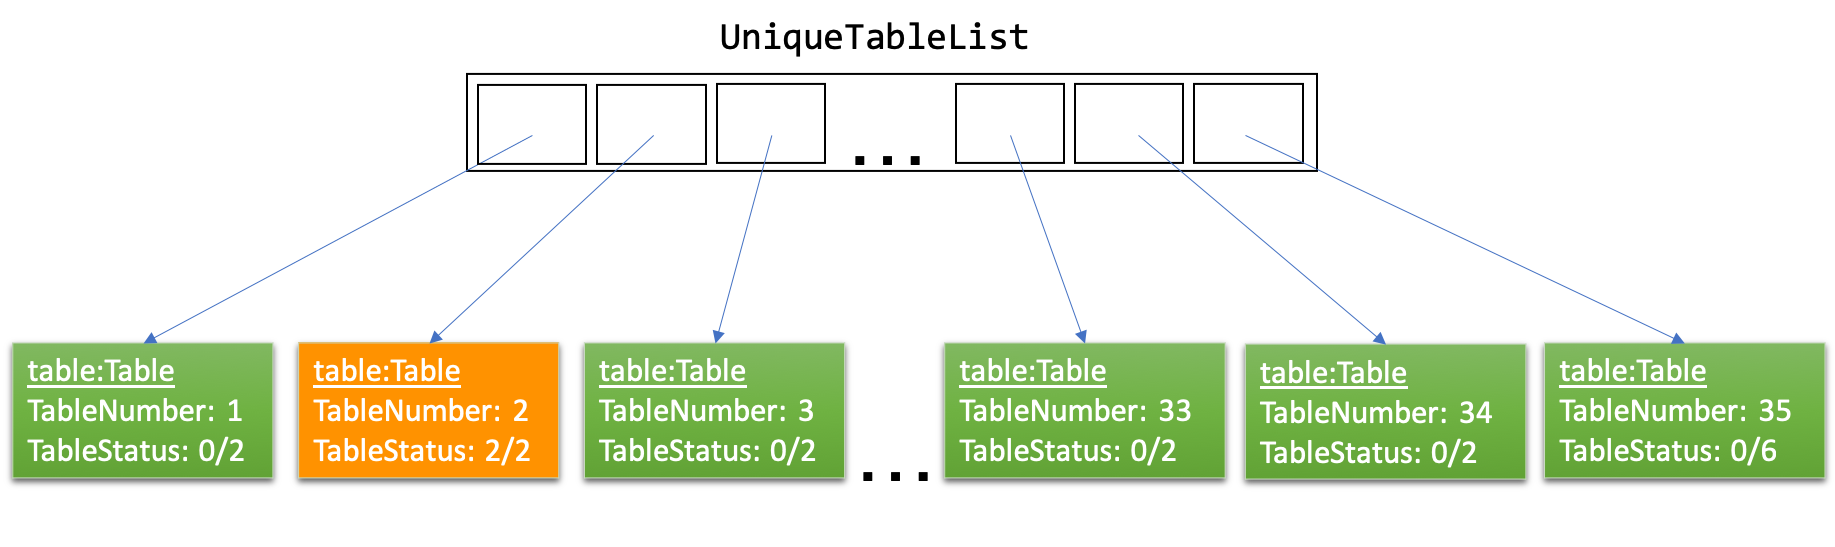
The Storage detects the above change in the UniqueTableList and also updates itself.
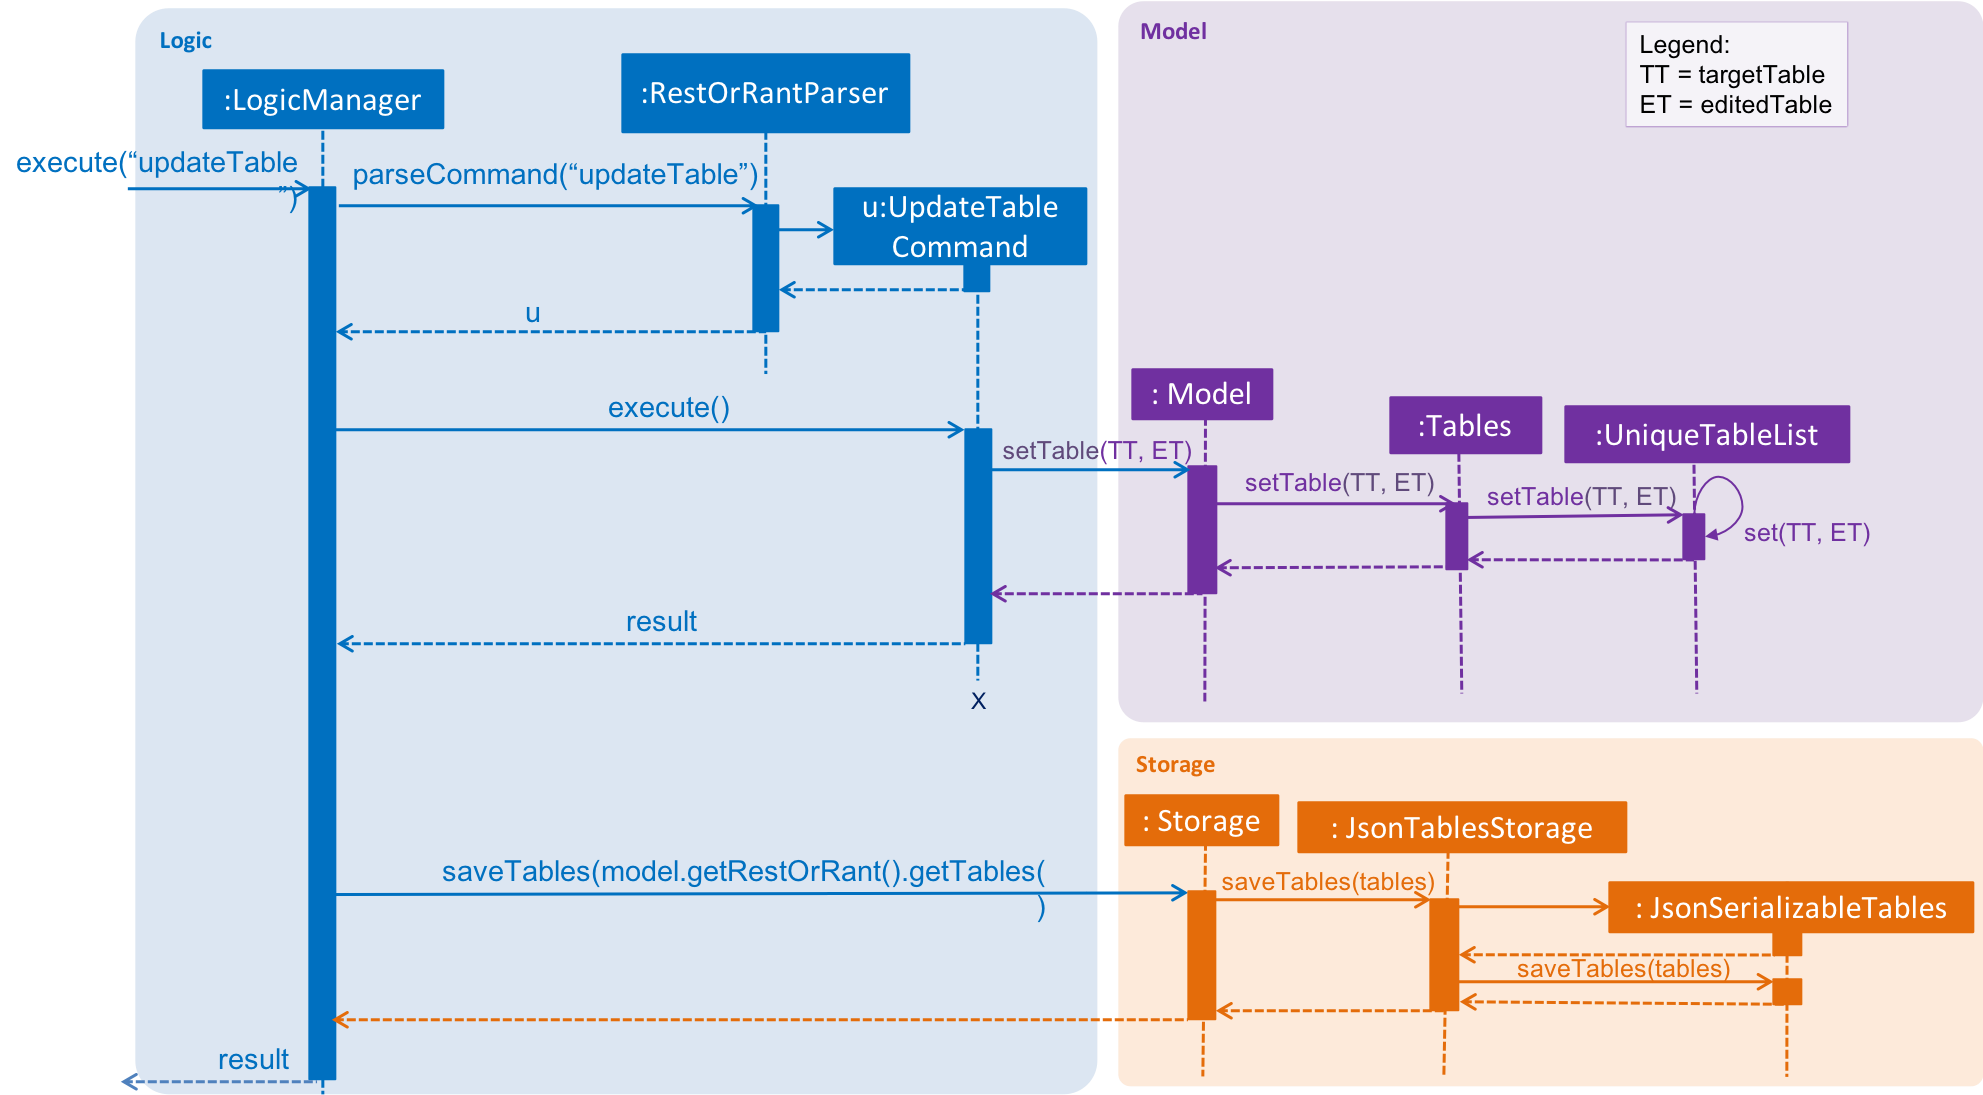
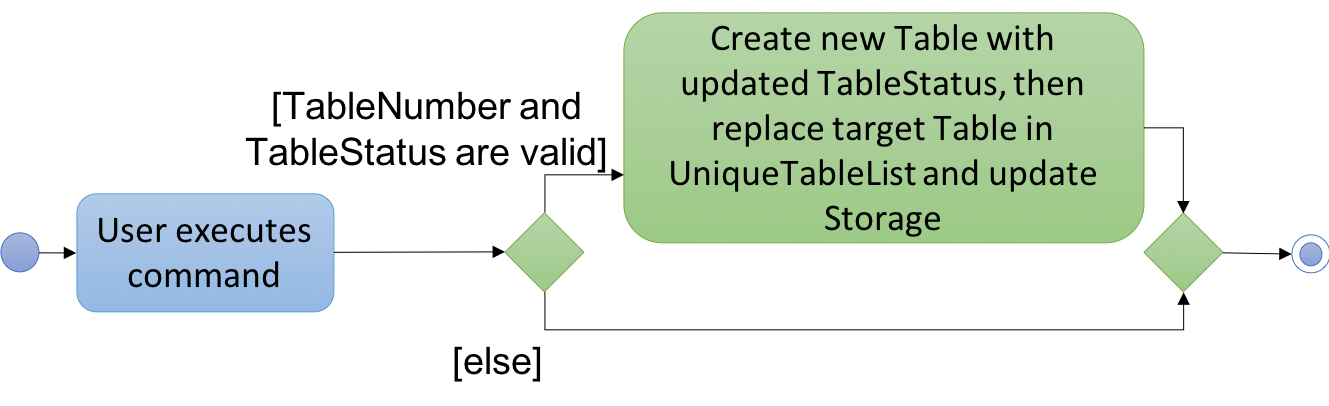
The following sequence diagram shows how the edit pax operation works:
| If the table to be edited does not exist in the UniqueTableList, the application returns an error to the user rather than attempting to replace the non existent table. |
The following activity diagram summarises what happens when a user executes a new command:
Design Considerations
| Aspect | Alternative 1 | Alternative 2 |
|---|---|---|
Editing the tables in UniqueTableList |
Replace the entire table with an updated table. We decided to choose this option because we realise that if we were to edit the tables directly, we would need a listener for each Table in the UniqueTableList to detect changes, which is not an efficient design. Furthermore, the tables can only be edited one at a time. Hence, the space efficiency issue would not be significant. |
Directly edit the TableStatus of the tables. |
4.2.4. Edit seats at a table
The interaction between the components for this function is similar to editing pax at a table. A key difference in function is that editPax changes the occupancy of the Table by changing the number of customers seated at the table while editSeats changes the number of seats at the table.
One thing to note is that the editSeats command can be called on not just unoccupied tables but also occupied tables. Hence, there is a different set of checks in place to ensure that the integrity of tables is intact.
An example would be, suppose editSeats is called on an occupied table, we do not allow the user to change the number of seats at the table to less than the current number of customers seated at the same table. Hence, if Table 1 already has 4 customers, editSeats 1 2 would return an error.
4.2.5. Clear all tables in ROR
The interaction between the components for this function is similar to clearing an order. The key difference is that clearTables requires ROR to be completely empty before the command can be successfully executed.
This means that all of the tables in ROR have to be unoccupied and this is checked in the ClearTablesCommand#execute() method as shown in the code snippet below.
public CommandResult execute(Mode mode, Model model, CommandHistory history) throws CommandException {
        requireNonNull(model);
        StringBuilder sbFinalOutput = new StringBuilder(MESSAGE_SUCCESS);
        if (model.getRestOrRant().getTables().getTableList().isEmpty()) { (1)
            throw new CommandException(MESSAGE_FAILURE);
        }
        if (!model.isRestaurantEmpty()) { (2)
            throw new CommandException(INVALID_RESTAURANT_STATE);
        }

        model.setTables(new ArrayList<>()); (3)

        return new CommandResult(sbFinalOutput.toString());
}
In the method above, Model#isRestaurantEmpty() loops through all the tables in the UniqueTableList and checks if they are occupied. Let’s walk through this method to see how the main functionality of clearTables is implemented:
| 1 | It first checks if ROR already has no tables. If it does not, an error is returned as we cannot clear an empty ROR. |
| 2 | Then, as mentioned above, it checks if ROR is completely unoccupied by using the Model#isRestaurantEmpty() method. |
| 3 | Lastly, it replaces the current list of tables in UniqueTableList with an empty List which effectively removes all record of any tables from ROR. |
4.2.6. Getting an available table for customers
Current Implementation
This command’s interaction with the components is very similar to editing pax at a table. The key difference is that it searches for the best fit table automatically instead of having the table specified by the user.
This functionality uses the spaceFor command and is facilitated by the Model#isOccupied(Table) method. This method checks if the specified table has any customers seated at the table. The spaceFor command works like a request and takes in 1 argument specifying the number of customers to be seated in ROR.
SpaceForCommand#execute() is then called which searches through the UniqueTableList for the best fit table. In this case, the best fit Table is the smallest available one that can accommodate the specified number of customers. If there is more than 1 Table that fits those criterions, the Table with the smallest TableNumber is chosen.
public CommandResult execute(Mode mode, Model model, CommandHistory history) throws CommandException {
        requireNonNull(model);
        Table bestFitTable = null;
        int smallestSize = Integer.MAX_VALUE;

        for (Table table : model.getRestOrRant().getTables().getTableList()) {
            int numberOfSeats = Integer.parseInt(table.getTableStatus().getNumberOfSeats());
            if (!table.isOccupied() && numberOfSeats >= size && numberOfSeats < smallestSize) { (1)
                bestFitTable = table;
                smallestSize = numberOfSeats;
            }
            if (smallestSize == size) { (2)
                break;
            }
        }

        if (bestFitTable == null) { (3)
            throw new CommandException(String.format(MESSAGE_NO_AVAILABLE_TABLE, String.valueOf(size)));
        }
        model.setTable(bestFitTable, new Table(bestFitTable.getTableNumber(),
                new TableStatus(String.valueOf(size) + "/" + bestFitTable.getTableStatus().getNumberOfSeats()))); (4)

        return new CommandResult(String.format(MESSAGE_SUCCESS, String.valueOf(size), bestFitTable.getTableNumber()));
}
In the method above, we loop through the tables in the UniqueTableList while checking for the following:
| 1 | It first checks if the table is occupied. If the table is occupied, the if-statement is short circuited. If the table is not occupied, we check if the table is able to accommodate the specified number of customers. |
| 2 | This second if statement checks if we have already found the best fit table. If we have, we can break out of the for loop to make this operation more efficient. |
| 3 | The last if-statement checks if an available table can be found in the UniqueTableList. If the table is not found, an error message is thrown for the user. |
The smallestSize attribute is meant to facilitate the search for the best fit table.
Design Considerations
| Aspect | Alternative 1 | Alternative 2 |
|---|---|---|
Choosing the table to allocate to the customers. |
Search for the best fit table (table with the least number of seats that can accommodate the customers) We decided to choose this option because we realise getting the best fit table would be something that our users prefer as it allows them to run their business more efficiently. |
Select the first table that is able to accommodate the specified customers. |
4.3. Orders feature
The Orders feature allows restaurant front-end staff to take orders from customers using the addToOrder command,
as well as remove incorrectly inputted orders using the deleteFromOrder or clearOrder commands.
They can track the current list of items ordered for each table (in Table Mode) or across all tables (in Restaurant Mode) and update their serving statuses with the serve command.
4.3.1. Classes for Orders feature in Model
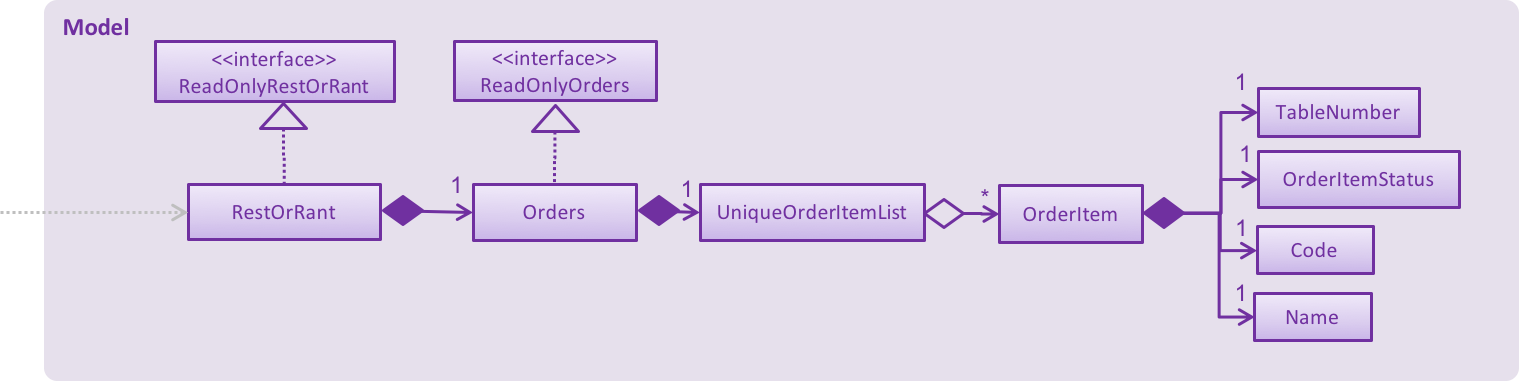
The Orders feature was implemented with the introduction of a new set of classes to Model. A new Orders class encapsulates all the methods and classes related to this feature. It also contains a listener that is used to update the storage when any modification is made to the orders. The Orders object is stored in RestOrRant and it exposes a read-only interface ReadOnlyOrders to allow the other components to retrieve order-related information while maintaining data integrity.
Orders contains a UniqueOrderItemList, which contains a list of all the items ordered across all the tables in the restaurant, represented by OrderItem objects. Each OrderItem object consists of 4 objects:
-
TableNumber indicates the table number of the table that ordered the item
-
OrderItemStatus tracks the quantity ordered and the quantity that has yet to be served
-
Code indicates the item code and is used to identify the item ordered
-
Name indicates the item name and is used for display in the UI
OrderItem objects are uniquely identified by TableNumber, Code and Name as each table can only have one order entry for each item.
The Orders Class Diagram below shows the relationship between the classes.
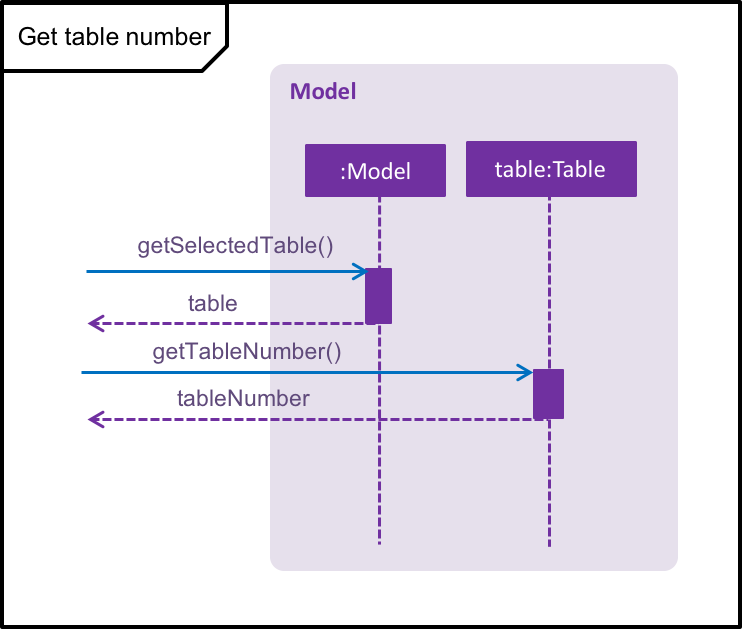
4.3.2. Getting the table number
The Orders feature allows users to perform order-related operations for a specific table. The table number of that table is specified when switching over to Table Mode.
| The table number is stored so that users do not need to keep specifying it when typing the commands. |
As a result, all the commands in the Orders feature will have to retrieve the table number from Model first before they can perform their functions. The current table is stored as a Table object in Model, which is retrieved by calling Model#getSelectedTable(). The table number, which is represented by a TableNumber object, can then be retrieved from that Table. The sequence diagram for this operation is shown below.
4.3.3. Adding to an order
The user may want to add new order items to a specific table’s order and this can be done with the addToOrder command.
The interaction between the components for this function is similar to adding to menu. A key difference in function is that addToMenu only adds 1 menu item each time, but addToOrder allows multiple and duplicate items to be added in a single command.
Suppose the user wants to add 3 "W09 Chicken Wings" and 1 "W12 French Fries" to the order. When addToOrder W09 3 W12 1 is keyed in, the command is parsed by AddToOrderCommandParser to check if the arguments are in valid format. They are then converted into a list of Code item codes and a list of Integer quantities, which are stored in the AddToOrderCommand object returned by the parser.
When AddToOrderCommand#execute() is called, the Code objects in the list are processed one by one. For each Code:
-
It attempts to retrieve a MenuItem object that contains the given Code from Model to check if the item exists in the menu. If it does not exist, an error is returned and the subsequent item codes in the list are not processed.
-
It thens attempt to find an OrderItem object with the given Code and the current TableNumber to see if that item has already been ordered by the table. If it already exists, the quantity will be updated in the UniqueOrderItemList using Model#setOrderItem(). A new OrderItem with a new OrderItemStatus will be created to replace the existing one. Otherwise, a new OrderItem will be added to the UniqueOrderItemList using Model#addOrderItem().
4.3.4. Deleting from an order
The user may want to remove an order item from a specific table’s order and this can be done with the deleteFromOrder command.
The interaction between the components for this function is similar to deleting from menu.
Suppose the user wants to delete "W09 Chicken Wings" from the order. When deleteFromOrder W09 is keyed in, the command is parsed by DeleteFromOrderCommandParser to check if the item code is in valid format. It is then converted into a Code object which is stored in the DeleteFromOrderCommand object returned by the parser.
When DeleteFromOrderCommand#execute() is called, it will use the Code to check whether the item exists in the menu and whether the current table has ordered the item. If the OrderItem is found, it will be deleted from the UniqueOrderItemList using Model#deleteOrderItem().
4.3.5. Clearing an order
The user may want to remove all the order items from a specific table’s order and this can be done with the clearOrder command.
Current Implementation
When the user enters the clearOrder command, the command is parsed and a ClearOrderCommand object is created.
ClearOrderCommand#execute() is then called, which in turn calls Model#clearOrderItemsFrom() with the current TableNumber. Model acts as a facade and forwards the call to Orders#clearOrderItemsFrom(), and that method’s source code is replicated below.
public void clearOrderItemsFrom(TableNumber tableNumber) {
        ArrayList<OrderItem> itemsToDelete = new ArrayList<>();
        for (OrderItem orderItem : orderItems) { (1)
            if (orderItem.getTableNumber().equals(tableNumber)) {
                itemsToDelete.add(orderItem);
            }
        }
        for (OrderItem item : itemsToDelete) { (2)
            orderItems.remove(item);
        }
        indicateModified(); (3)
}
In the method above, orderItems is a UniqueOrderItemList that contains all the order items from all the tables. Let’s walk through this method to see how the main functionality of clearOrder is implemented:
| 1 | It first loops through all the items in the UniqueOrderItemList and stores the OrderItem objects with the current TableNumber into a new list. |
| 2 | It then deletes the items in this list from the UniqueOrderItemList. |
| 3 | Finally, it triggers the listener in Orders to indicate that the order item list has been modified. This signals to the LogicManager to update the storage data files by calling Storage#saveOrders(). |
The sequence diagram for when a user executes the clearOrder command is shown below.

clearOrder commandDesign Considerations
| Aspect | Alternative 1 | Alternative 2 |
|---|---|---|
Storing of order items |
The order items from all the tables in RestOrRant can be stored in a single UniqueOrderItemList. We decided to choose this option because we realise that customers are unlikely to order a large number of items in a single table, so it would not be space efficient to create so many UniqueOrderItemList. Furthermore, it also provides the benefit of arranging the order items across all the tables based on when they were ordered without keeping an extra time attribute. This provides the useful functionality of seeing which orders should be fulfilled first in Restaurant Mode. |
Each table has its own UniqueOrderItemList to store the order items for that table. |
4.3.6. Serving items in an order
The user may want to mark order items from a specific table’s order as served and this can be done with the serve command.
The interaction between the components for this function is similar to editing the occupancy of a table.
Suppose 3 "W09 Chicken Wings" have been ordered by the table and the user wants to mark 2 of them as served. When serve W09 2 is keyed in, the command is parsed by ServeCommandParser to check if the arguments are in valid format. The valid Code item code and Integer quantity are then stored in the ServeCommand object returned by the parser.
When ServeCommand#execute() is called, it will use the Code to check whether the item exists in the menu and whether the current table has ordered the item. If the OrderItem is found and the quantity served is valid, a new OrderItem object will be created with a new OrderItemStatus that reflects the new quantities. Model#setOrderItem() is then used to replace the old OrderItem object in the UniqueOrderItemList with the new one.
4.4. Menu feature
The Menu feature allows restaurant managers to take add items to the menu using the addToMenu command, as well as
remove menu items as needed using the deleteFromMenu or clearMenu commands. They can track the current list of
available items in the menu (with the UI displays in Table Mode and Menu Mode).
This feature works in support of
-
Orders feature: Adding and removing items from the menu would in turn affect items to be ordered.
-
Statistics feature: Popular menu items are listed in descending order of quantities ordered. This is supported by storing the quantities ordered in the json file and internally updating it when orders are confirmed.
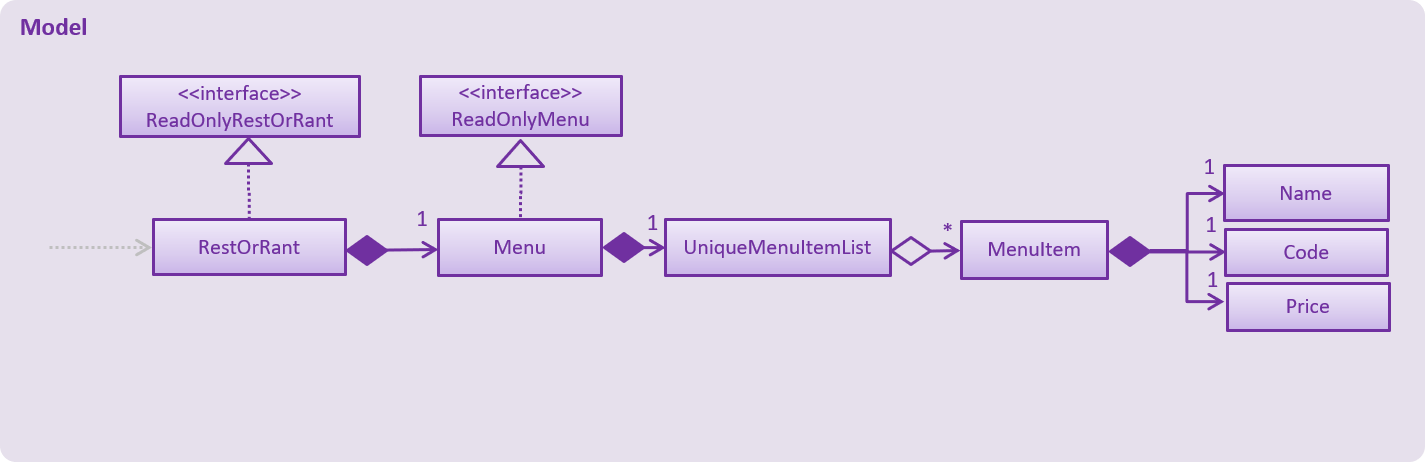
4.4.1. Classes for Menu feature in Model
The Menu feature was implemented with the introduction of a new set of classes to Model. A new Menu class encapsulates all the methods and classes related to this feature. It also contains a listener that is used to update the storage when any modification is made to the orders. The Menu object is stored in RestOrRant and it exposes a read-only interface ReadOnlyMenu to allow the other components to retrieve menu-related information while maintaining data integrity.
Menu contains a UniqueMenuItemList, which contains a list of all the items in the menu, represented by MenuItem objects. Each MenuItem object consists of 3 objects:
-
Name indicates the item name and is used for display in the UI
-
Code indicates the item code and is used to identify the menu item
-
Price indicates the item price and is used for display in the UI and calculation of bill
MenuItem objects are uniquely identified by Code. As such, each menu item should have distinct item codes.
The Menu Class Diagram below shows the relationship between the classes.
4.4.2. Adding to menu
The user may want to add new menu items to the menu and this can be done with the addToMenu command.
Current Implementation
The menu items in the menu are stored as a list. Adding a new menu item to the menu is done by adding to the existing list.
The command is read as a text string from the command box in the UI and then is executed by calling MainWindow#executeCommand(), which passes this string to the Logic component by calling Logic#execute().
The sequence diagram for interactions between the Logic, Model and Storage components when a user executes the addToMenu command is shown below.
addToMenu commandThe Logic#execute() method then creates a command from the text string input by parsing the string to identify the command word (done by the RestOrRantParser#parse() method) and other parameters, in this case the attributes of the MenuItem (done by the AddToMenuCommandParser#parse() method, omitted from the sequence diagram). After parsing, the text string is then converted to Name, Code, and Price and a new MenuItem is created with these attributes and then passed to Model component.
In the Model component, firstly the validity of the Name, Code and Price of the MenuItem is checked. The three attributes must follow the specified format for them to be valid. The MenuItem is only added to the UniqueMenuItemList after ensuring that the same menu item does not already exist in the list. For this to be true, the new menu item should not have the same Code as any other item in the list.
After adding to the list in the Model component, the Menu#indicateModified() method is called, which then triggers the Logic component to save the state of the menu, by calling Storage#saveMenu().
The User Interface also updated by adding the new menu item to the list panel.
| This action can only be done in Menu Mode. If not in Menu Mode currently, users can first change mode by switching over to Menu Mode. |
Design Considerations
| Aspect | Alternative 1 | Alternative 2 |
|---|---|---|
Saving changes from addition of menu items |
Save only the menu, using the Menu#indicateModified() and Storage#saveMenu() methods. We decided to choose this option because we realise that there would be bigger performance issues such as lagging in the long run if we were to save every instance of the restaurant for every update to each feature. |
Save the whole restaurant instance, by just having two methods (RestOrRant#indicateModified() and Storage#saveRestOrRant()) overall. |
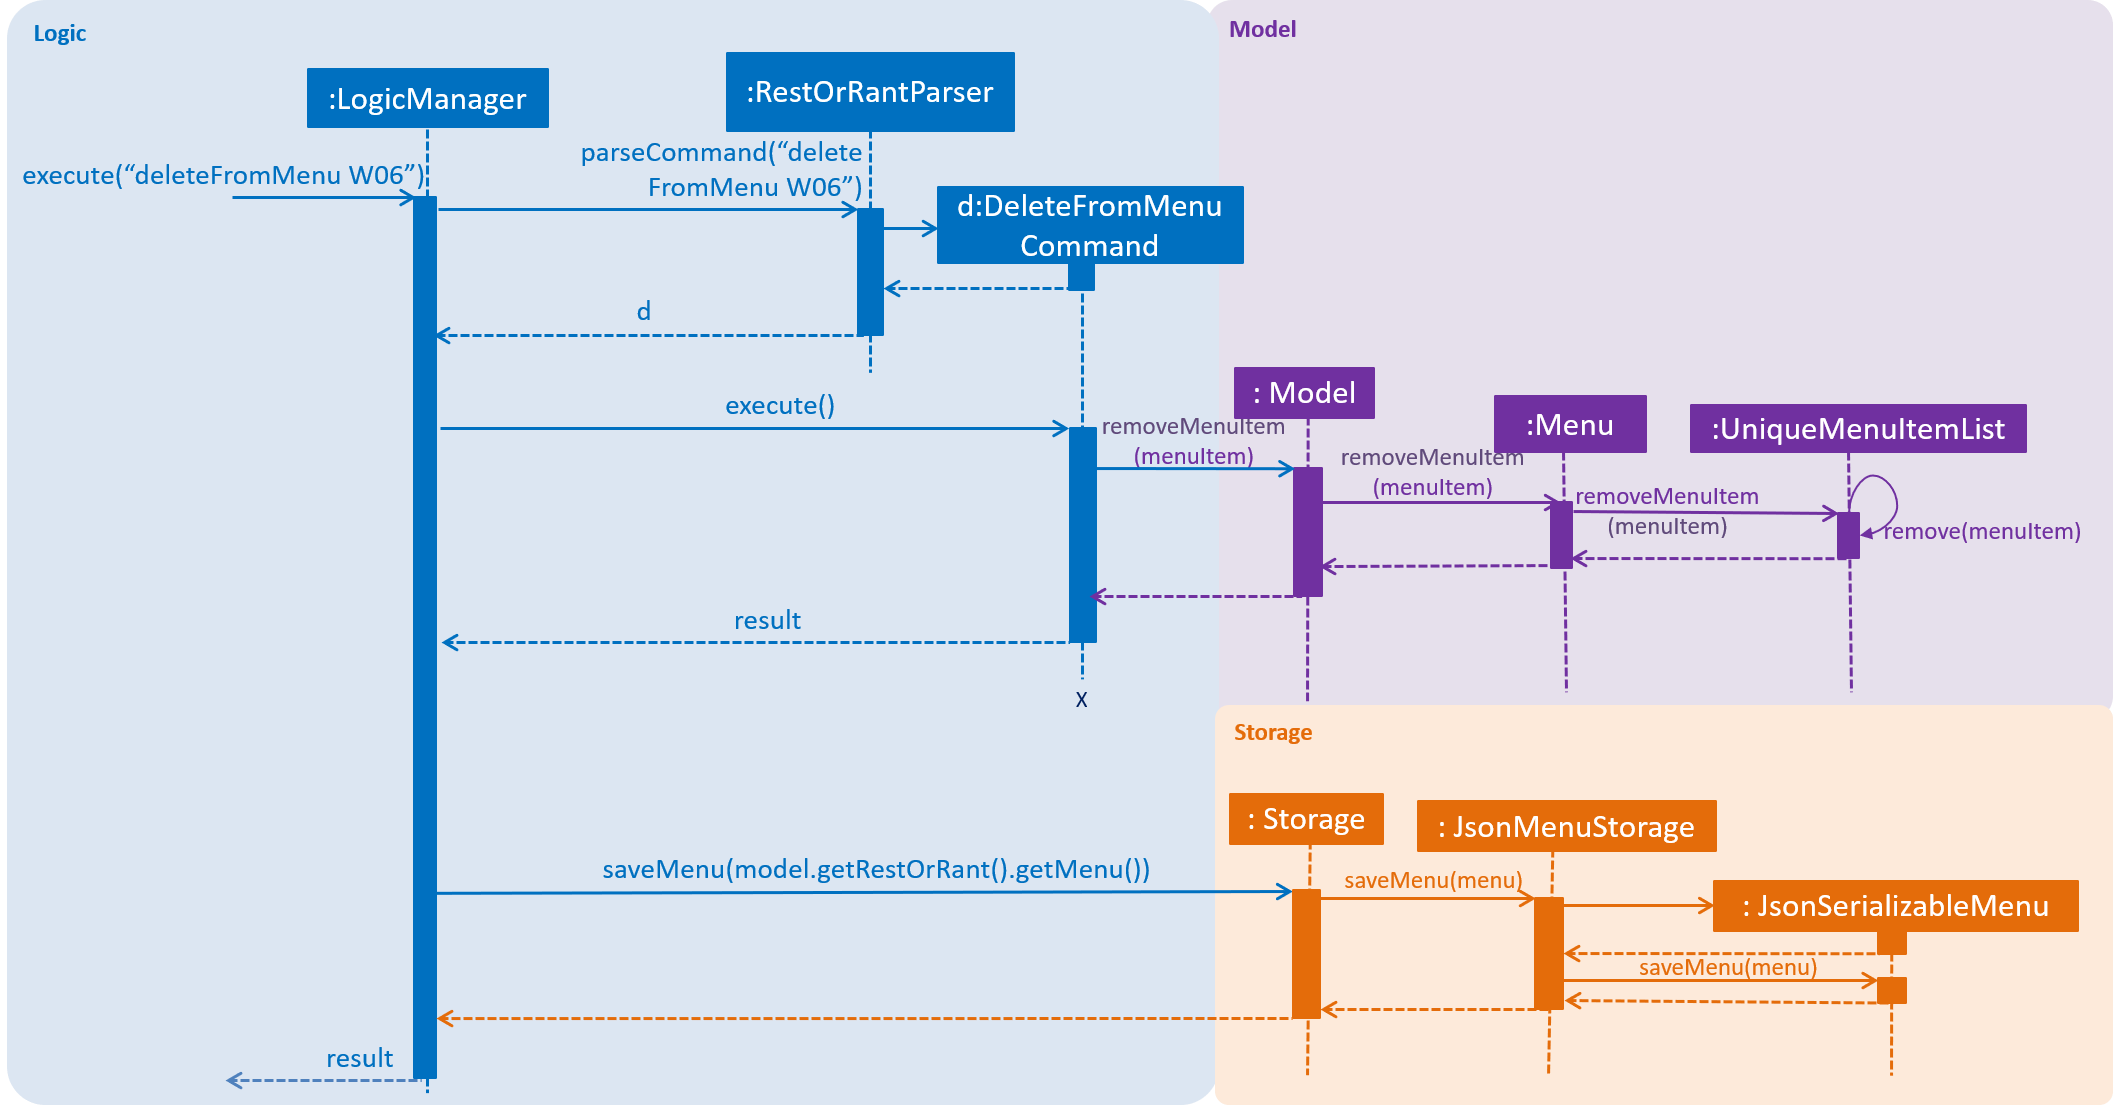
4.4.3. Deleting from menu
The user may want to remove a menu item from the menu and this can be done using the deleteFromMenu command.
Current Implementation
As mentioned above, deleting a menu item from the menu is done by removing from the existing list.
The interactions between all four components when a user executes the deleteFromMenu command is very similar to the interactions when adding to menu:
One specific difference is that deleting from menu only requires item Code, whereas adding to menu requires Name, Code and Price. For this reason, we have decided to not use any prefixes (such as c/ to denote item code).
After parsing the input text string by the RestOrRantParser#parse() method, the DeleteFromMenuCommand object is created.
DeleteFromMenuCommand then makes use of the method Menu#getItemFromCode() to retrieve the menu item from the item Code input. The code snippet of the method is shown below:
public Optional<MenuItem> getItemFromCode(Code code) {
    Iterator<MenuItem> iterator = menuItems.iterator();
    while (iterator.hasNext()) { (1)
        MenuItem menuItem = iterator.next();
        if (menuItem.getCode().equals(code)) {
            return Optional.of(menuItem); (2)
        }
    }
    return Optional.empty(); (3)
}
The MenuItem is retrieved from the Code by searching through the UniqueMenuItemList, called menuItems in this snippet. Optional is used as a means of defensive programming so that a null Code would not result in a null pointer exception but would be safely handled by showing an error message to the user for incorrect Code input.
| 1 | The method first loops through all items in the list. |
| 2 | If a MenuItem with the same code is found, it is returned as an Optional. |
| 3 | If no such MenuItem is found, an Optional.empty() is returned, to safely handle nulls. |
The retrieved MenuItem is then passed to Model component to be removed from the UniqueMenuItemList.
Similar to adding to the menu, after removing from the list in the Model component, the Menu#indicateModified() method is called, which then triggers the Logic component to save the state of the menu, by calling Storage#saveMenu().
The User Interface is also updated by removing the menu item on the list panel.
| This action can only be done in Menu Mode. If not in Menu Mode currently, users can first change mode by switching over to Menu Mode. |
Design Considerations
The above design considerations under Adding to Menu on saving changes to the menu also holds when deleting menu items.
| Aspect | Alternative 1 | Alternative 2 |
|---|---|---|
Retrieving the MenuItem from the Code |
Handle this operation with the already existing UniqueMenuItemList. We decided to choose this option because we realise that the system would be able to support a typical restaurant’s menu with close to no lagging, and chose to optimise memory over speed. |
Create a new HashTable to map item codes to menu items, and search through this HashTable to retrieve the item. |
4.4.4. Clearing the menu
The user may want to remove all the menu items from the menu and this can be done with the clearMenu command.
The interaction between the components for this function is similar to clearing an order. A small difference is that clearMenu clears all menu items, while clearOrder only clears orders within a specific table.
When clearMenu is keyed in, the command is parsed by RestOrRantParser and a ClearMenuCommand object is returned by the parser.
When ClearMenuCommand#execute() is called, it will check if the restaurant is occupied, and if the menu is empty. CommandException with respective error messages will be thrown if either of the conditions are true. After ensuring that the restaurant is unoccupied and the menu is non-empty, the menu will be cleared by initializing the menu with an empty ArrayList, with the Model#setMenuItems() method.
4.5. Statistics feature
The Statistics feature allows users to perform queries that deal with the restaurant’s statistical data, mainly the
revenue earned and the popularity of menu items. With Statistics feature, restaurant front-end staffs can bill the
customers' orders and automatically save the revenue in the restaurant’s statistics storage using the bill
command.
Other commands like yearly, monthly, daily and revenue
commands allow the manager to retrieve and study the restaurant’s statistical data trends.
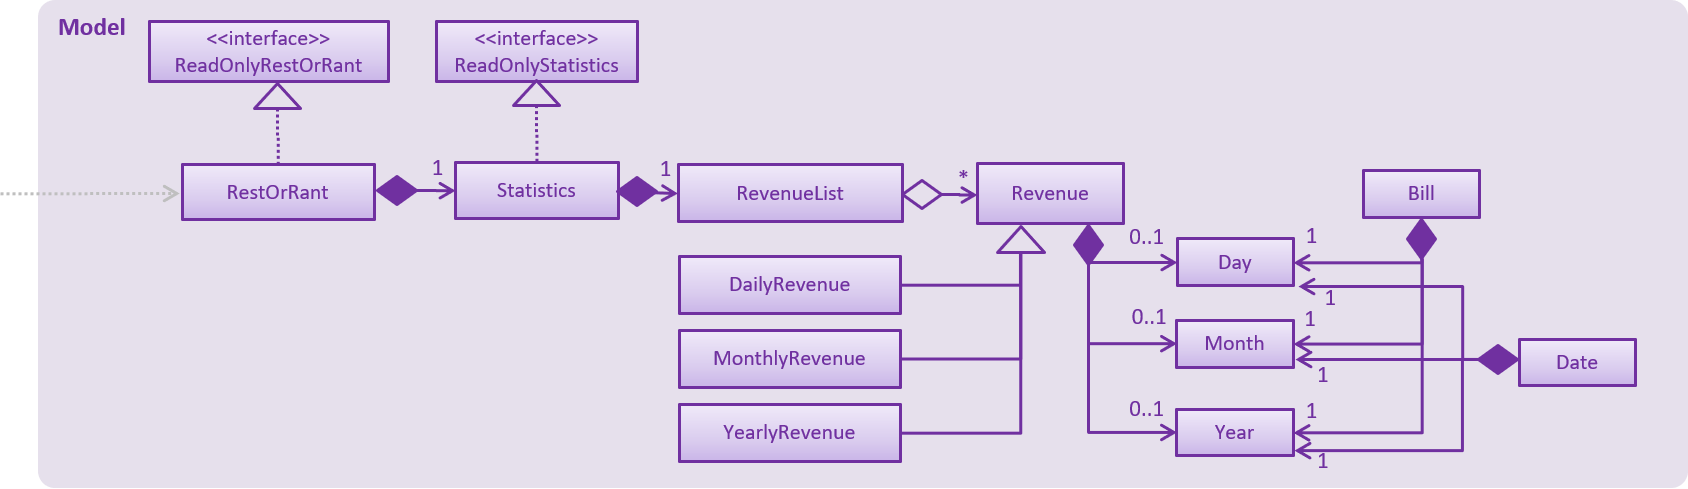
4.5.1. Classes for Statistics feature in Model
The Statistics feature was implemented with the introduction of a new set of classes to Model. A new Statistics class encapsulates all the methods and classes related to this feature. It also contains a listener that is used to update the storage when any modification is made to the statistics. The Statistics object is stored in RestOrRant and it exposes a read-only interface ReadOnlyStatistics to allow the other components to retrieve statistics-related information while maintaining data integrity.
Statistics contains a RevenueList, which contains a list of all the revenue recorded in the restaurant, represented by Revenue objects. Each Revenue object consists of 3 objects:
-
Year indicates the year which the revenue was earned
-
Month indicates the month which the revenue was earned
-
Day indicates the day which the revenue was earned
YearlyRevenue, MonthlyRevenue and DailyRevenue are classes that extends Revenue to inherit its properties. Hence, they are all uniquely identified by Year, Month and Day. Similarly, Date and Bill also consists and are identified by the above 3 objects.
The Statistics Class Diagram below shows the relationship between the classes.
4.5.2. Design Considerations for Statistics Storage
The data stored in Storage (/data/statistics.json) only encompasses Day, Month, Year and Revenue earned on
that specific date. These data are stored when the bill command is called.
| Aspect | Alternative 1 | Alternative 2 |
|---|---|---|
Storage of statistical data |
Stores daily revenue which comprises of day, month, year and revenue. In a restaurant, it is unlikely that a customer will request for a refund after consuming and paying for the meal. Even if there are complaints about the meal, they will demand for a newly cooked dish before calling for the bill. Hence, we did not see the need to store receipts in the storage and chose this design. |
Stores bill which comprises of the day, month, year, bill, table number and receipt. |
4.5.3. Billing an order
Each Bill is unique to a Table. Hence, the bill mechanism can only be executed under Table Mode.
The Table and its TableNumber was specified when switching over to Table Mode.
The way TableNumber is specified is explained in Orders feature.
Once the bill command is called, it will internally switch to Bill Mode where the receipt of
the specified table is displayed. Concurrently, the bill mechanism accesses functions from Tables, Orders, Menu and
Statistics to execute the following:
-
Table: Updates specified table’s occupancy to accommodate new customers.
-
Order: Clears the order list that belongs to the specified table.
-
Menu: Saves the quantity of menu items ordered in the Menu storage (/data/menu.json).
-
Statistics: Saves the revenue in the Statistics Storage (/data/statistics.json).
Current Implementation
The main crux of Bill mechanism is implemented in BillCommand. Just like any other commands, BillCommand#execute() overrides Command#execute() which is called in LogicManager. It takes in the current mode, model and command history which will provide the necessary functions it will need to execute the command properly with the following operations:
-
BillCommand#calculateBill() — Creates a bill with a receipt of all menu items ordered and updates the quantity of menu items ordered in Menu#menuItems.
-
BillCommand#createOrUpdateRevenue() — Either saves the bill as a new DailyRevenue or updates an existing Revenue in the Statistics#revenueList.
-
BillCommand#updateStatusOfTable() — Updates the occupancy of the specified table to indicate that it has zero customers and resets the selected table to null.
-
Model#clearOrderItemsFrom() — Clears the order list to prepare for the next customer.
This sequence diagram provides an overview of how the operations above work together to execute bill command.
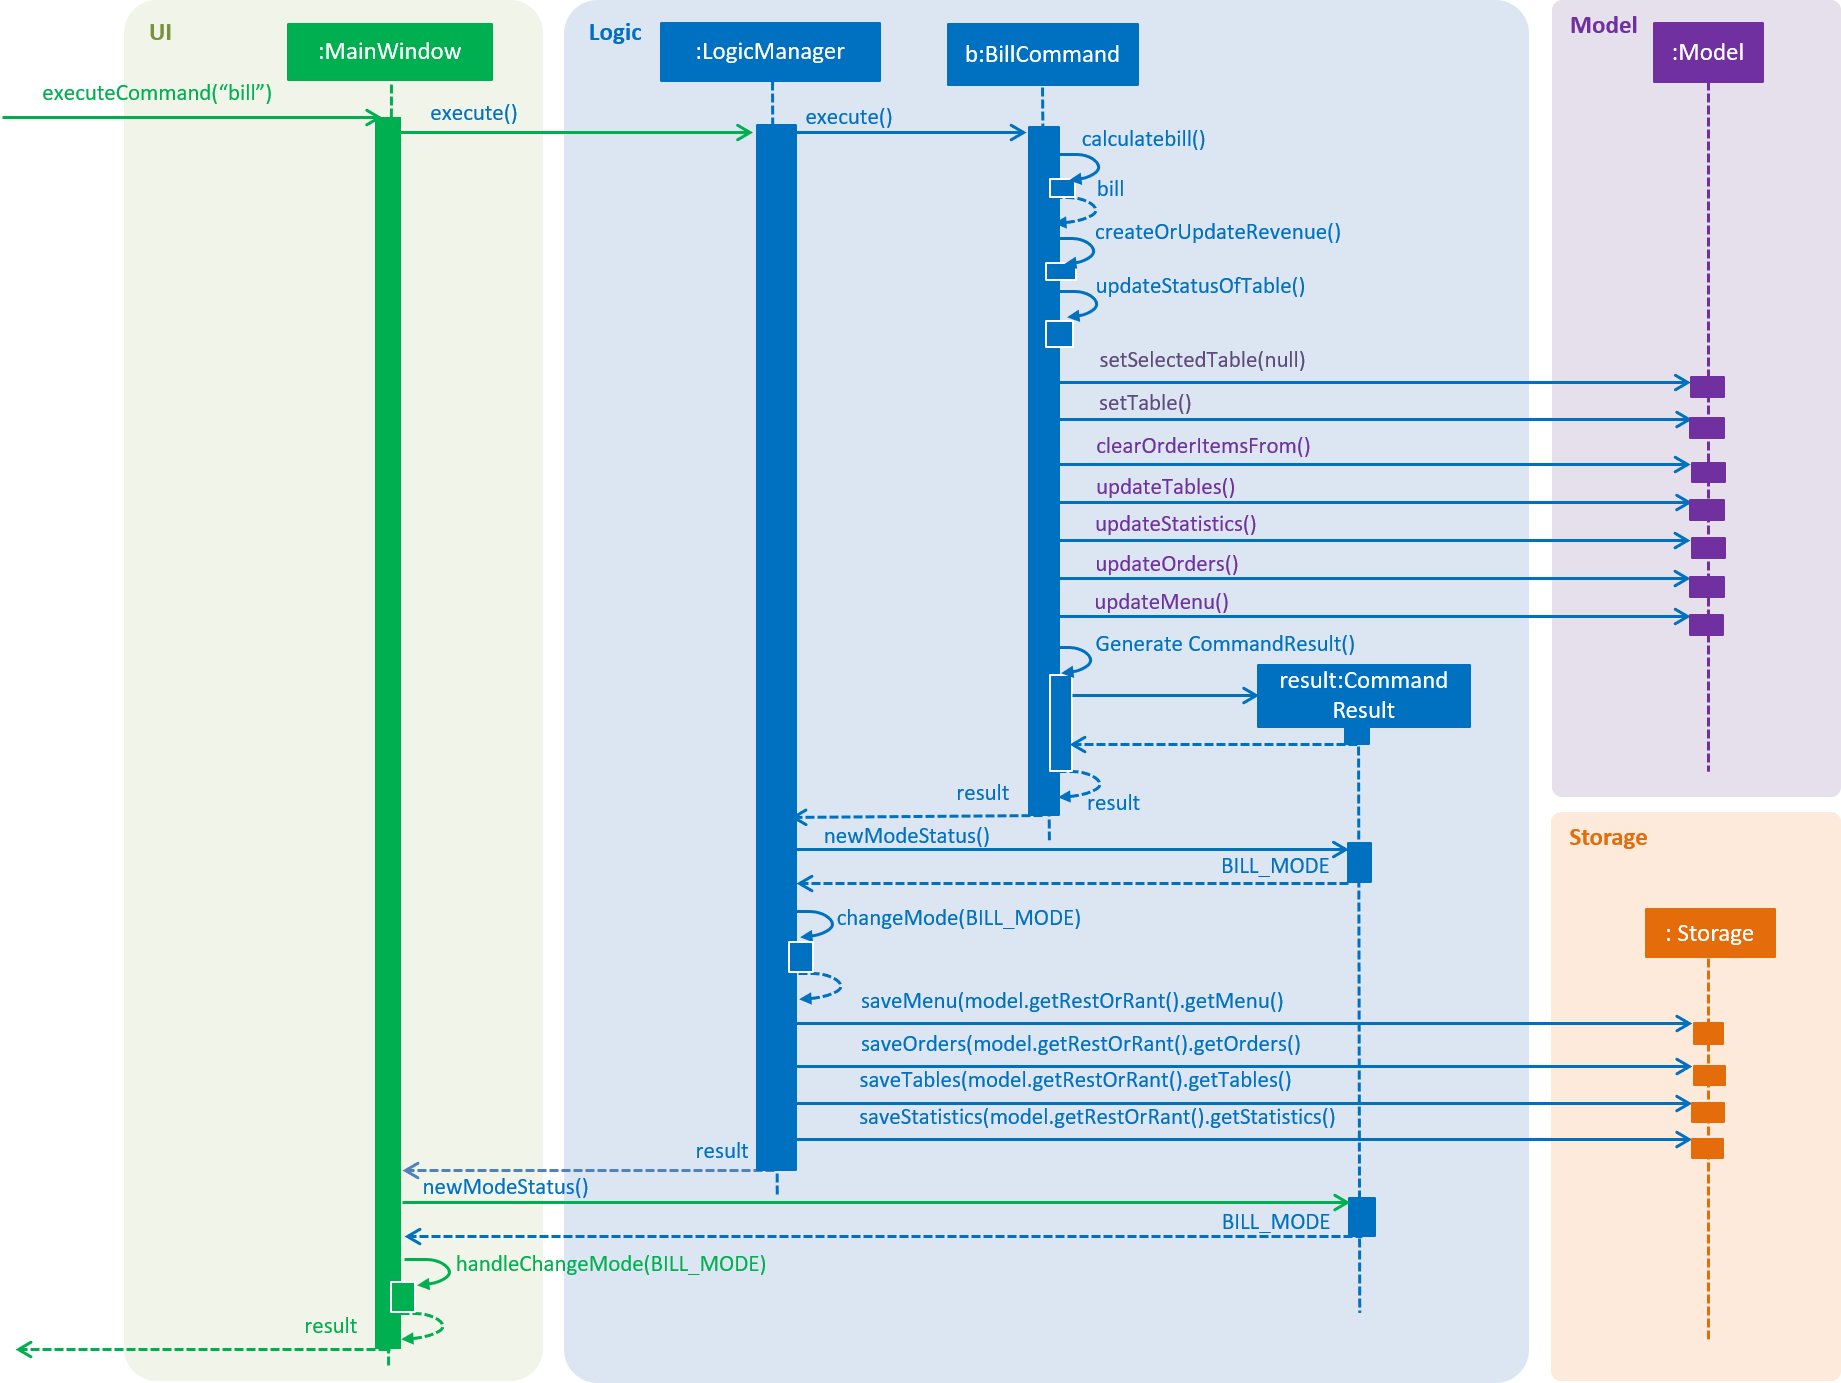
bill commandTo give you a better understanding of the sequence diagram, the following is a usage scenario and how the bill mechanism behaves at each step.
Step 1.
Let’s assume that the user is in Table Mode 1. This means Table 1 is the selected table. Before the
bill command can be executed successfully, BillCommand#execute() conducts 2 checks.
-
Checks that current table obtained from Model#getSelectedTable() exists.
-
Checks that all order items in Model#getFilteredOrderItemList() have been served. The status of the order item is determined via Model#getOrderItemStatus().
Step 2. Given that the command passes all checks, the user can successfully run BillCommand#calculateBill() to assign a new calculated bill to the tableToBill attribute. Let’s refer to the function’s sequence diagram below.
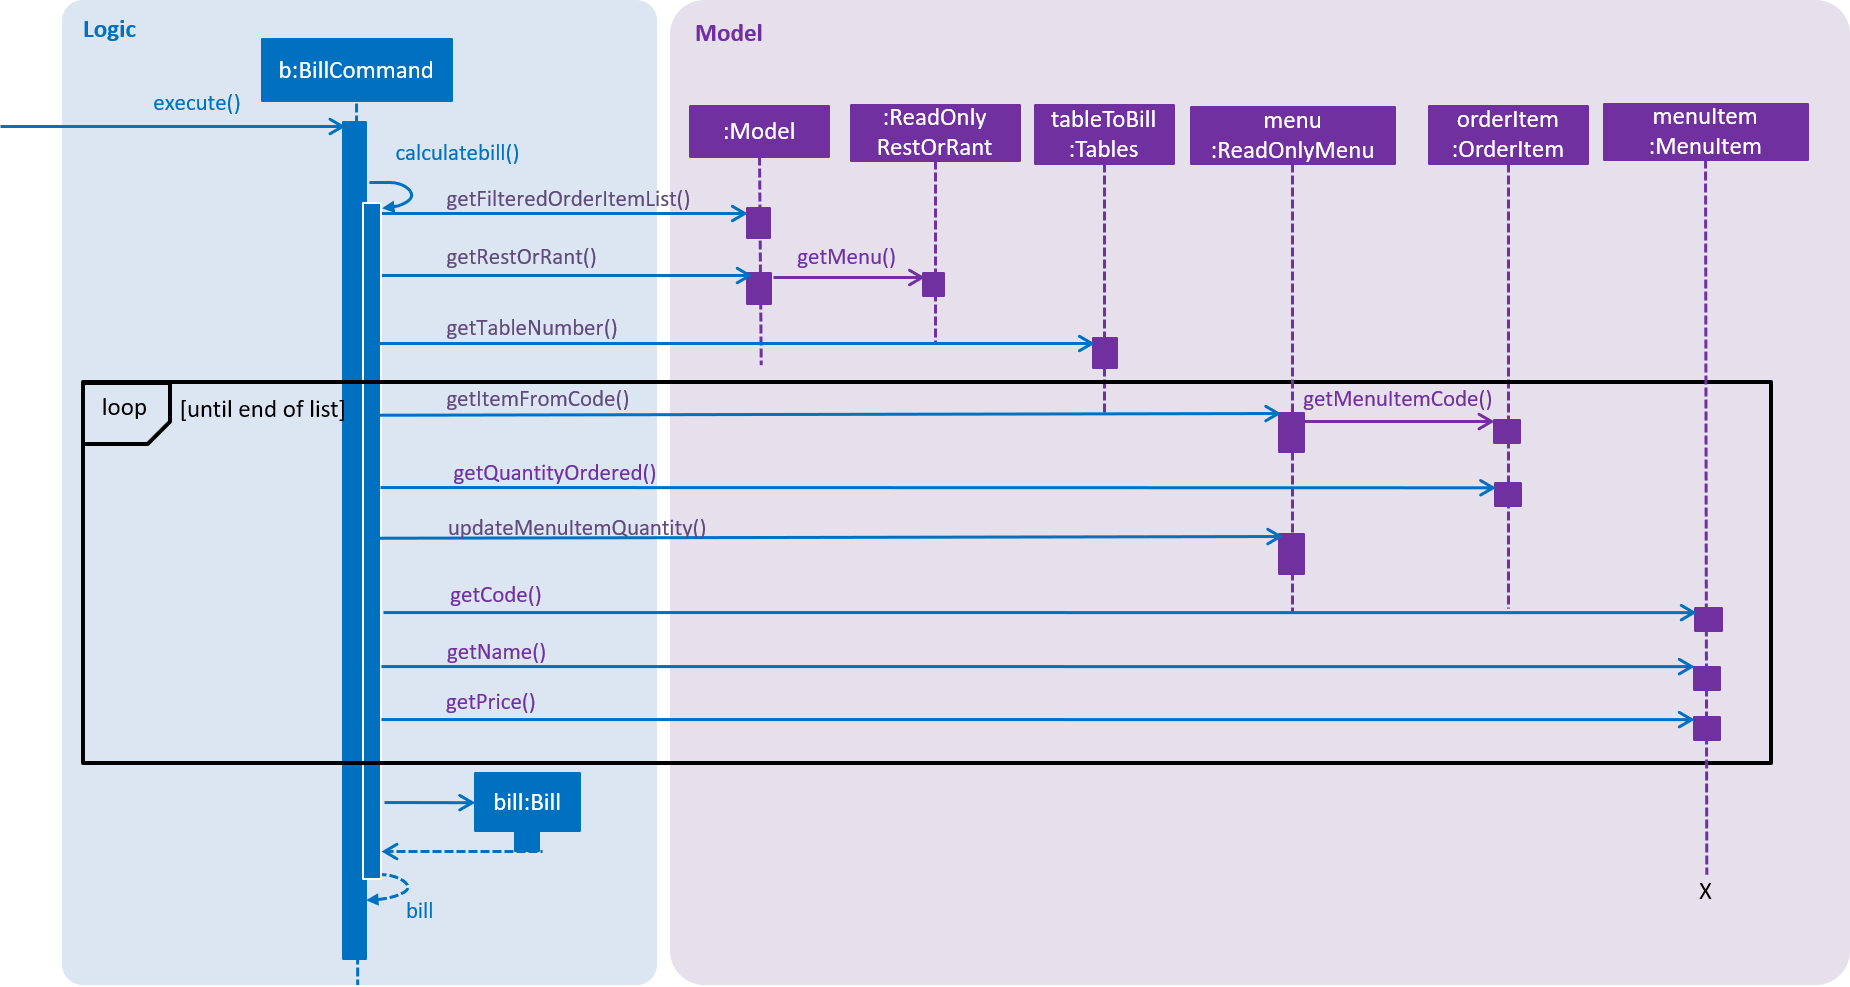
BillCommand#calculateBill() calls both Model#getFilteredOrderItemList() and ReadOnlyRestOrRant#getMenu() to obtain the table’s list of orders and the restaurant’s menu. After which, it iterates through the list of orders to obtain individual OrderItem and executes the following in each iteration:
-
Gets MenuItem by passing the code of the OrderItem into Menu#getItemFromCode().
-
Retrieves the quantity of OrderItem ordered using OrderItem#getQuantityOrdered().
-
Updates the quantity of menu item ordered using ReadOnlyMenu#updateMenuItemQuantity().
-
Creates a receipt that appends the MenuItem#getCode(), MenuItem#getName(), MenuItem#getPrice() and the quantity retrieved previously.
-
Adds the price of each MenuItem multiplied by the quantity ordered to the total bill.
After iterating through the list of orders, receipt appends the final calculation of the total bill and the function returns a new Bill that contains the updated tableNumber, totalBill and receipt. This new Bill will be assigned to the bill attribute and passed into Model#setRecentBill() to update the Model’s recent bill (This step is needed when changing the user interface to Bill Mode).
Now that bill is updated, it is passed into BillCommand#createOrUpdateRevenue() to store the calculated bill in Statistics#revenueList. Refer to the function’s sequence diagram below.

As shown above, BillCommand#createOrUpdateRevenue() creates a DailyRevenue with the bill’s year, month and day. It checks if the newly created DailyRevenue exists in the revenueList via Model#hasRevenue(). If it is true that DailyRevenue exists, the function iterates through the Model#getFilteredRevenueList() and searches for a an existing Revenue that has the same year, month and day as the DailyRevenue. Once the Revenue is found, Revenue#addToRevenue() is used to add the total bill of the DailyRevenue into Revenue. Otherwise, the DailyRevenue is added into the revenueList via Model#addRevenue().
Now, that the necessary data are updated in the internal list of Menu and Statistics, BillCommand#execute() calls BillCommand#updateStatusOfTable() and Model#clearOrderItemsFrom() to make the table available for new customers.
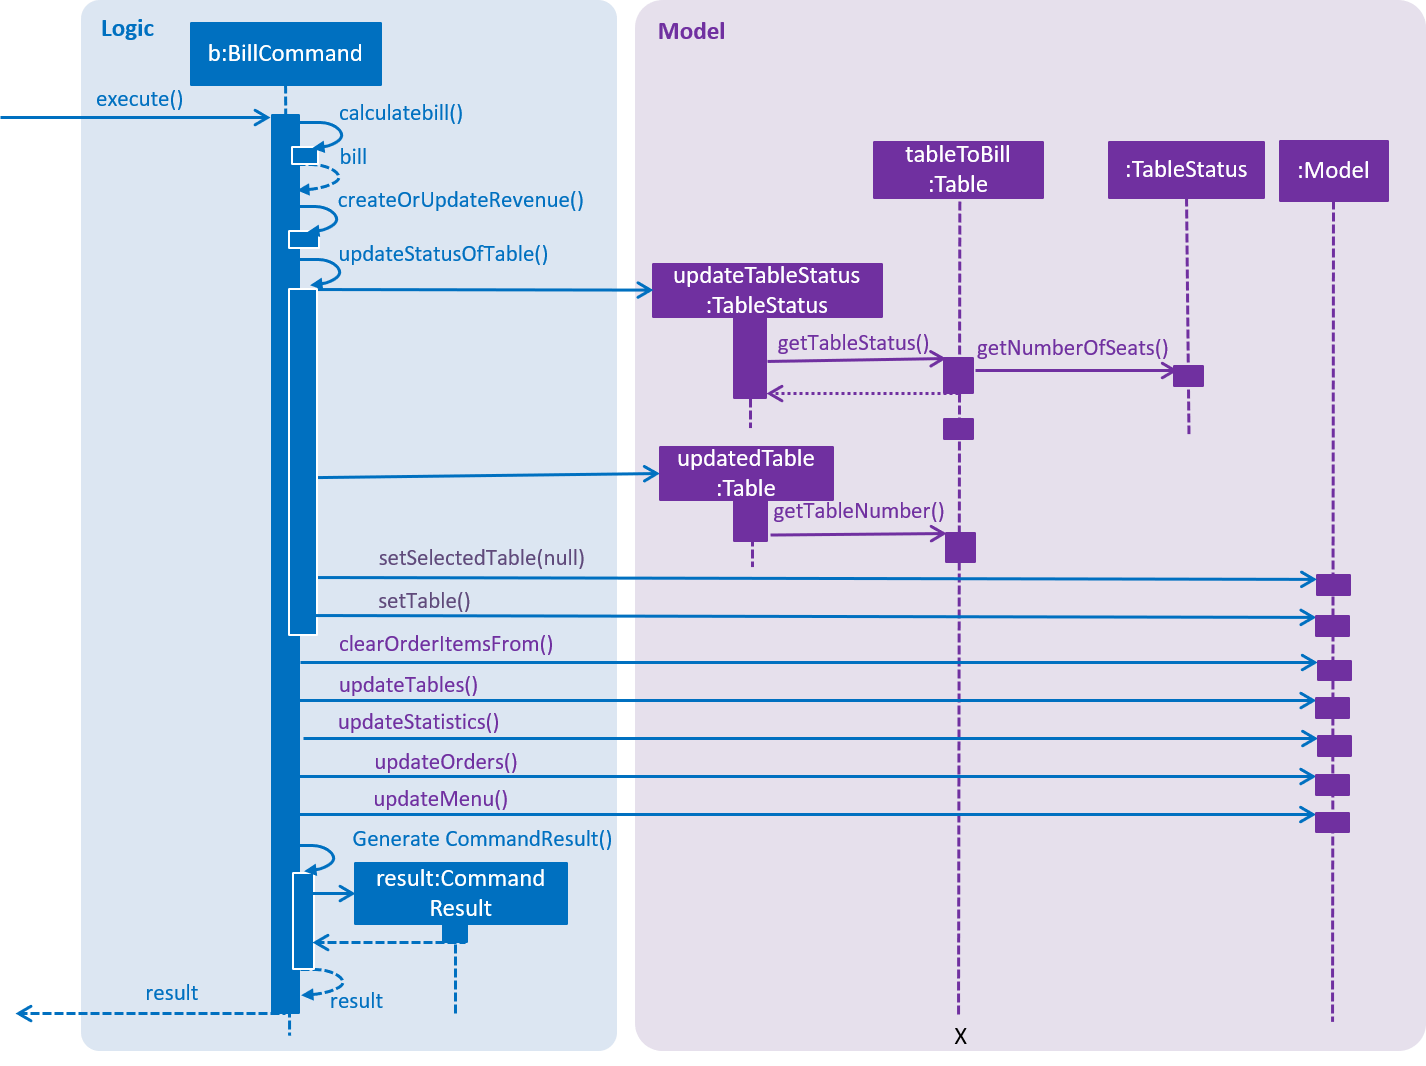
BillCommand#updateStatusOfTable() updates the table status by creating a new Table with an updated TableStatus and replace the existing Table with the new one. After the table is updated, the program sets the selected table to null to indicate that the table is no longer in use.
Once these essential functions are executed, BillCommand#execute() moves on to indicate that the Tables, Orders, Menu and Statistics data have been modified via Model#updateTables(), Model#updateOrders(), Model#updateMenu(), Model#updateStatistics(). After which it returns the CommandResult to LogicManager#excute() where the it will check if the Tables, Orders, Menu and Statistics data have been modified and updates the storage accordingly. The same CommandResult is returned to MainWindow#executeCommand() where the user interface switches to Bill Mode to display the receipt of the recent Bill.
| Internally the program switches to Bill Mode. However, this mode is shown to the user as Table Mode to avoid confusion. |
Design Considerations
| Aspect | Alternative 1 | Alternative 2 |
|---|---|---|
Design calculateBill() |
Iterates through the FilteredOrderItemList once to append the receipt, update quantity ordered of
the items in Menu and calculate the bill. We chose this design to prioritize efficiency in this use case. Since |
Create different functions that specifically calculates the bill, creates a bill receipt and update the quantity of
menu items ordered. |
4.5.4. Changing Statistics Mode display
The following implementation applies for yearly, monthly and daily commands.
These commands make adjustments to the user interface to display statistical data trends.
Current Implementation
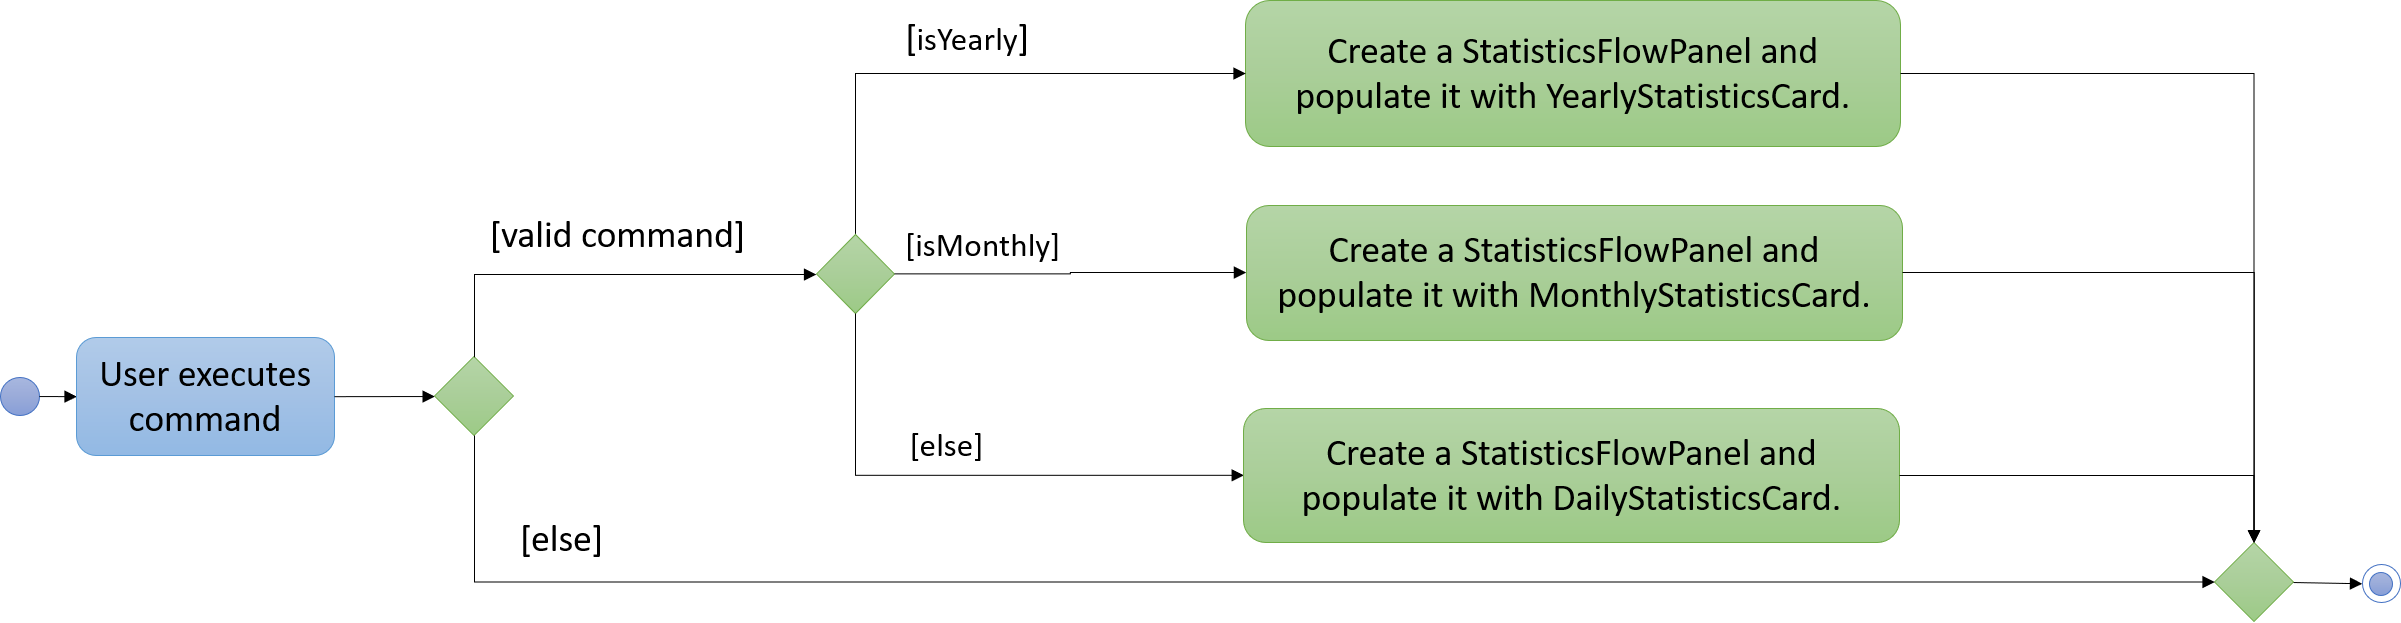
The execution of these commands is similar to changing the mode. The only difference is that isYearly, isMonthly and isDaily boolean variables are used in MainWindow#executeCommand(). These boolean variables are passed into MainWindow#handleChangeMode() where it will determine which display to switch to. You may refer to the activity diagram to understand the cause of actions in the Statistics Mode user interface.
Since these commands changes the user interface, a huge portion of their mechanism is dependent on StatisticsFlowPanel. It determines the layout and arrangement of the revenue cards displayed.
Once the revenue observable list and boolean variables are passed into StatisticsFlowPanel, the function
checks which boolean variable is true. Lets assume that isDaily is true for daily command. The function
enters a while loop that iterates through the revenue list until at most 30 DailyRevenue objects are created
and added to a list of DailyRevenue.
| The list of DailyRevenue generated is sorted in a reverse chronological order of the date. Hence, even if there are no revenue recorded on a specific date, a DailyRevenue object is still created and added to the list. |
After which, the list of DailyRevenue is iterated to generate DailyStatisticsCard for each DailyRevenue. These DailyStatisticsCard are added to the StatisticsFlowPanel#statisticsFlowPane to update the user interface.
Design Considerations
| Aspect | Alternative 1 | Alternative 2 |
|---|---|---|
Arrangement of [XXX]StatisticsCard |
[XXX]StatisticsCard are arranged in descending order. |
[XXX]StatisticsCard are arranged in ascending order. |
Limit the number of [XXX]StatisticsCard |
Maximum [XXX]StatisticsCard shown is 30. |
Display all [XXX]StatisticsCard created from stored revenue data. |
Create additional [XXX]StatisticsCard with $0 revenue |
Display all [XXX]StatisticsCard in chronological order. |
Only display all [XXX]StatisticsCard created from stored revenue data. |
The current implementation uses the designs in Alternative 1. However, in version 2.0, the application will take the pros of Alternative 2 designs and incorporate them to the current implementation. To help users better study the revenue trends, v2.0 will allow users to call the commands with an argument that indicates the month or year that they want. The display will arrange the DailyStatisticsCard in a calender view with 7 columns for each day. A limit of 31 DailyStatisticsCard will be used to replicate a calendar and prevent overflowing.
4.5.5. Getting the revenue
Current Implementation
When the user enters the revenue command, the command is parsed and a RevenueCommand object is created.
RevenueCommand#execute() is then called, which in turn calls Model#getFilteredRevenueList() to
obtain the list of revenue stored in the Storage. To create convenience and efficiency in the execution of the
revenue command, 4 different types of argument combinations are provided for the users to obtain the desired revenue.
The diagram below illustrates the internal flow of actions for different argument inputs.
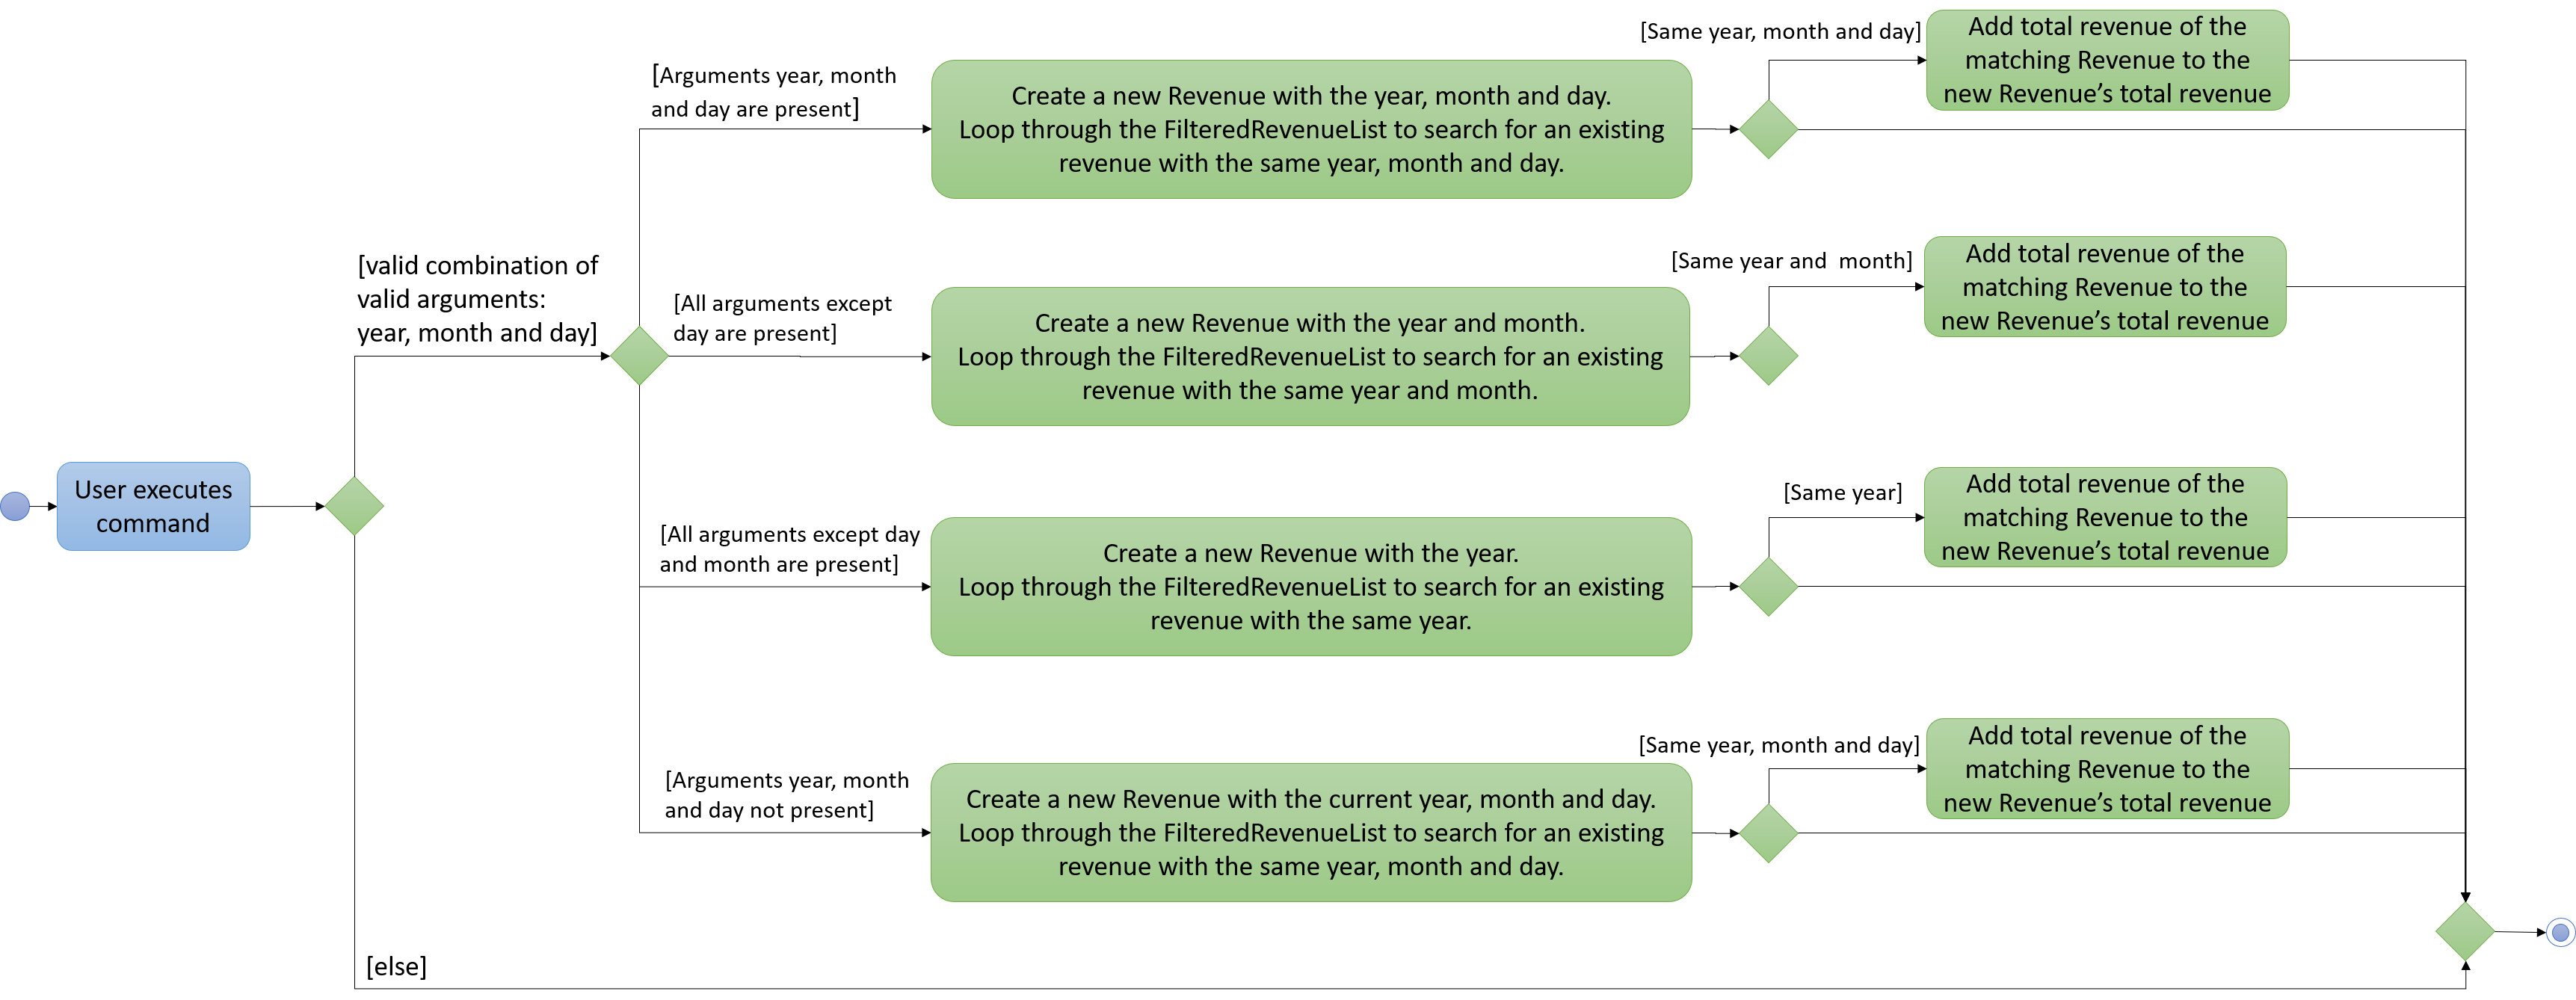
The above diagram summarizes the overall implementation of RevenueCommand. Depending on the user input, the function creates a new Revenue object and iterates through the revenue list to search for revenue of the same year, month or day. If the revenue is the same as the new Revenue, its total revenue is added to the new Revenue. After which, the new Revenue object is used to generate the CommandResult output string where the calculated figure will be returned.
Design Considerations
| Aspect | Alternative 1 | Alternative 2 |
|---|---|---|
Validation regex of Month and Day |
Allow single and double digits. Since the user input will eventually be parsed as an integer during its validation check, there is no need to restrict the day and month inputs to 2 digits. |
Restricts to double digit |
Validation regex of Year |
Only allow four digits that are greater than 2000. Since this application is catered to existing restaurants with messy front-end management, there is no need to accept dates that are way before the 2000s. |
No restrictions |
Switch case versus Array |
Store months in string format in an Array We chose this design as it not only reduces the lines of code, but also efficiently obtains the needed string. |
Switch case |
4.6. Logging
We are using java.util.logging package for logging. The LogsCenter class is used to manage the logging levels and logging destinations.
-
The logging level can be controlled using the logLevel setting in the configuration file (See Section 4.7, “Configuration”)
-
The Logger for a class can be obtained using LogsCenter.getLogger(Class) which will log messages according to the specified logging level
-
Currently log messages are output through: Console and to a .log file.
Logging Levels
-
SEVERE : Critical problem detected which may possibly cause the termination of the application
-
WARNING : Can continue, but with caution
-
INFO : Information showing the noteworthy actions by the App
-
FINE : Details that is not usually noteworthy but may be useful in debugging e.g. print the actual list instead of just its size
4.7. Configuration
Certain properties of the application can be controlled (e.g user prefs file location, logging level) through the configuration file (default: config.json).
5. Documentation
We use asciidoc for writing documentation.
| We chose asciidoc over Markdown because asciidoc, although a bit more complex than Markdown, provides more flexibility in formatting. |
5.1. Editing Documentation
See UsingGradle.adoc to learn how to render .adoc files locally to preview the end result of your edits. Alternatively, you can download the AsciiDoc plugin for IntelliJ, which allows you to preview the changes you have made to your .adoc files in real-time.
5.2. Publishing Documentation
See UsingTravis.adoc to learn how to deploy GitHub Pages using Travis.
5.3. Converting Documentation to PDF format
We use Google Chrome for converting documentation to PDF format, as Chrome’s PDF engine preserves hyperlinks used in webpages.
Here are the steps to convert the project documentation files to PDF format.
-
Follow the instructions in UsingGradle.adoc to convert the AsciiDoc files in the docs/ directory to HTML format.
-
Go to your generated HTML files in the build/docs folder, right click on them and select .
-
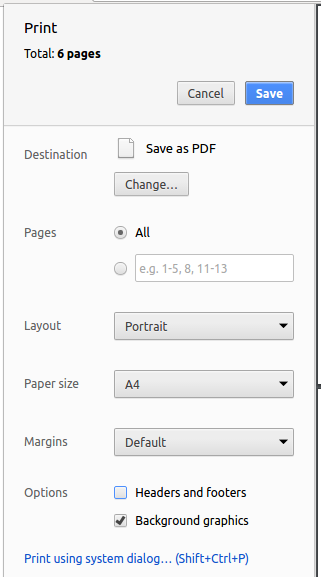
Within Chrome, click on the Print option in Chrome’s menu.
-
Set the destination to Save as PDF, then click Save to save a copy of the file in PDF format. For best results, use the settings indicated in the screenshot below.
5.4. Site-wide Documentation Settings
The build.gradle file specifies some project-specific asciidoc attributes which affects how all documentation files within this project are rendered.
| Attributes left unset in the build.gradle file will use their default value, if any. |
| Attribute name | Description | Default value |
|---|---|---|
site-name |
The name of the website. If set, the name will be displayed near the top of the page. |
not set |
site-githuburl |
URL to the site’s repository on GitHub. Setting this will add a "View on GitHub" link in the navigation bar. |
not set |
site-seedu |
Define this attribute if the project is an official SE-EDU project. This will render the SE-EDU navigation bar at the top of the page, and add some SE-EDU-specific navigation items. |
not set |
5.5. Per-file Documentation Settings
Each .adoc file may also specify some file-specific asciidoc attributes which affects how the file is rendered.
Asciidoctor’s built-in attributes may be specified and used as well.
| Attributes left unset in .adoc files will use their default value, if any. |
| Attribute name | Description | Default value |
|---|---|---|
site-section |
Site section that the document belongs to. This will cause the associated item in the navigation bar to be highlighted. One of: UserGuide, DeveloperGuide, LearningOutcomes*, AboutUs, ContactUs * Official SE-EDU projects only |
not set |
no-site-header |
Set this attribute to remove the site navigation bar. |
not set |
5.6. Site Template
The files in docs/stylesheets are the CSS stylesheets of the site. You can modify them to change some properties of the site’s design.
The files in docs/templates controls the rendering of .adoc files into HTML5. These template files are written in a mixture of Ruby and Slim.
|
Modifying the template files in docs/templates requires some knowledge and experience with Ruby and Asciidoctor’s API. You should only modify them if you need greater control over the site’s layout than what stylesheets can provide. The SE-EDU team does not provide support for modified template files. |
6. Testing
6.1. Running Tests
There are three ways to run tests.
| The most reliable way to run tests is the 3rd one. The first two methods might fail some GUI tests due to platform/resolution-specific idiosyncrasies. |
Method 1: Using IntelliJ JUnit test runner
-
To run all tests, right-click on the src/test/java folder and choose Run 'All Tests'
-
To run a subset of tests, you can right-click on a test package, test class, or a test and choose Run 'ABC'
Method 2: Using Gradle
-
Open a console and run the command
gradlew clean allTests(Mac/Linux:./gradlew clean allTests)
| See UsingGradle.adoc for more info on how to run tests using Gradle. |
Method 3: Using Gradle (headless)
Thanks to the TestFX library we use, our GUI tests can be run in the headless mode. In the headless mode, GUI tests do not show up on the screen. That means the developer can do other things on the Computer while the tests are running.
To run tests in headless mode, open a console and run the command gradlew clean headless allTests (Mac/Linux: ./gradlew clean headless allTests)
6.2. Types of tests
We have two types of tests:
-
GUI Tests - These are tests involving the GUI. They include,
-
System Tests that test the entire App by simulating user actions on the GUI. These are in the systemtests package.
-
Unit tests that test the individual components. These are in seedu.address.ui package.
-
-
Non-GUI Tests - These are tests not involving the GUI. They include,
-
Unit tests targeting the lowest level methods/classes.
e.g. seedu.address.commons.StringUtilTest -
Integration tests that are checking the integration of multiple code units (those code units are assumed to be working).
e.g. seedu.address.storage.StorageManagerTest -
Hybrids of unit and integration tests. These test are checking multiple code units as well as how the are connected together.
e.g. seedu.address.logic.LogicManagerTest
-
6.3. Troubleshooting Testing
Problem: HelpWindowTest fails with a NullPointerException.
-
Reason: One of its dependencies, HelpWindow.html in src/main/resources/docs is missing.
-
Solution: Execute Gradle task
processResources.
7. Dev Ops
7.1. Build Automation
See UsingGradle.adoc to learn how to use Gradle for build automation.
7.2. Continuous Integration
We use Travis CI and AppVeyor to perform Continuous Integration on our projects. See UsingTravis.adoc and UsingAppVeyor.adoc for more details.
7.3. Coverage Reporting
We use Coveralls to track the code coverage of our projects. See UsingCoveralls.adoc for more details.
7.4. Documentation Previews
When a pull request has changes to asciidoc files, you can use Netlify to see a preview of how the HTML version of those asciidoc files will look like when the pull request is merged. See UsingNetlify.adoc for more details.
7.5. Making a Release
Here are the steps to create a new release.
-
Update the version number in MainApp.java.
-
Generate a JAR file using Gradle.
-
Tag the repo with the version number. e.g. v0.1
-
Create a new release using GitHub and upload the JAR file you created.
7.6. Managing Dependencies
A project often depends on third-party libraries. For example, RestOrRant depends on the Jackson library for JSON parsing. Managing these dependencies can be automated using Gradle. For example, Gradle can download the dependencies automatically, which is better than these alternatives:
-
Include those libraries in the repo (this bloats the repo size)
-
Require developers to download those libraries manually (this creates extra work for developers)
Appendix A: Product Scope
Target user profile:
-
has a need to manage the front-end operations of a restaurant (customers, orders, menu)
-
still uses outdated front-end restaurant management systems like pen and paper
-
wants to easily keep track of restaurant statistics (revenue, dishes’ popularity)
-
prefer desktop apps over other types
-
can type fast
-
prefers typing over mouse input
-
is reasonably comfortable using CLI apps
Value proposition: RestOrRant manages the customers, orders, menu and restaurant statistics with a speed faster than a typical mouse/GUI driven application. This allows the user to have a clear idea of the current status of the restaurant without the need to physically check out the space. This is especially useful for busy restaurants with unorganised or slow front-end management systems.
Appendix B: User Stories
Priorities: High (must have) - * * *, Medium (nice to have) - * *, Low (unlikely to have) - *
| Priority | As a … | I want to … | So that I can… |
|---|---|---|---|
|
waiter |
view the status of the tables |
know which tables are free/occupied and which tables are waiting for orders/has received their orders |
|
waiter |
change status of tables |
update the availability of tables |
|
manager |
add items to the menu |
accurately reflect the available dishes |
|
manager |
delete items from the menu |
update changes to the menu |
|
waiter |
add orders to a table |
know which orders to serve to each table |
|
waiter |
delete orders from a table |
update changes to the orders of each table |
|
waiter |
update wrong orders |
conveniently assist to customers demands without keying in wrong/changed orders |
|
cashier |
retrieve the bill for each table |
easily process their bill when they are done eating |
|
manager |
obtain specific date’s revenue |
easily close accounts for the day and track profit |
|
manager |
view yearly, monthly and daily statistics |
study the restaurant’s revenue trends |
|
waiter |
add special requests to the order |
inform the chef of the customers' specific preferences |
|
manager |
view popular dishes via statistics |
decide the amount of ingredients to purchase |
|
waiter |
view popular dishes via statistics |
suggest the best dishes to the customer |
|
waiter |
reserve tables |
see which tables can be provided to other subsequent customers |
Appendix C: Use Cases
(For all use cases below, the System is RestOrRant and the Actor is the user, unless specified otherwise)
Use case: UC1 - Switching to Restaurant Mode
MSS
-
User enters command to switch to Restaurant Mode.
-
RestOrRant displays a grid of all the tables in the restaurant with their statuses in the main panel, as well as a list of all the orders from all tables in the side panel.
User case ends.
Extensions
-
1a. RestOrRant is already in Restaurant Mode.
-
1a1. RestOrRant returns an error message saying that it is already in the mode.
Use case ends.
-
Use case: UC2 - Switching to Menu Mode
MSS
-
User enters command to switch to Menu Mode.
-
RestOrRant displays a grid of all the items on the restaurant menu with their code, name and price on the side panel.
Use case ends.
Extensions
-
1a. RestOrRant is already in Menu Mode.
-
1a1. RestOrRant returns an error message saying that it is already in the mode.
Use case ends.
-
Use case: UC3 - Switching to Table Mode
MSS
-
User enters command to switch to Table Mode and specifies the table number of the target table.
-
RestOrRant displays a grid of all the items on the restaurant menu with their code, name and price on the side panel.
Use case ends.
Extensions
-
1a. RestOrRant is already in Table Mode of the same table number.
-
1a1. RestOrRant returns an error message saying that it is already in the mode.
Use case ends.
-
-
1b. The specified table number is invalid.
-
1ab. RestOrRant returns an error message saying that the table number is invalid.
Use case ends.
-
-
1c. The table with the specified table number is unoccupied.
-
1c1. RestOrRant returns an error message saying that the table is unoccupied.
Use case ends.
-
Use case: UC4 - Adding new tables
MSS
-
User enters command to add a table to the restaurant.
-
RestOrRant Program returns success message that the table is added, providing the table number and table status.
Use case: UC5 - Checking for available tables
MSS
-
User enters command to list all tables in the restaurant.
-
RestOrRant Program returns the status (number of customers at the table/number of seats at the table) of all tables in the restaurant.
Use case ends.
Extensions
-
2a. The list is empty.
-
2a1. RestOrRant Program returns an error message that there are no tables in the restaurant.
Use case ends.
-
Use case: UC6 - Taking an order
MSS
-
User switches to Table Mode (UC3).
-
RestOrRant switches to Table Mode.
-
User enters a list of item codes and quantities of the items to be added to the table’s order.
-
RestOrRant updates the list of order items in the side panel to include the newly added order items.
Use case ends.
Extensions
-
3a. The item code(s) are not present in the menu.
-
3a1. RestOrRant displays the first invalid item code in the Results Display and stops adding new items to the order.
Use case resumes from step 4.
-
-
3b. The item code(s) do not follow the standard alphanumeric format.
-
3b1. RestOrRant returns an error message saying that the item code is in invalid format.
Use case ends.
-
-
3c. The quantity of an item exceeds the limit after the user tries to add the specified quantity.
-
3c1. RestOrRant displays the item code of that item in the Results Display and stops adding new items to the order.
Use case resumes from step 4.
-
-
3d. The quantities provided are not in valid format or exceed the limit.
-
3d1. RestOrRant returns an error message saying that the quantity is in invalid format.
Use case ends.
-
Use case: UC7 - Adding items to menu
Preconditions: Item to be added cannot exist in the menu.
MSS
-
User switches to Menu Mode (UC2).
-
RestOrRant switches to Menu Mode.
-
User enters the item’s code, name and price.
-
RestOrRant updates the list of menu items in the side panel to include the added menu item.
Use case ends.
Extensions
-
1a. The menu already contains the item to be added (same item code).
-
1a1. RestOrRant returns an error message saying that duplicate menu items cannot be added.
Use case ends.
-
-
1b. The item code does not follow the specified alphanumeric format.
-
1b1. RestOrRant returns an error message saying that the item code is in invalid format.
Use case ends.
-
-
1c. The item name does not follow the standard alphanumeric format.
-
1b1. RestOrRant returns an error message saying that the item name is in invalid format.
Use case ends.
-
-
1d. The item price does not follow the specified format of rational number with two decimal digits.
-
1d1. RestOrRant returns an error message saying that the item price is in invalid format.
Use case ends.
-
Use case: UC8 - Obtaining revenue from statistics
MSS
-
User enters the revenue command with specific optional arguments (year, month and date).
-
RestOrRant Program collates data from the stated period, calculates all the revenue and prints out the calculated figure for the user to refer.
Use case ends.
Extensions
-
1a. The combination of arguments are invalid.
-
1a1. RestOrRant prints out "Invalid command format! revenue: Gets the revenue from the specified year, month or day. Parameters: [y/YEAR [m/MONTH] [d/DAY]]] Example: revenue or revenue y/2019 or revenue y/2019 m/12 or revenue y/2019 m/12 d/30"
Use case ends.
-
-
1b. Invalid year.
-
1b1. RestOrRant prints out "Year should be in the format <four digit integer>, it should not be blank or larger than current year. Years before 2000s are not supported (2000 to current year)."
Use case ends.
-
-
1c. Invalid month.
-
1c1. RestOrRant prints out "Month should be a single or double double digit integer, and it should not be blank and should be a valid month (1 to 12)."
Use case ends.
-
-
1d. Invalid day.
-
1d1. RestOrRant prints out "Day should be a single or double double digit integer, it should not be blank and should be a valid day (1 to 31)."
Use case ends.
-
-
1d. Invalid date.
-
1d1. RestOrRant prints out "Date is invalid. It does not exists."
Use case ends.
-
-
2a. No arguments keyed in.
-
2a1. RestOrRant returns the revenue of the current day.
Use case ends.
-
-
2b. There is no data recorded, list is empty.
-
2b1. RestOrRant prints out "Revenue for (stated day, month or year) $ 0.00"
Use case ends.
Appendix D: Non Functional Requirements
-
Should work on any mainstream OS as long as it has Java 9 or higher installed.
-
Should work on both 32-bit and 64-bit machines.
-
A user with above average typing speed for regular English text (i.e. not code, not system admin commands) should be able to accomplish most of the tasks faster using commands than using the mouse.
-
Should be able to handle any kind of input, including invalid ones.
-
Should be able to respond within two seconds, even with a large number of tables and order items.
-
Number of tables in the restaurant will not be greater than 400.
-
Quantity of an item ordered by a table will not be greater than 2,000,000,000.
-
Number of menu items in the menu will not be greater than 200.
-
Not required to handle the printing of receipts.
Appendix E: Glossary
- Mainstream OS
-
Windows, Linux, Unix, OS-X
- Order
-
The list of items ordered by dining customers at a table
- Menu
-
The list of items available to be ordered by dining customers at the restaurant
- Bill
-
The amount of money that dining customers have to pay based on their order
- Revenue
-
The amount of money earned based on the bills
Appendix F: Instructions for Manual Testing
Given below are instructions to test the app manually.
| These instructions only provide a starting point for testers to work on; testers are expected to do more exploratory testing. |
F.1. Launch and Shutdown
-
Initial launch
-
Download the jar file and copy into an empty folder.
-
Double-click the jar file.
Expected: Shows the GUI with sample data. The window size may not be optimum.
-
-
Saving window preferences
-
Resize the window to an optimum size. Move the window to a different location. Close the window.
-
Re-launch the app by double-clicking the jar file.
Expected: The most recent window size and location is retained.
-
-
Exiting the application
-
Add some data into RestOrRant (eg.
addTable 4 4 2 2). -
Exit RestOrRant by clicking the button, then re-launch the app.
Expected: The application closes upon exit. All data remains intact upon re-launch. -
Exit RestOrRant by typing the
exitcommand, then re-launch the app.
Expected: Similar to previous. -
Exit RestOrRant by clicking the Close button on the window, then re-launch the app.
Expected: Similar to previous.
-
{ more test cases … }
F.2. Changing Modes
-
Restaurant Mode
-
In Restaurant Mode, switch to Restaurant Mode with
restaurantModeorRM.
Expected: Mode is not changed. Error message is shown in the Results Display. -
In any other mode, switch to Restaurant Mode with
restaurantModeorRM.
Expected: Status bar indicates "Restaurant Mode". Success message is shown in the Results Display. Main panel will display a grid of tables with their statuses and side panel will display a list of order items across all tables.
-
-
Menu Mode
-
In Menu Mode, switch to Menu Mode with
menuModeorMM.
Expected: Mode is not changed. Error message is shown in the Results Display. -
In any other mode, switch to Menu Mode with
menuModeorMM.
Expected: Status bar indicates "Menu Mode". Success message is shown in the Results Display. Main panel will be empty and side panel will display a list of menu items with their code, name and price.
-
-
Table Mode
-
Pre-requisite: Tables should have been populated with sample data. Table 1 is unoccupied while Tables 2 and 3 are occupied.
-
In Table Mode for Table 2, switch to Table Mode with
tableMode 2orTM 2.
Expected: Mode is not changed. Error message is shown in the Results Display. -
In Table Mode for Table 2 or in any other mode, switch to Table Mode with
tableMode 3orTM 3.
Expected: Status bar indicates "Table Mode: Table 3". Success message is shown in the Results Display. Main panel will display a grid of menu items with their code, name and price and side panel will display a list of order items from Table 3. -
Test case for unoccupied table: In any mode, switch to Table Mode with
tableMode 1orTM 1.
Expected: Mode is not changed. Error message is shown in the Results Display. -
Test case for invalid table number: In any mode, switch to Table Mode with
tableMode 100orTM 100.
Expected: Mode is not changed. Error message is shown in the Results Display.
-
-
Statistics Mode
-
In Statistics Mode, switch to Statistics Mode with
statisticsModeorSM.
Expected: Mode is not changed. Error message is shown in the Results Display. -
In any other mode, switch to Statistics Mode with
statisticsModeorSM.
Expected: Status bar indicates "Statistics Mode". Success message is shown in the Results Display. Main panel will display a grid of dates with their revenues and side panel will be a list of menu items sorted according to its popularity.
-
F.3. Tables feature
-
Adding a table
-
Switch to Restaurant Mode (
restaurantMode). -
Test case:
addTable 1
Expected: Adds a table with table status of 0/1. -
Test case:
addTable
Expected: No tables are added. Error message is shown in the Results Display. Status bar remains the same. -
Test case:
addTable 4 4 8
Expected: Adds 3 tables with table statuses 0/4, 0/4 and 0/8 for tables 1, 2 and 3 respectively. -
Test case:
addTable @
Expected: No tables are added. Error message is shown in the Results Display. -
Test case:
addTable 1 2 3 $
Expected: No tables are added. Error message is shown in the Results Display.
-
-
Editing pax in a table
-
Switch to Restaurant Mode (
restaurantMode). -
Test case:
editPax 2 2
Expected: Edits Table 2 to have 2 customers. -
Test case:
editPax @ 2
Expected: No tables are edited. Error message is shown in the Results Display. -
Test case:
editPax 2 @
Expected: No tables are edited. Error message is shown in the Results Display.
-
-
Editing seats in a table
-
Switch to Restaurant Mode (
restaurantMode). -
Test case:
editSeats 2 4
Expected: Edits Table 2 to have 4 seats. -
Test case:
editSeats @ 2
Expected: No tables are edited. Error message is shown in the Results Display. -
Test case:
editSeats 2 @
Expected: No tables are edited. Error message is shown in the Results Display.
-
-
Clear tables
-
Switch to Restaurant Mode (
restaurantMode). -
Test case:
clearTables
Expected: All tables have been cleared. -
Test case:
clearTables 2
Expected: All tables have been cleared. -
Test case:
clearTables @
Expected: All tables have been cleared
-
-
Space for specified number of customers
-
Test case:
spaceFor 3
Expected: A table has been allocated for the customers. -
Test case:
spaceFor @
Expected: No tables have been allocated. Error message is shown in the Results Display.
-
F.4. Menu feature
-
Adding to the menu
-
Switch to Menu Mode (
menuMode). -
For the following test cases,
addToMenucan be replaced with the shortcutadd. -
Test case:
addToMenu c/W09 n/Chicken Wings p/4.50
Expected: Adds a menu item "Chicken Wings" with code W09 and price 4.50 to the menu. -
Test case:
addToMenu n/French Fries c/W12 p/2.50
Expected: Adds a menu item "French Fries" with code W12 and price 2.50 to the menu. -
Test case:
addToMenu p/4.00 n/Beef Burger c/W04
Expected: Adds a menu item "Beef Burger" with code W04 and price 4.00 to the menu. -
Test case for invalid name format:
addToMenu n/N@me c/W12 p/2.50
Expected: No menu items are added. Error message is shown in the Results Display. -
Test case for invalid code format:
addToMenu n/French Fries c/102W p/2.50
Expected: Similar to previous. -
Test case for invalid price format:
addToMenu n/French Fries c/W12 p/2.505
Expected: Similar to previous.
-
-
Deleting from the menu
-
Switch to Menu Mode (
menuMode). -
For the following tst cases,
deleteFromMenucan be replaced with the shortcutdel. -
Test case:
deleteFromMenu W09
Expected: Deletes the menu item "Chicken Wings" with code W09 from the menu. -
Test case for invalid code format:
deleteFromMenu 102W
Expected: No items are deleted from the menu. Error message is shown in the Results Display. -
Test case for item does not exist in the menu:
deleteFromMenu A01
Expected: Similar to previous.
-
-
Clearing the menu
-
Switch to Menu Mode (
menuMode). -
Test case:
clearMenuorclearExpected: All the menu items are deleted.
-
F.5. Orders feature
-
Adding to an order
-
Switch to Table Mode for Table 10 (
tableMode 10). -
For the following test cases,
addToOrdercan be replaced with the shortcutadd. -
Test case:
addToOrder W09 2
Expected: Adds an order item "W09 Chicken Wings" with quantity of 2/2 to Table 10’s order. -
Test case:
addToOrder W12 2 W13 1
Expected: Adds order items "W12 French Fries" with quantity of 2/2 and "W13 Coke" with quantity of 1/1 to Table 10’s order. -
Test case:
addToOrder W09 1
Expected: Updates the order item "W09 Chicken Wings" in Table 10’s order from quantity of 2/2 to quantity of 3/3. -
Test case for invalid command format:
addToOrder W09
Expected: No order items are added. Error message is shown in the Results Display. -
Test case for invalid item code format:
addToOrder 2A 2
Expected: Similar to previous. -
Test case for item code not in menu:
addToOrder W35 2
Expected: Similar to previous. -
Test case for invalid quantity:
addToOrder W09 3000000000
Expected: Similar to previous. -
Other invalid test cases:
addToOrder,addToOrder 3,addToOrder W99 1,addToOrder W09 1 W12,addToOrder W09 -2
-
-
Deleting from an order
-
Switch to Table Mode for Table 22 (
tableMode 22). -
For the following test cases,
deleteFromOrdercan be replaced with the shortcutdel. -
Test case:
deleteFromOrder W09
Expected: Deletes the order item "W09 Chicken Wings" from Table 22’s order. -
Test case for invalid command format:
deleteFromOrder W09 3
Expected: No order items are deleted. Error message is shown in the Results Display. -
Test case for invalid item code format:
deleteFromOrder 2A
Expected: Similar to previous. -
Test case for item code not in order:
deleteFromOrder W14
Expected: Similar to previous. -
Other invalid test cases:
deleteFromOrder,deleteFromOrder W01,deleteFromOrder W35
-
-
Clearing an order
-
Switch to Table Mode for Table 5 (
tableMode 5). -
Test case:
clearOrderorclear
Expected: All the order items from Table 5’s order are deleted.
-
-
Serving items in an order
-
Switch to Table Mode for Table 24 (
tableMode 24). -
For the following test cases,
servecan be replaced with the shortcuts. -
Test case:
serve W01 3
Expected: Updates the order item "W01 Chicken Burger" in Table 24’s order from quantity of 3/3 to quantity of 0/3. -
Test case:
serve W12
Expected: Updates the order item "W12 French Fries" in Table 24’s order from quantity of 3/3 to quantity of 2/3. -
Test case for invalid item code format:
serve 2A
Expected: No order items are updated. Error message is shown in the Results Display. -
Test case for item code not in order:
serve W02
Expected: Similar to previous. -
Test case for item already fully served:
serve W01 2
Expected: Similar to previous. -
Other invalid test cases:
serve,serve W12 4,serve W03 2
-
F.6. Statistics feature
-
Billing an order
-
Switch to Table Mode of the selected table. Orders should have been populated and served from the Order tests above.
-
Test case:
billorb
Expected: Mode change to Bill Mode where a receipt of the orders will be shown. The total bill is calculated and recorded. If Bill is the first bill of the day, a new daily revenue card will appear in the default display of Statistics Mode. Otherwise, it just updates the daily revenue by adding the total bill to the current revenue of the current date. The order list and occupancy of the selected table should be cleared. -
Switch to Table Mode of the selected table. Orders should have been populated from the Order tests above. Some of the order items are not served.
-
Test case:
billorb
Expected: Error message is shown in Results Display.
-
-
Retrieving revenue for a specified day, month or year
-
Switch to Statistics Mode. Daily revenue should have been populated from the Bill test.
-
Test case:
revenueorr
Expected: Revenue of the current date will be calculated. -
Test case:
revenue y/2019 m/1 d/1orr y/2019 m/1 d/1
Expected: Revenue of 1-Jan-2019 will be calculated. -
Test case:
revenue y/2019 m/1orr y/2019 m/1
Expected: Revenue of Jan-2019 will be calculated. -
Test case:
revenue y/2019ory/2019
Expected: Revenue of year 2019 will be calculated. -
Test case:
revenue d/1 y/2019orr d/1 y/2019
Expected: No revenue are calculated. Error message is shown in the Results Display. -
Other invalid test cases:
revenue m/1,revenue d/1,revenue m/1 d/1,revenue y/2019 m/2 d/29
-
F.7. Data storage
-
Missing data files
-
Open the data folder inside your RestOrRant home folder and delete one or more of the json files.
-
Launch RestOrRant by double-clicking the jar file.
Expected: Shows the GUI with sample data restored.
-
-
Corrupted data files
-
Open any of the json files in the data folder and delete all its contents.
-
Launch RestOrRant by double-clicking the jar file.
Expected: Shows the GUI with no data.
-