By: Team W09-3 Since: Feb 2019 Licence: MIT
- 1. Introduction
- 2. Quick Start
- 3. Modes and Commands
- 3.1. General
- 3.2. Changing Modes
- 3.3. Restaurant Mode
- 3.4. Table Mode
- 3.4.1. Adding items to an order :
addToOrder - 3.4.2. Deleting an item from an order :
deleteFromOrder - 3.4.3. Clearing all the items in an order :
clearOrder - 3.4.4. Marking an item in an order as served :
serve - 3.4.5. Calling the bill of an order :
bill - 3.4.6. Adding a note to an order item :
addNote(Coming in v2.0)
- 3.4.1. Adding items to an order :
- 3.5. Menu Mode
- 3.6. Statistics Mode
- 4. FAQ
- 5. Glossary
- 6. Command Summary
1. Introduction
RestOrRant is a desktop restaurant management application that allows restaurant managers, waiters and cashiers to perform restaurant front-end operations more efficiently. With RestOrRant, you can easily manage table allocation, handle orders, track menu item availability and check restaurant statistics.
RestOrRant mainly uses a Command Line Interface (CLI) to perform operations, but it also boasts a Graphical User Interface (GUI) to provide you with visual information for ease of reference.
Interested? Head over to Section 2, “Quick Start” to get started with RestOrRant!
2. Quick Start
Welcome to RestOrRant! If you are just starting out, this quick start section will help you get RestOrRant up and running in no time at all. It will equip you with the basics so that you can quickly enjoy and master the features that RestOrRant has to offer.
2.1. Using the User Guide
This User Guide is filled with information to help you set up and make the most of RestOrRant. You will be able to learn more about the commands that are available for you, together with examples of how they are used. These commands are also consolidated into a summary for your convenience.
To complement your reading experience, you may find it useful to refer to the table below for the different symbols and formatting used throughout this guide.
|
Command that can be typed into the command box |
|
Expected result after executing the command |
|
Tips and tricks that might be useful |
|
Additional information that is good to know |
|
Important pointers to take note |
You may also refer to the Glossary for some common terms used in this User Guide.
2.2. First steps
These steps will guide you in installing RestOrRant on your computer.
-
Ensure you have Java version 9 or later installed in your computer.
You can download the latest Java version here. -
Download the latest restorrant.jar here.
-
Copy the file to the folder you want to use as the home folder for RestOrRant.
-
Double-click the file to start the app. The interface below should appear in a few seconds.
2.3. Understanding the Mode system
RestOrRant operates in 4 different modes and you will start off in the default Restaurant Mode. Each mode is dedicated to a main feature that RestOrRant provides and comes with its own colour, display and set of commands for that feature. You may switch between the modes by using the commands provided.
The 4 modes are shown below and you may click on them to find out more information about each mode, along with the commands that are available for you in that mode.

Restaurant Mode |
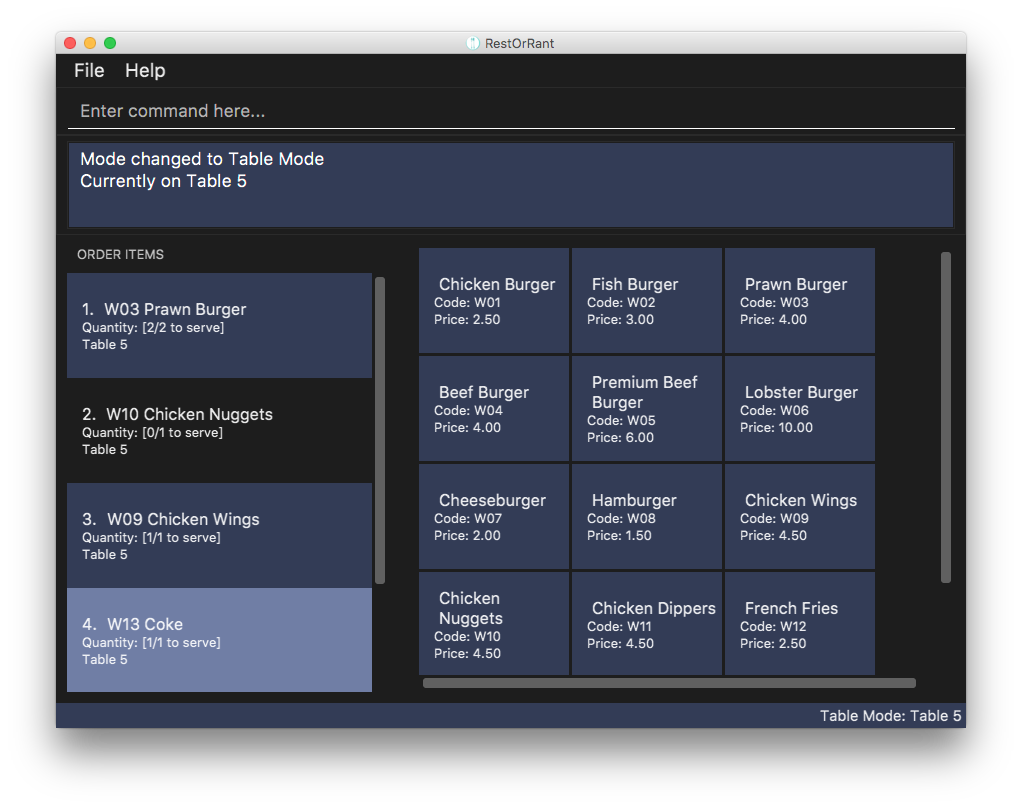
Table Mode |
Menu Mode |
Statistics Mode |
2.4. Navigating the user interface
When you open up RestOrRant, you will see various components in the user interface. While the different modes display different information that is relevant to the specific mode, the general interface remains the same and the different components are labeled in the image below.
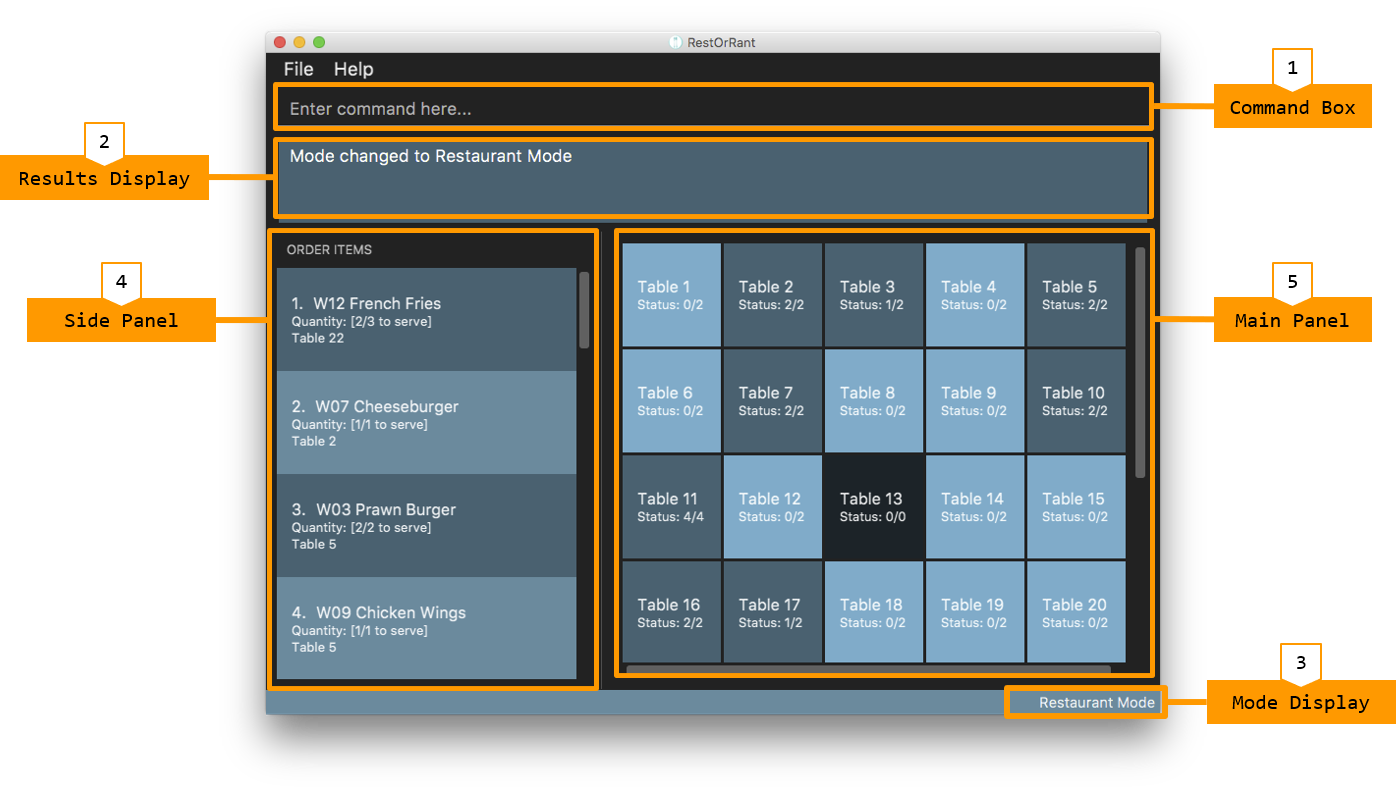
The function of each component is as follows:
-
Command Box: This is where you can key in commands to perform operations in RestOrRant.
-
Results Display: This is where the results are displayed after executing a command.
-
Mode Display: This indicates the current mode that you are in.
-
Side Panel: This panel lists information that is relevant to the mode.
-
Main Panel: This panel displays information that is relevant to the mode.
You can find out what is displayed in the side and main panels for each mode in Section 3, “Modes and Commands”.
2.5. Using commands
You can use the commands described in Section 3, “Modes and Commands” by typing them into the Command Box and pressing Enter to execute it.
For example, typing help and pressing Enter will open the help window.
Shortcuts are also provided for some commands to allow you to type faster and perform operations more quickly.
For example, you may type the shortcut b instead of the full bill command to return the bill.
Note that the commands need to be executed in the correct mode as some of the shortcuts perform different operations when used in the different modes.
For example, the add shortcut performs addTable in Restaurant Mode but addToMenu in Menu Mode.
|
You may need to include parameters for some commands and the format of each command is provided in the command descriptions. You may refer to the pointers below to understand the formatting used to write the command format.
Some of the parameters have restrictions and they are stated below.
Some commands may make changes to the data in RestOrRant. There is no need to save manually as the data will be automatically saved in the hard disk.
2.6. Using RestOrRant in your restaurant
RestOrRant comes preloaded with sample data to allow you to explore and get familiar with the application. The examples in this User Guide also make use of this data so that you can easily follow along.
When you are ready to use RestOrRant in your restaurant, use the commands in the following steps to set up and personalise RestOrRant for your own usage. You can find out more information about each command by clicking on them.
-
clearRestOrRant: Remove all the sample data so that you can fill it with your own restaurant’s information. -
addTable(in Restaurant Mode): Populate the tables in RestOrRant with your restaurant’s seating information by specifying the number of seats for each table, in ascending order of table number.-
For example, if your restaurant has 3 tables, and Table 1 and 2 have 4 seats while Table 3 has 8 seats, you can type in
addTable 4 4 8.You can add all the tables with just a single command!
-
-
menuMode: Switch over to Menu Mode to fill up the menu in RestOrRant with your restaurant’s menu information. -
addToMenu(in Menu Mode): Add each item into the menu by specifying the item code, name and price.-
For example,
addToMenu c/A05 n/Salad p/4.50will add a new salad item to the menu in RestOrRant.
-
That’s it! Your RestOrRant is now ready for use. You may head on to Section 3, “Modes and Commands” to learn more about the commands that are available for you.
3. Modes and Commands
In this section, you can find details about the commands that RestOrRant supports. These details include the command function, format and example usage. The commands have been organised based on the mode that they can be executed in so that you can easily look for the command that you want.
3.1. General
RestOrRant provides general commands that are not feature-specific, but they enhance your RestOrRant experience as a whole. You can use these commands in any mode.
3.1.1. Viewing help : help
If you ever feel lost or cannot remember what command to use, don’t fret! You can access this User Guide any time directly from RestOrRant by simply typing this command.
| You can also access the help window by clicking on in the menu bar. |
|
The help window will open. |
3.1.2. Viewing history : history
You can easily view all the past commands used by you or your other colleagues by using this command, which will display the list of past commands in reverse chronological order (the last used one will appear first).
| You can also use the ↑ and ↓ keys to view past commands in the Command Box. |
|
The list of past commands will be shown in the Results Display. |
3.1.3. Clearing all the data : clearRestOrRant
If you need to start from a clean slate, you can clear all the data in RestOrRant with this command and restart from an empty application.
| This action is not reversible! Be certain before you use this command. |
| No shortcut is provided and the command is intentionally long to prevent accidental use of this command. |
|
All data in RestOrRant will be deleted and the side and main panels will be empty. |
3.1.4. Exiting the program : exit
When you are done with using RestOrRant, you can exit the application with this command.
| You can also exit RestOrRant by clicking on in the menu bar. |
|
RestOrRant exits and the application window closes. |
3.2. Changing Modes
The commands in this section allow you to switch between modes to use the features that each mode provides. You can use these commands in any mode except if you are already in the mode that you are trying to switch to.
| You may find out more information about RestOrRant’s Mode system here. |
3.2.1. Switching to Restaurant Mode : restaurantMode
You can use this command to switch over to Restaurant Mode to manage the occupancy of the tables in the restaurant.
| Restaurant Mode is the application’s default mode when first starting up RestOrRant. |
|
The user interface switches to Restaurant Mode. |
3.2.2. Switching to Table Mode : tableMode
You can use this command to switch over to Table Mode for the specified table number to handle the orders of that table.
| You can only access Table Mode for tables that exist in the restaurant and are currently occupied. The tables can be updated in Restaurant Mode. |
| You can use this command in Table Mode if you are switching to a different table number. |
|
The user interface switches to Table Mode. The specified table number is also indicated in the Results Display and the Mode Display. |
For example, after executing 
The table number will also be displayed in the Mode Display until you change the mode, as shown below. 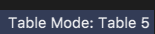
|
3.2.3. Switching to Menu Mode : menuMode
You can use this command to switch over to Menu Mode to modify the menu stored in RestOrRant.
|
The user interface switches to Menu Mode. |
3.2.4. Switching to Statistics Mode : statisticsMode
You can use this command to switch over to Statistics Mode to view revenue and order statistics for your restaurant.
| The default Revenue Panel view is Daily when you first switch over to Statistics Mode. You can find out more about the different views here. |
|
The user interface switches to Statistics Mode. |
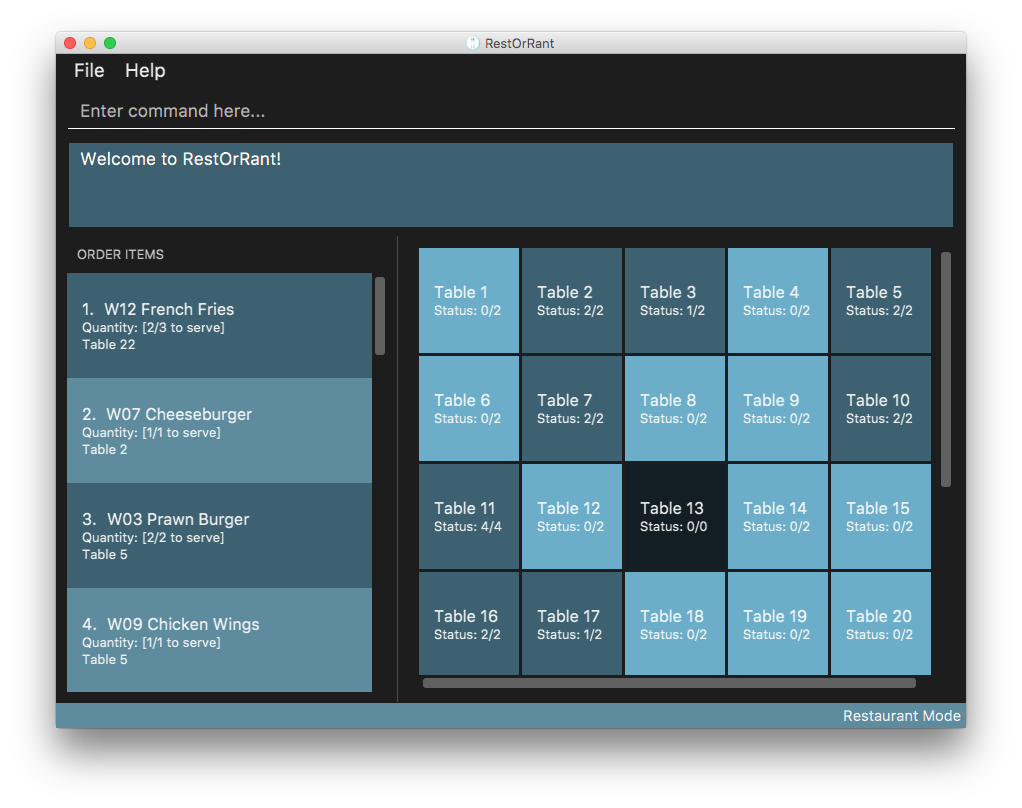
3.3. Restaurant Mode
In Restaurant Mode, which is the default mode, you can perform table-related operations and view the order items across all tables.
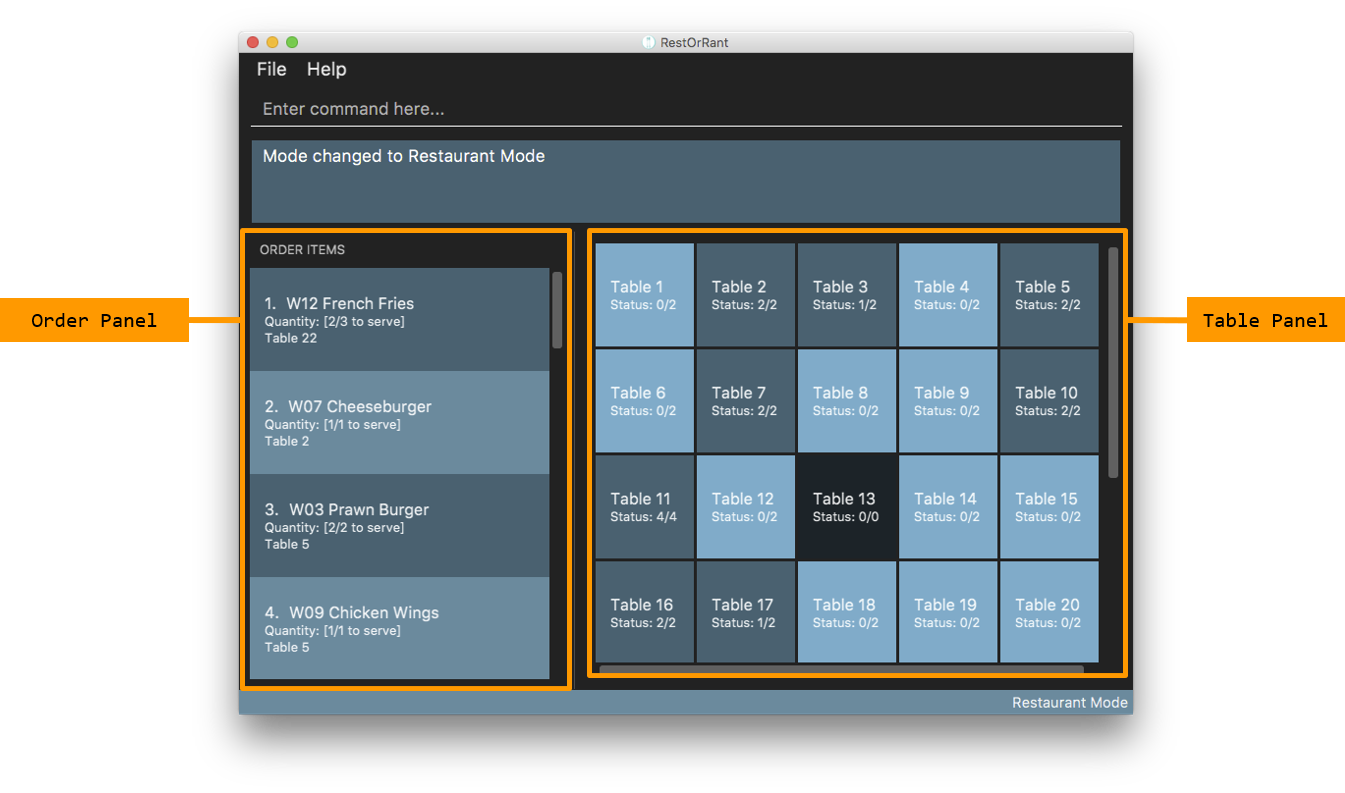
The function of the side and main panels are as follows:
-
Order Panel: This panel shows you the list of items ordered by all tables in RestOrRant, arranged in chronological order. This means that items that were ordered first appears at the top of the list. It also indicates the quantity left to serve for each item, and the background turns dark when the item is fully served.
-
Table Panel: This panel gives you an overview of all tables in RestOrRant with their table numbers and their respective occupancies.
|
The light coloured tables represent unoccupied tables. The slightly darker coloured tables represent occupied tables. The very dark coloured tables represent unusable tables. |
Here are the commands that you can use in this mode to efficiently manage the tables in your restaurant.
3.3.1. Adding tables : addTable
As you set up RestOrRant to reflect your physical restaurant or add tables in the event that there are new tables in your restaurant, this command allows you to add tables in RestOrRant by specifying the number of seats at each table.
| The maximum number of tables that can be added is 400. |
| Table number increases sequentially starting from 1. |
| You can add multiple tables at once. This means all of your tables can be added with a single command! |
|
You will see a success message in the Results Display and the new tables will be displayed in the Table Panel. |
For example, RestOrRant initially has 35 tables when you open it for the first time as shown in the image below. 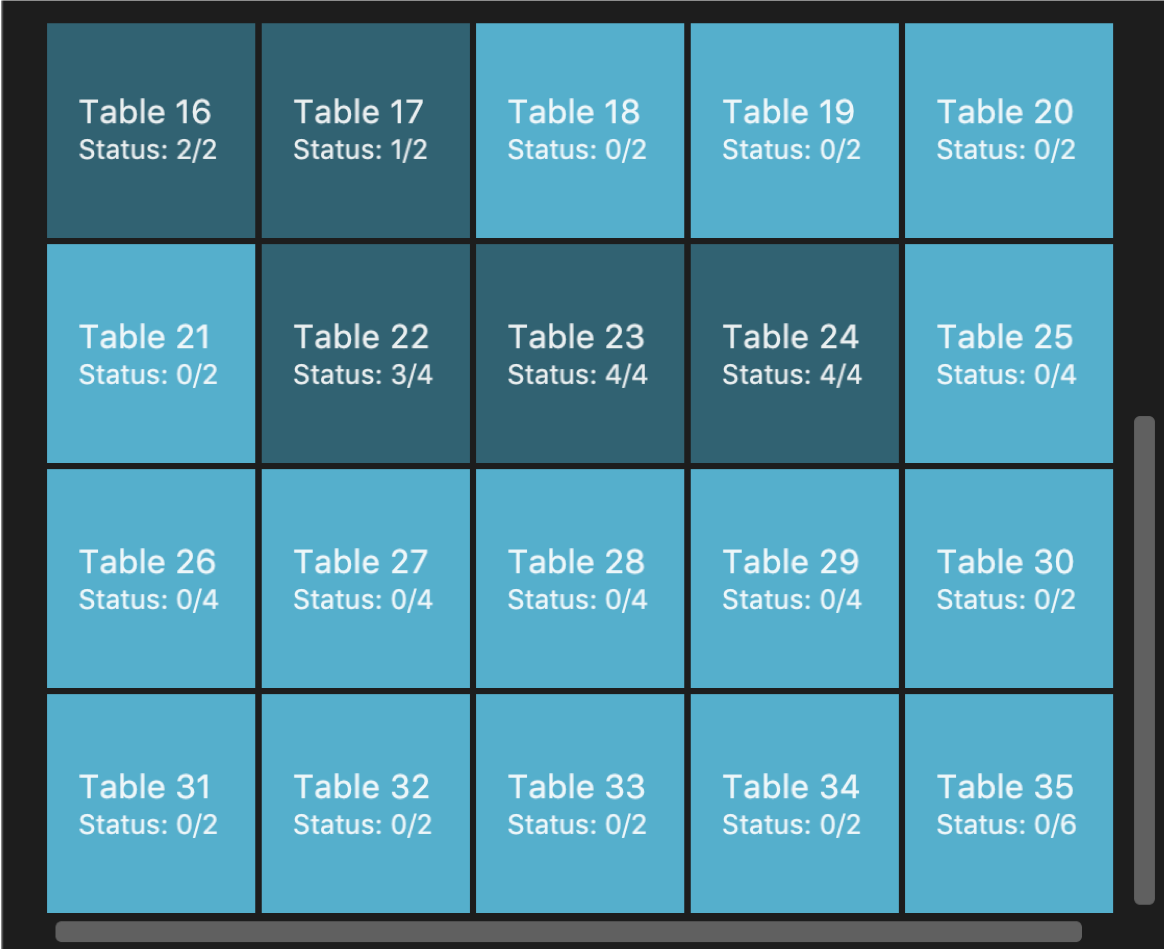
Suppose you decide to open 10 more tables in your restaurant to accommodate more customers, with the number of seats of the first 5 tables be 2, the number of seats for the next 3 tables be 4, and the number of seats at the last 2 tables be 8. 
The Table Panel will also be updated and if you were to scroll down on the Table Panel, you will see Table 36 to Table 45 added as shown in the image below. 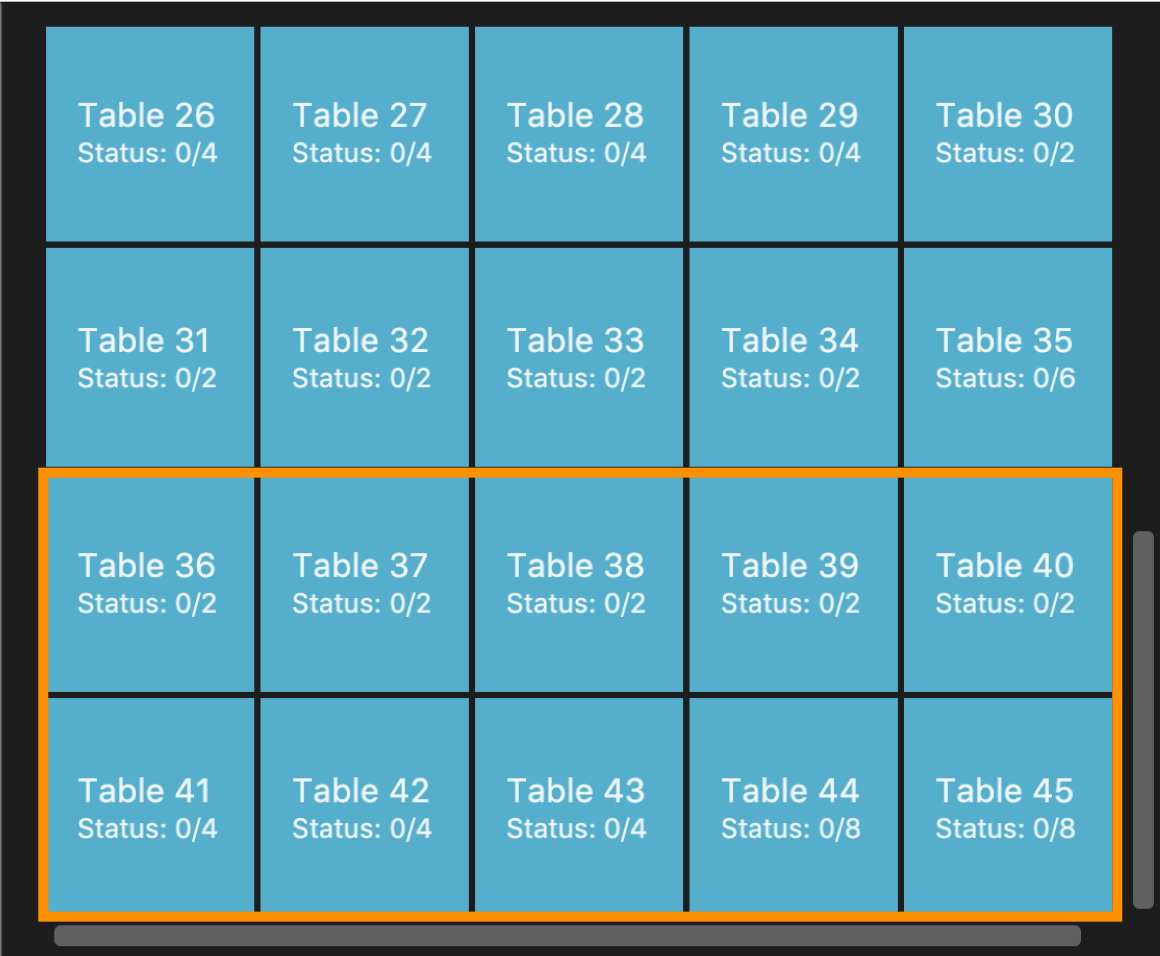
|
|
Alternatively, you can also add just one table at a time. For example, you can use the command |
3.3.2. Editing the occupancy : editPax
During the operation of your restaurant, this command helps you to update the occupancies of the tables in RestOrRant when customers enter your restaurant.
| Changing the table’s occupancy to 0 will automatically clear all records of its orders and they will not be included in RestOrRant’s statistics. |
| The specified table has to exist in RestOrRant and your specified number of customers cannot be greater than the number of seats available at the table. |
|
You will see a success message in the Results Display and the updated table will be displayed in the Table Panel. |
For example, Table 1 in RestOrRant is initially unoccupied as shown below where the table’s status is 0/2. 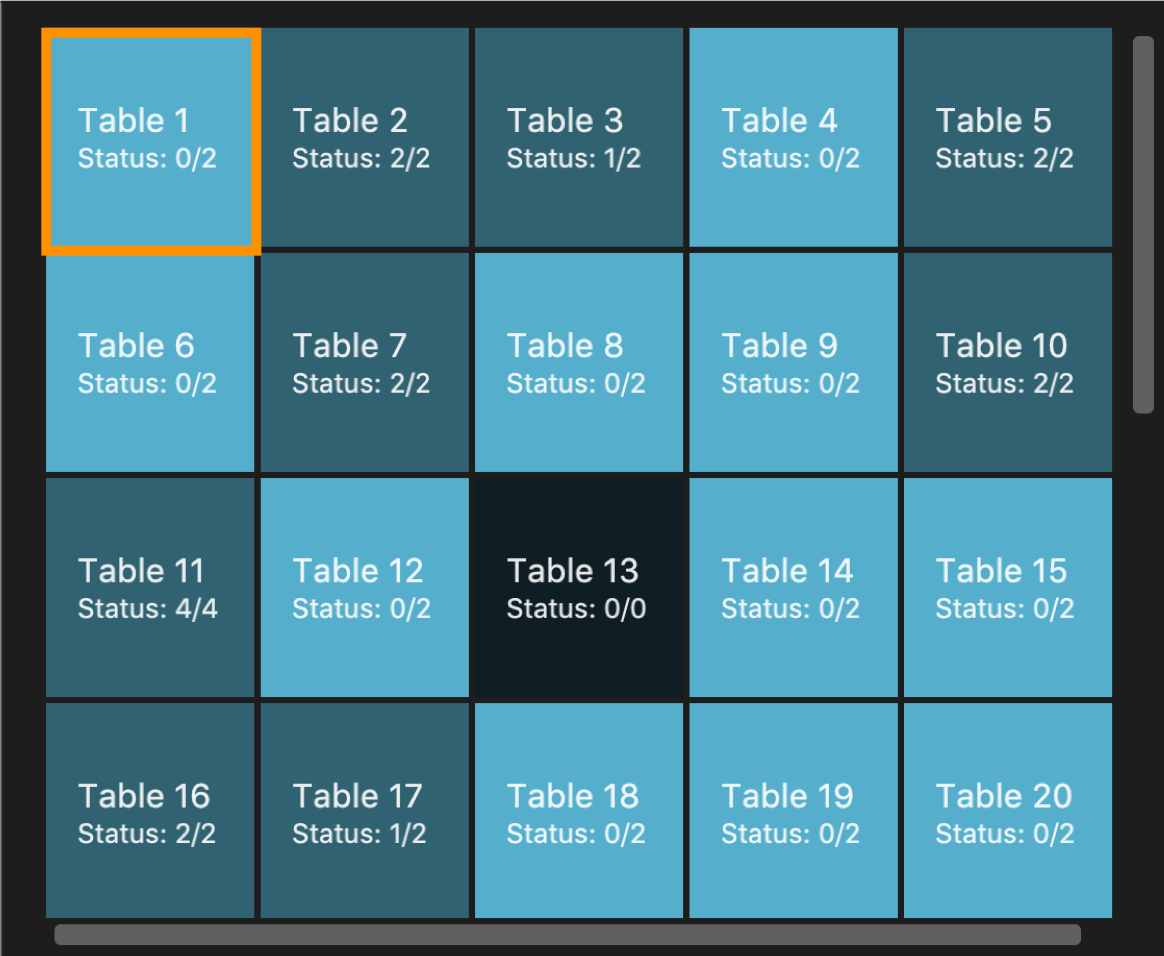
Suppose two customers now enter your restaurant and you would like to seat them at table 1. 
The Table Panel will also be updated where Table 1 shows an updated table status as well as a change to a slightly darker colour to represent an occupied table. 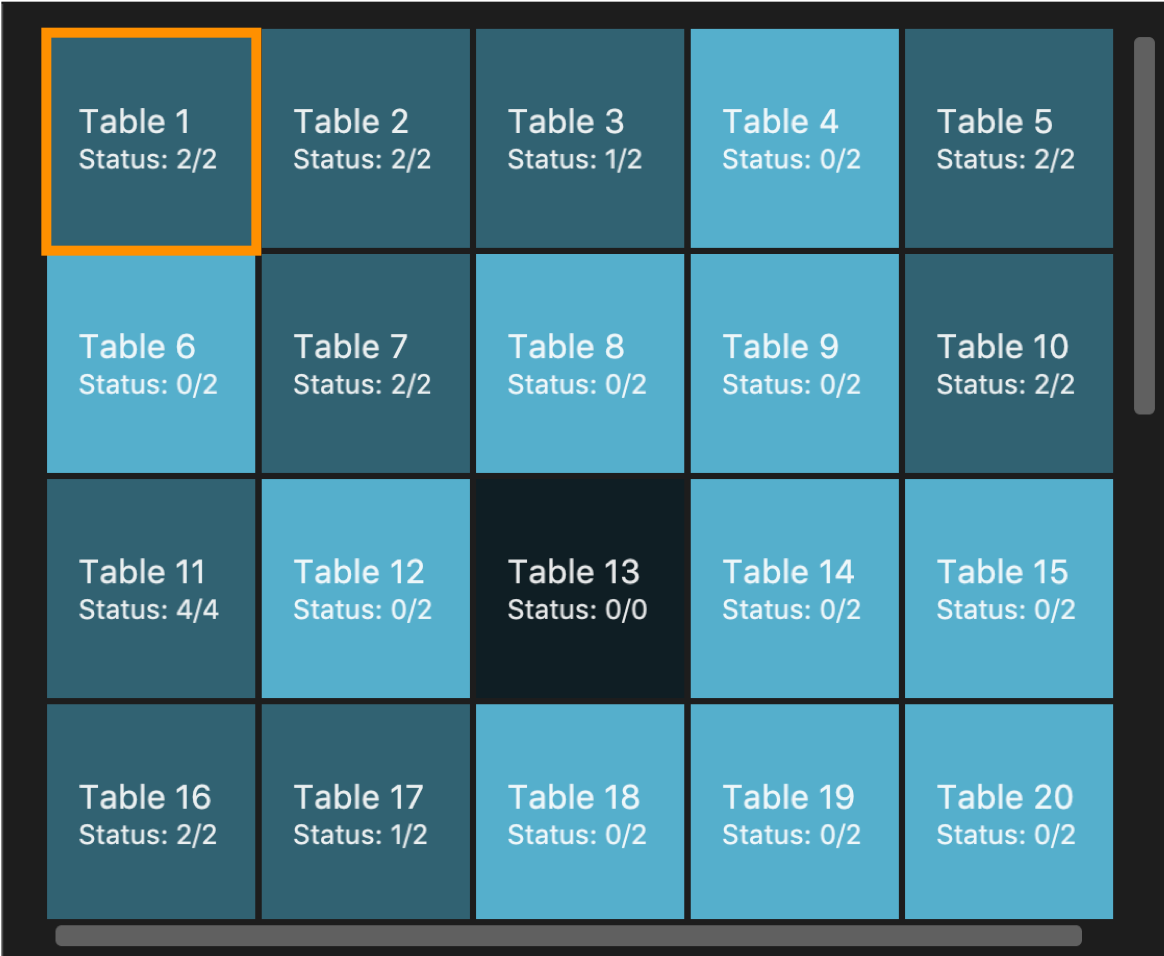
|
3.3.3. Editing the available seats : editSeats
In the event that there are changes to any table in your restaurant in terms of the number of seats at the table, this command can help you make sure RestOrRant is updated to reflect your physical restaurant.
| You can use this command to change the number of seats at a table to 0 to represent an unusable table. This would be useful if a table is broken or you decide to remove a table without re-numbering all the other tables. |
| The specified table has to exist in RestOrRant and the specified number of seats has to be more than the number of customers already seated at the table. |
|
You will see a success message in the Results Display and the updated table will be displayed in the Table Panel. |
For example, Table 2 in RestOrRant is initially occupied as shown below where the table’s status is 2/2. 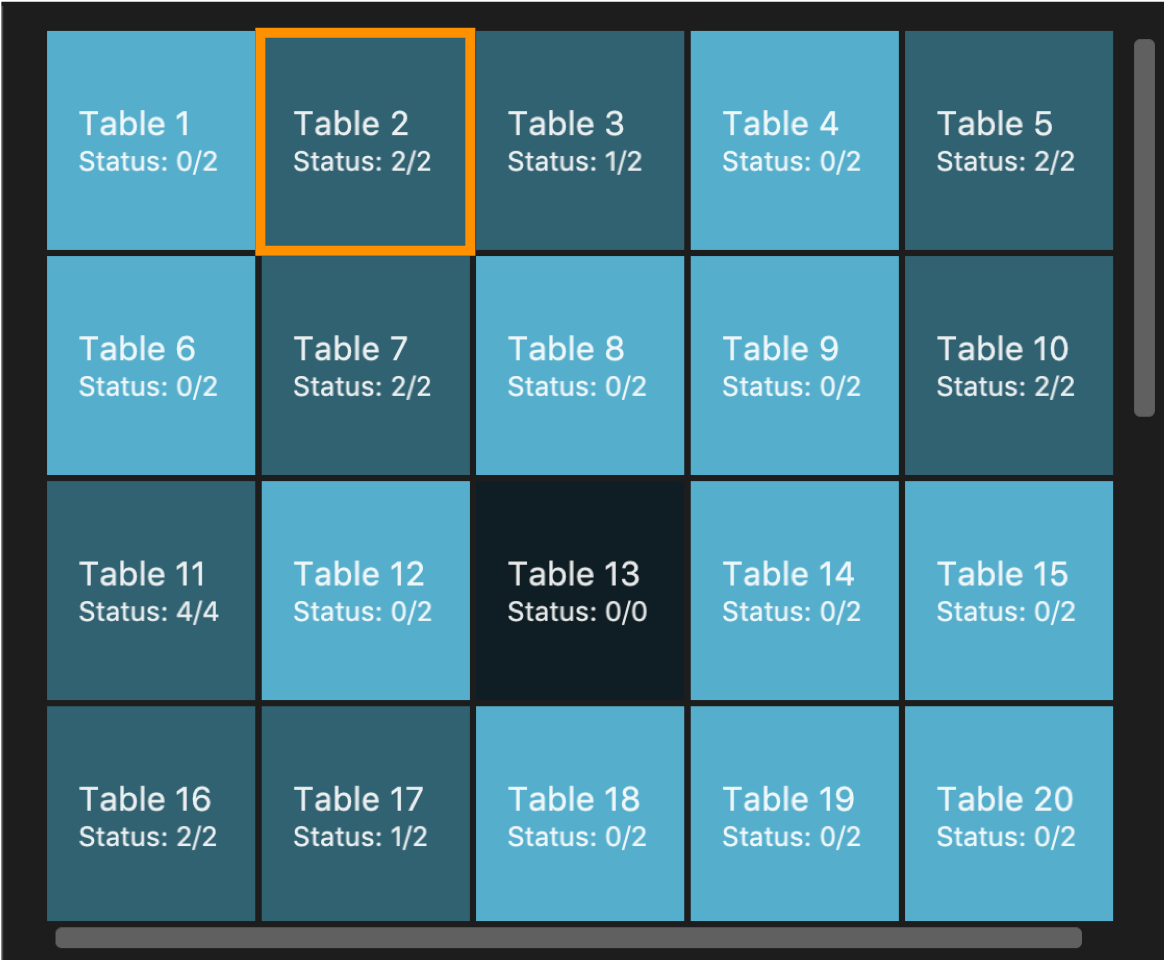
Suppose the customers at this table inform you that 2 other friends are joining them and they would like to pull chairs over. 
Table 2 in the Table Panel will then display the updated table information as shown below. 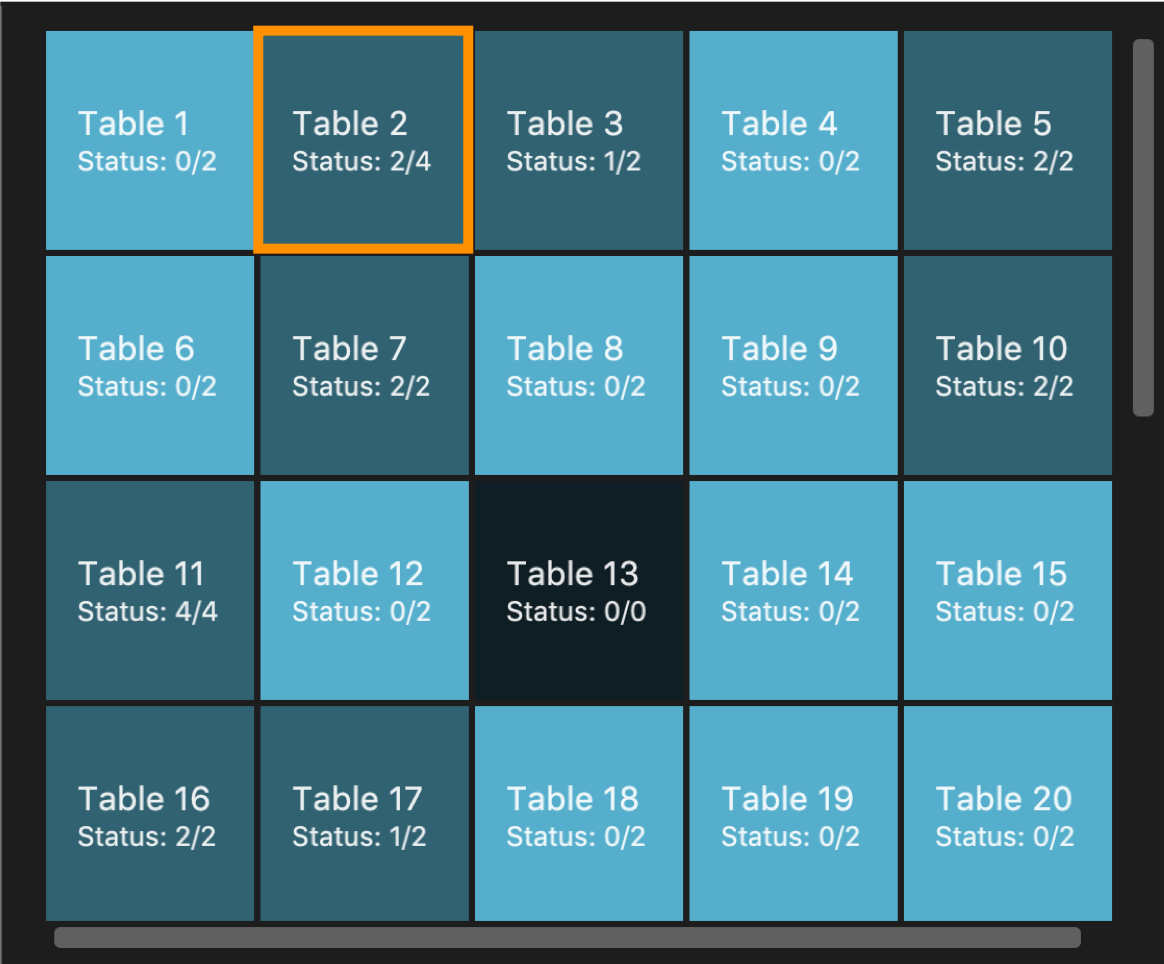
|
3.3.4. Clearing all the tables : clearTables
In the event that you have undergone massive changes in the restaurant, you can use this command to remove all tables in RestOrRant.
| This command checks if the restaurant is completely unoccupied before clearing the tables so you don’t have to worry about any accidents. |
| Clearing all the tables and adding them back using the addTable command is way faster than editing the tables if there are a lot of changes. |
This command is irreversible! In the event that you accidentally cleared your tables, you have to use the addTable command to add all the tables back.
|
|
You will see a success message in the Results Display and all tables will be removed from the Table Panel. |
For example, when all the customers have left the restaurant, all the tables in RestOrRant will be unoccupied as shown below. 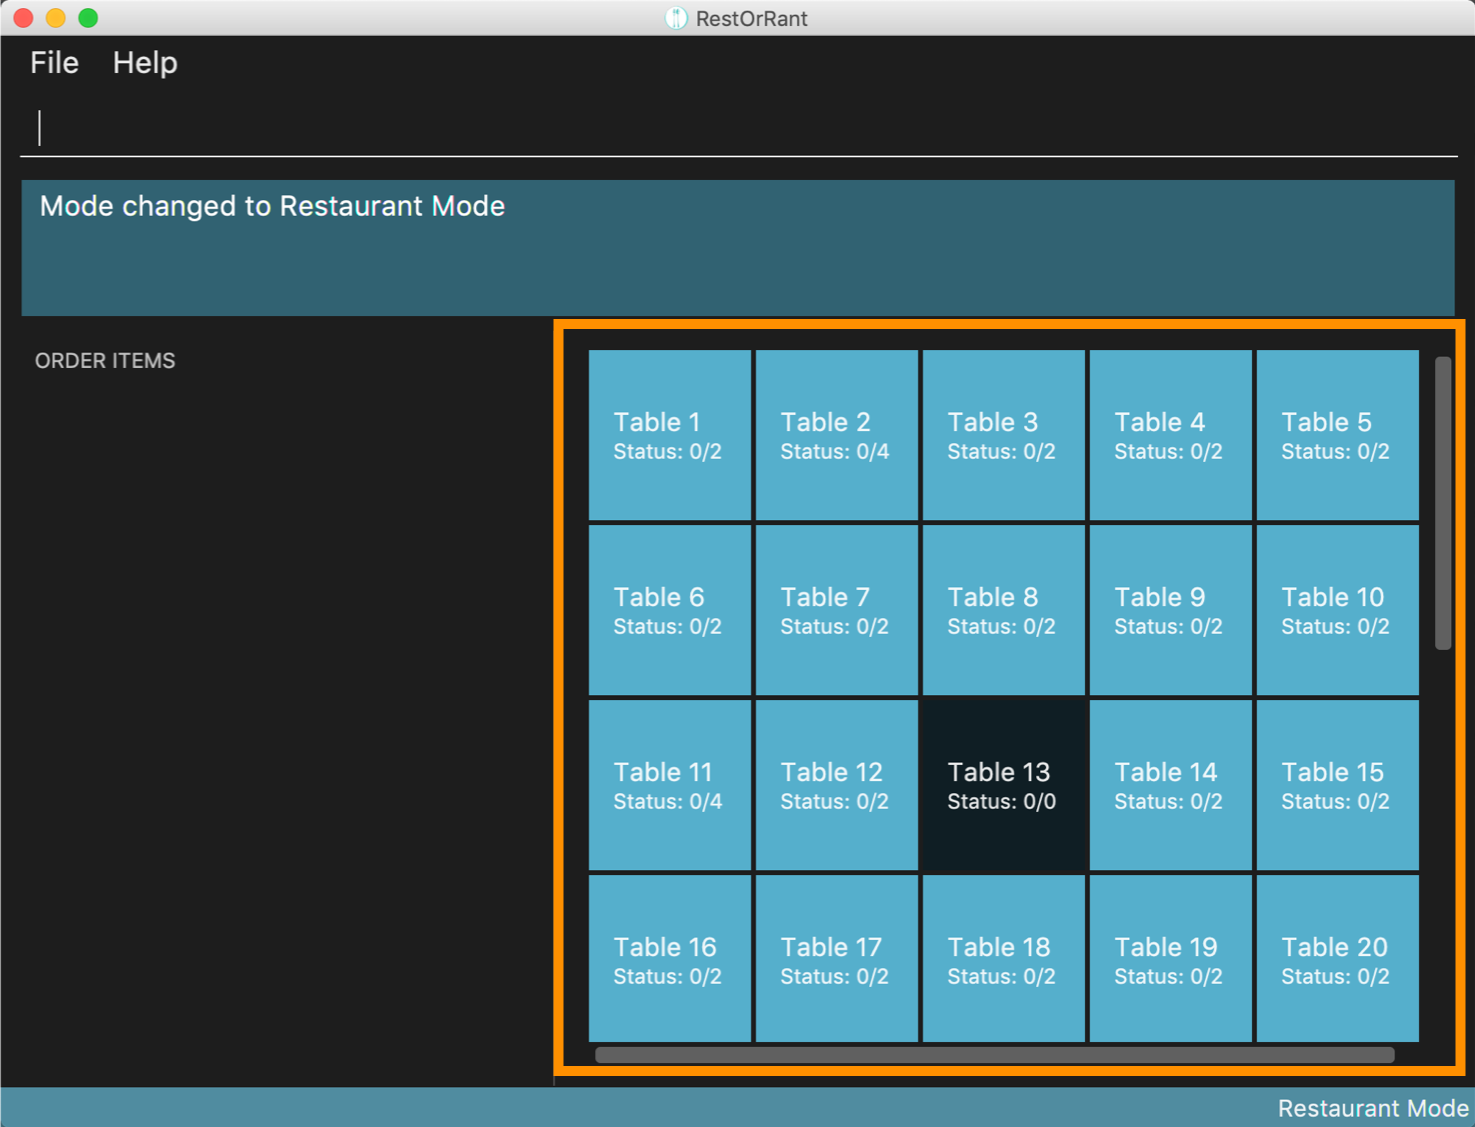
After you enter the command 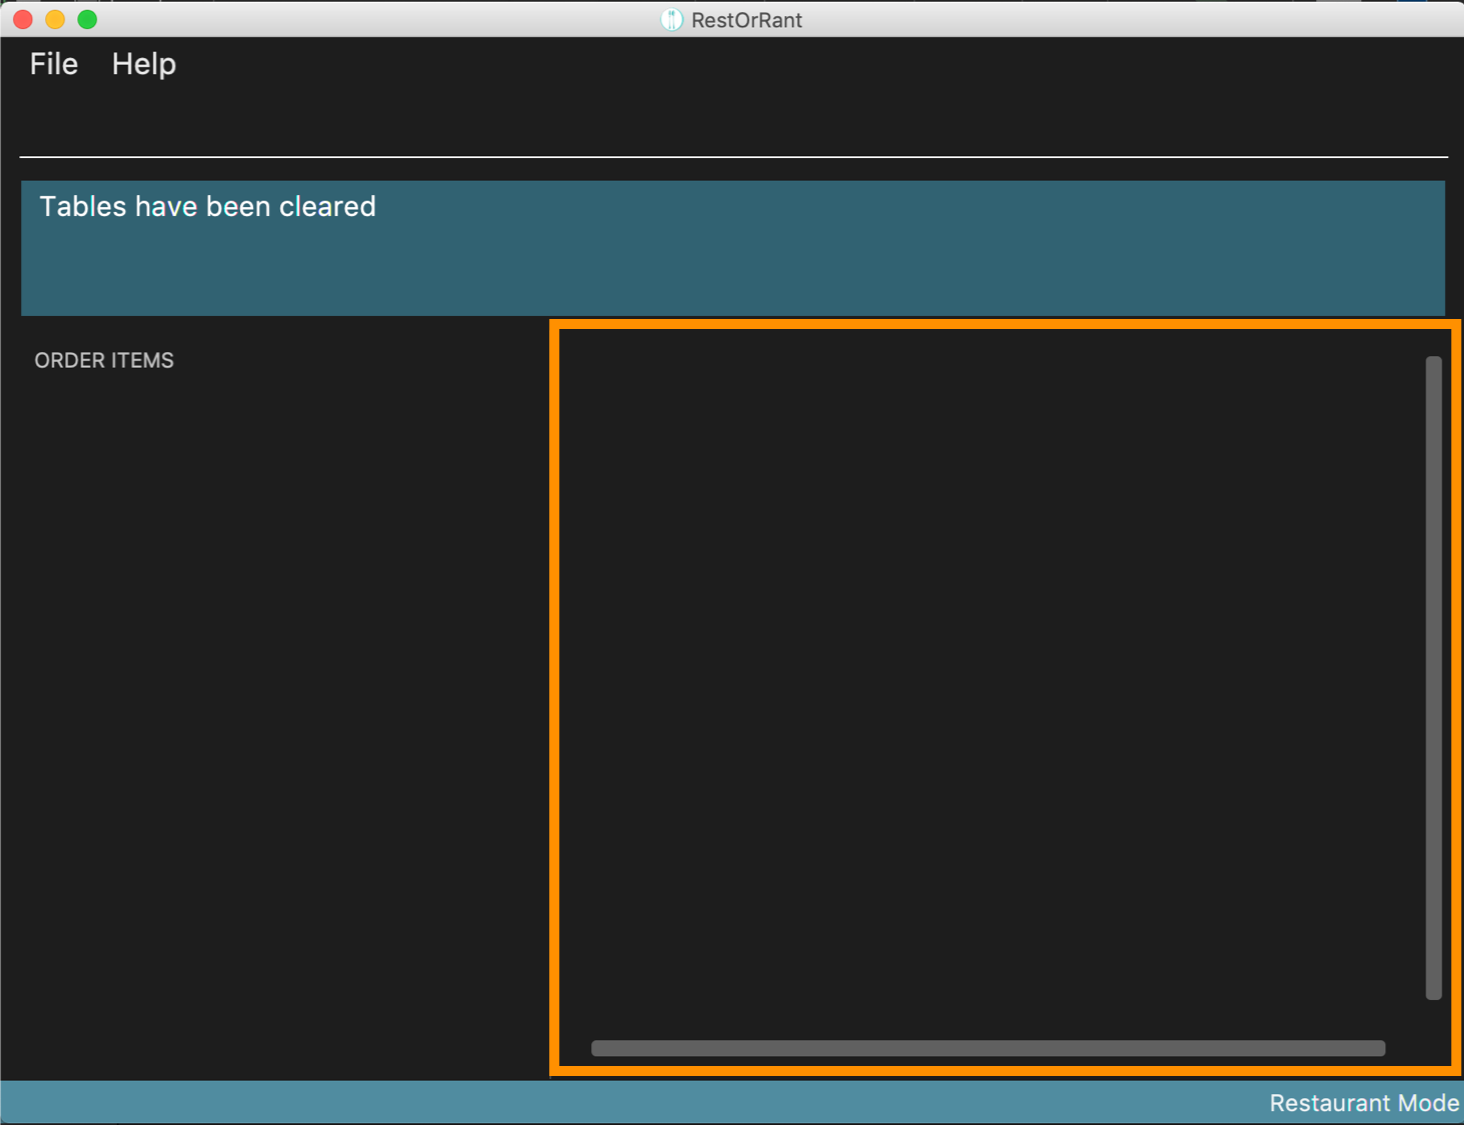
|
3.3.5. Getting available tables for customers : spaceFor
To speed up your management of customers, this command can help you look for available tables to accommodate your customers.
| This command finds the table with the least number of seats that is able to accommodate the specified customers. It will always choose the table with the smallest table number first. |
|
You will see a success message in the Results Display and the chosen table will be updated with the specified number of customers. |
For example, in the sample layout we provided, the next available table that can fit 3 customers is Table 25, as shown below. 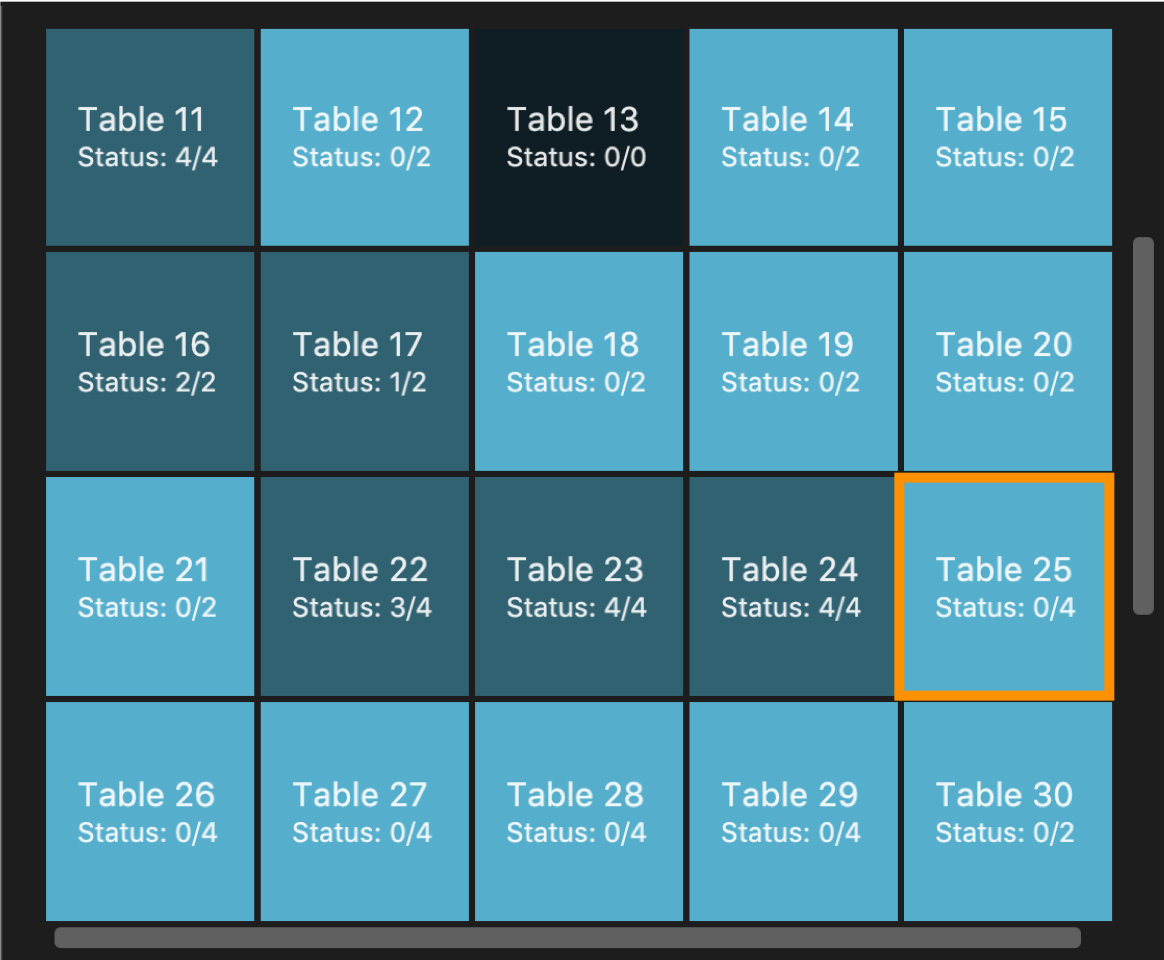
Suppose, 3 customers enter your restaurant and you want to quickly locate an available table for them, you can simply use the 
In the Table Panel, you will see that Table 25 will have been updated to the correct occupancy and changed to a slightly darker colour to indicate that it is occupied. 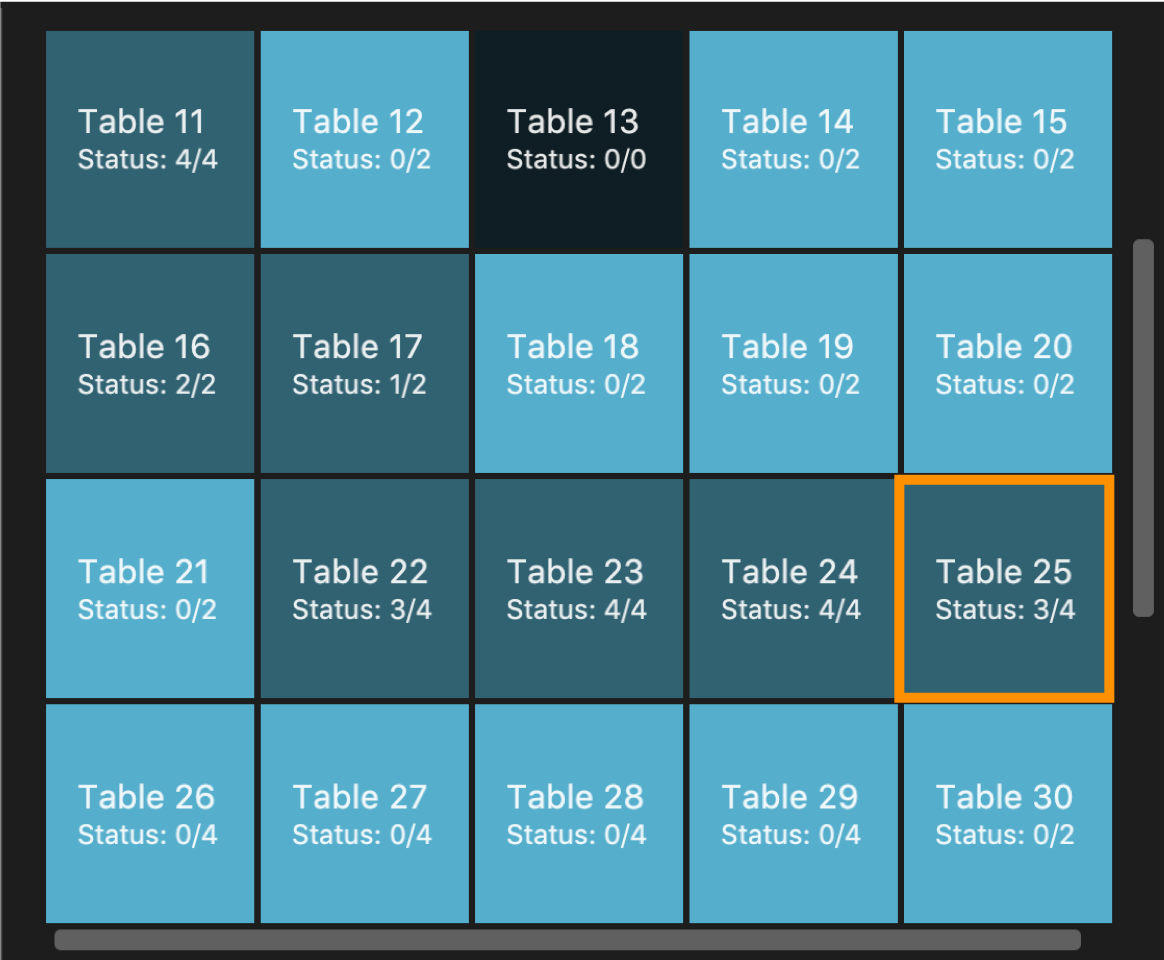
|
3.3.6. Making a reservation : reserve (Coming in v2.0)
Another key feature that many restaurants have is the ability to make reservations. Hence, a reserve function would be a necessary next step to make management of tables and customers more efficient.
| RestOrRant will check for other reservations and availabilities of tables before allowing you to make a reservation. |
|
You will see a success message in the Results Display. |
For example, after executing |
3.4. Table Mode
In Table Mode, you can handle orders from the current table, which is given by the table number that was specified in the tableMode command.
You can take orders, track the serving status of the items ordered, and calculate the bill for that table in this mode.
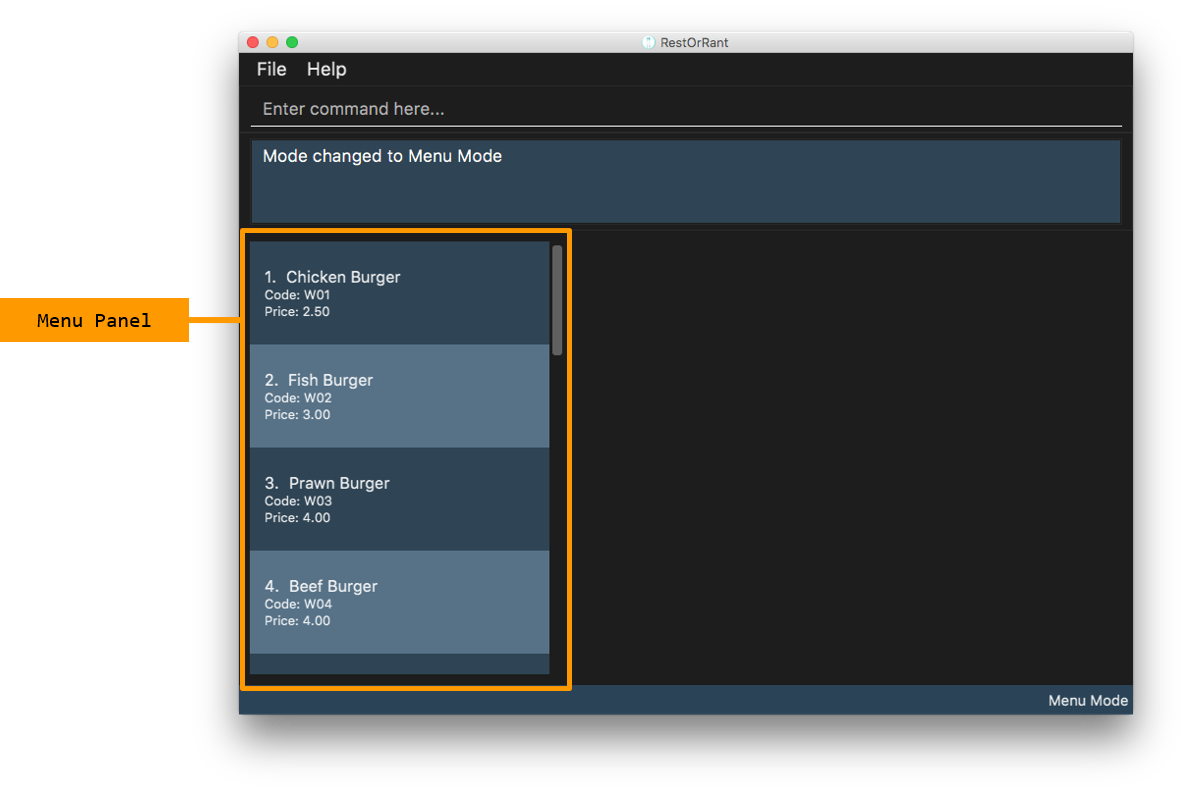
The user interface for Table Mode (in this example, for Table 5) is shown in the image below.
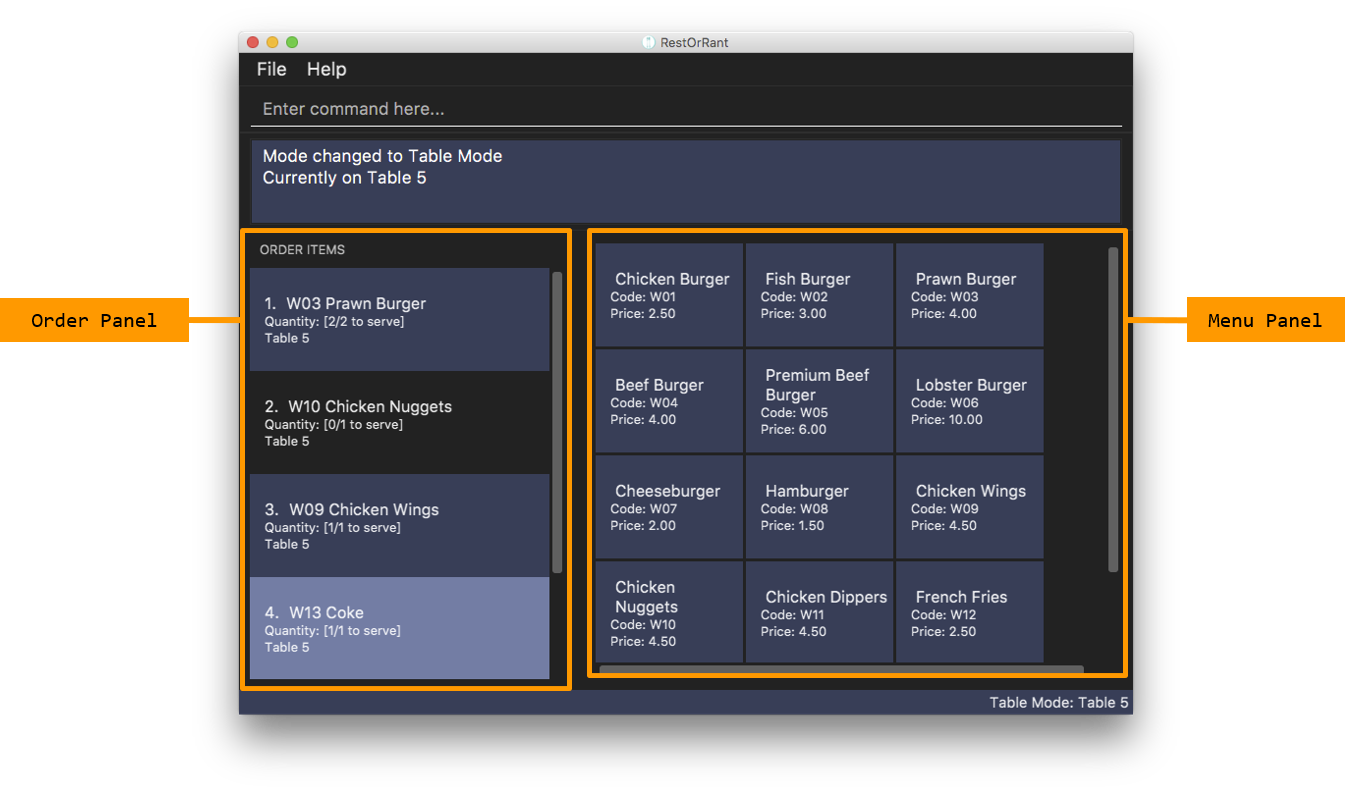
The function of the side and main panels are as follows:
-
Order Panel: This panel shows you the list of items ordered by the current table, arranged in chronological order. It also indicates the quantity left to serve for each item, and the background turns dark when the item is fully served.
-
Menu Panel: This panel displays the items on the menu along with their item codes for you to conveniently refer to when taking orders.
Here are the commands that you can use in this mode to efficiently handle the orders in your restaurant.
3.4.1. Adding items to an order : addToOrder
As you are taking an order from customers, this command allows you to record down the items that were ordered by the table by specifying the item code and quantity for each item that was ordered. You may also add an item that was previously ordered by the table to increase its quantity if customers choose to order more.
| The maximum quantity of an item that can be ordered by a table is 2,000,000. |
| The item codes for each item on the menu can be easily found in the Menu Panel. |
You can only add item codes that exist in the menu. You may add items to the menu using the addToMenu command in Menu Mode.
|
| You can add multiple or duplicate order items in a single command! |
| If any of the item codes do not exist in the menu or if the new quantity exceeds 2,000,000, then that item and subsequent items will not be added to the order. |
|
You will see a success message in the Results Display and the updated order items will be displayed in the Order Panel. |
For example, Table 5 initially has 4 items in the Order Panel as shown below. Note that the quantity of Coke ordered is 1. 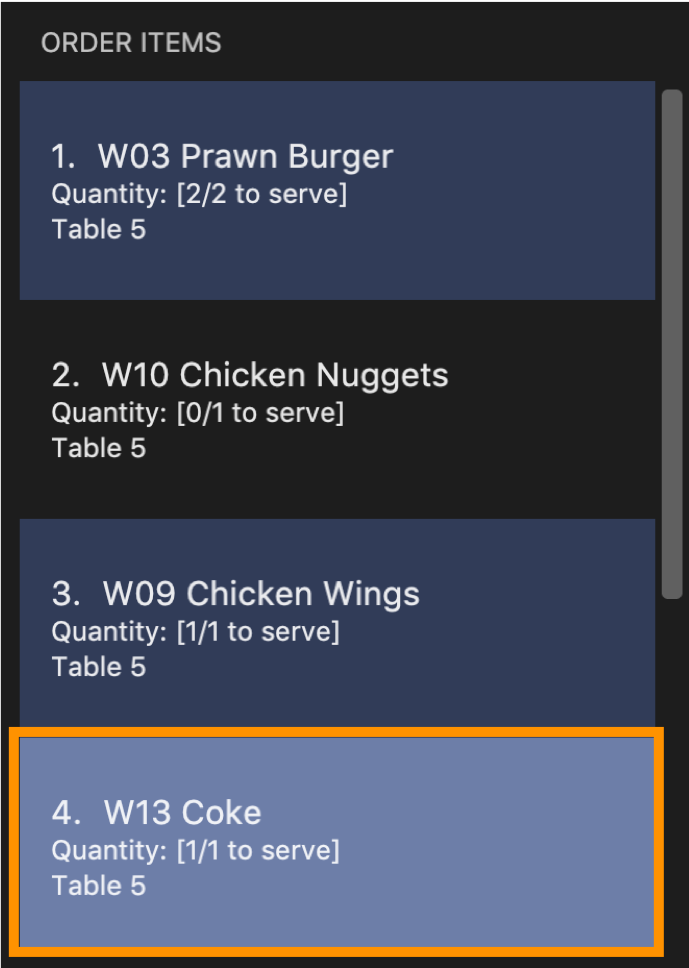
Suppose the customers at Table 5 want to order 1 more Cheeseburger and 1 more Coke. After executing 
The Order Panel will also be updated and you will now see 5 items displayed. As seen in the image below, 1 portion of Cheeseburger has been added as the 5th item, while the quantity of Coke ordered has been updated from 1 to 2. 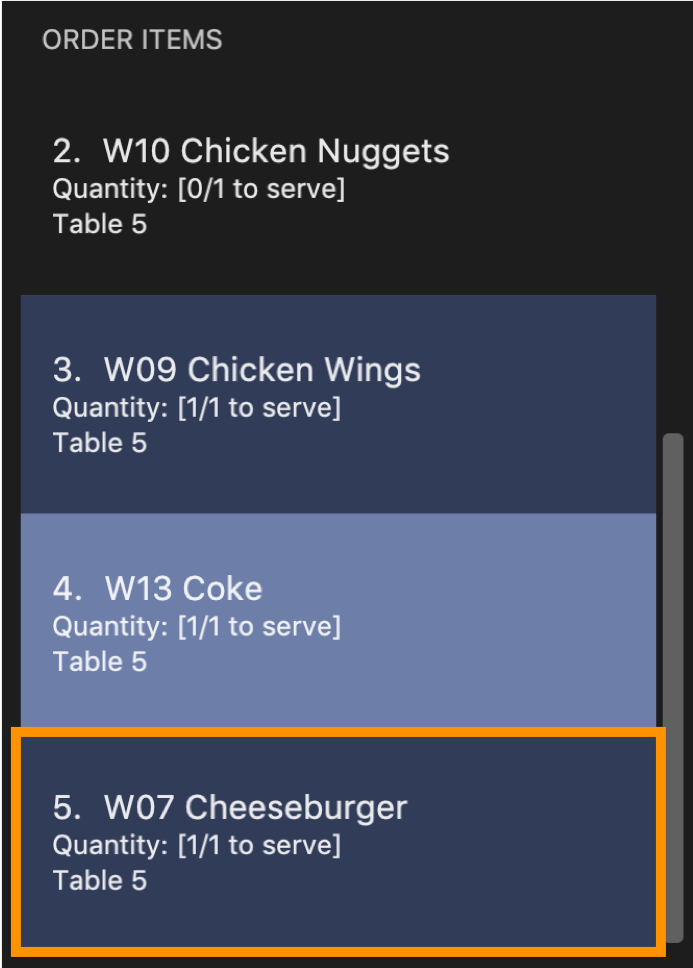
|
3.4.2. Deleting an item from an order : deleteFromOrder
If you have accidentally keyed in an incorrect order or if the customer decides not to order a particular item anymore, you can remove that item from the table’s order with this command.
| You can only delete item codes that have already been ordered by the table. |
|
You will see a success message in the Results Display and the deleted order item will no longer be displayed in the Order Panel. |
For example, Table 5 initially has 4 items in the Order Panel as shown below. Note that Coke has been ordered by the table.
Suppose the customers at Table 5 decide not to order Coke anymore. After executing 
The Order Panel will also be updated and you will now only see 3 items displayed. As seen in the image below, Coke has been removed from the order. 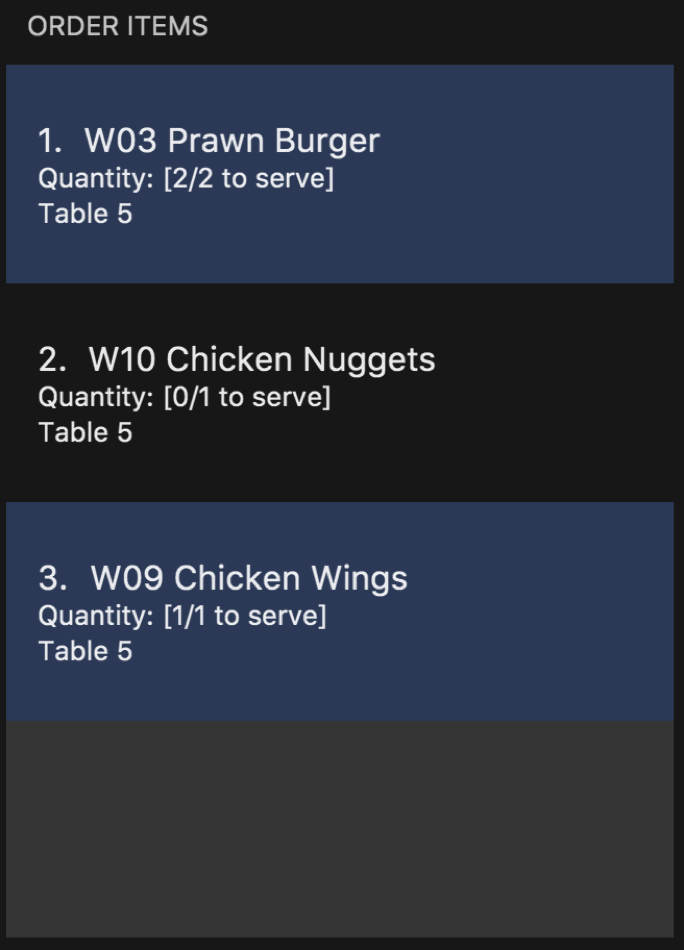
|
3.4.3. Clearing all the items in an order : clearOrder
This command allows you to clear all the items ordered by a table so that you can take orders from scratch.
This command is irreversible and will not save the order under RestOrRant’s statistics. If the customers are done with the meal, use the bill command instead, which will automatically clear the orders from the table.
|
|
You will see a success message in the Results Display and the Order Panel will be empty. |
For example, Table 5 initially has 4 items in the Order Panel as shown below. 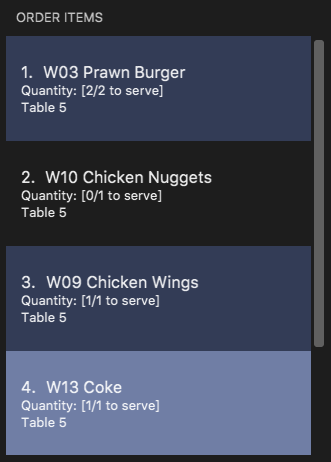
After executing 
The Order Panel will now be empty, as seen in the image below. 
|
3.4.4. Marking an item in an order as served : serve
Once you have served items to the table, you can update the serving status of those items by using this command so that you can easily keep track of what has and has not been served.
You can only serve item codes and quantities that have not already been served for the table. You can add items to the order using the addToOrder command.
|
| If the quantity is not specified, the default quantity served is 1. |
|
You will see a success message in the Results Display and the order item’s quantity to serve will be updated in the Order Panel. The background of the order item also turns dark once it is fully served. |
For example, Table 5 initially has 4 items in the Order Panel as shown below. Note that there are still 2 Prawn Burgers that have yet to be served. 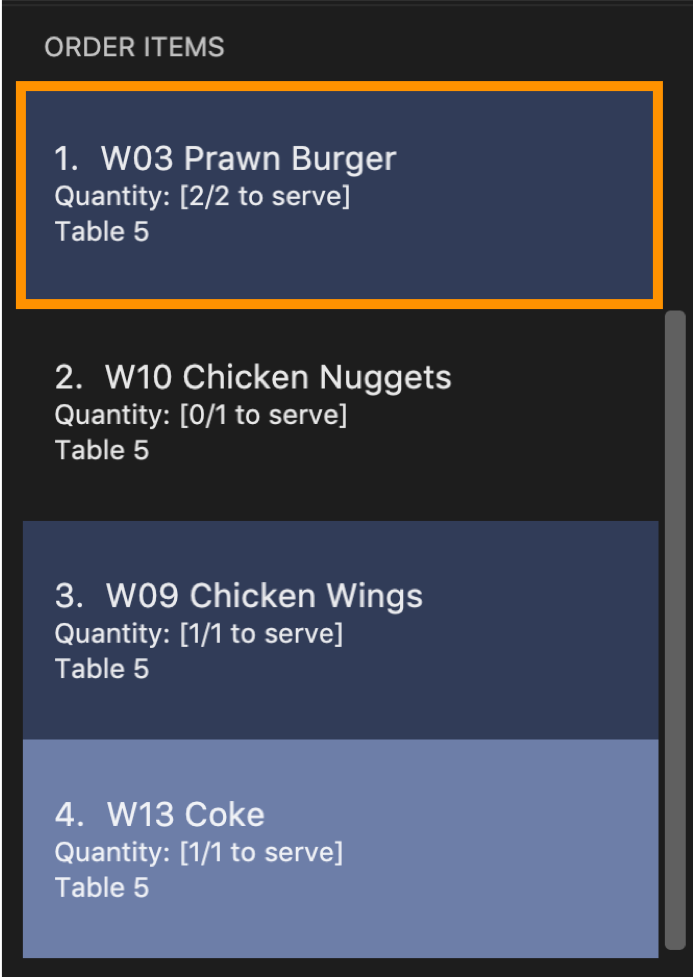
Suppose the Prawn Burgers have been served and you want to update their serving status in RestOrRant. After executing 
The Order Panel will also be updated and you can see from the image below that there are no more quantities of Prawn Burger to serve. Since it is fully served, the background of the Prawn Burger item has turned dark. 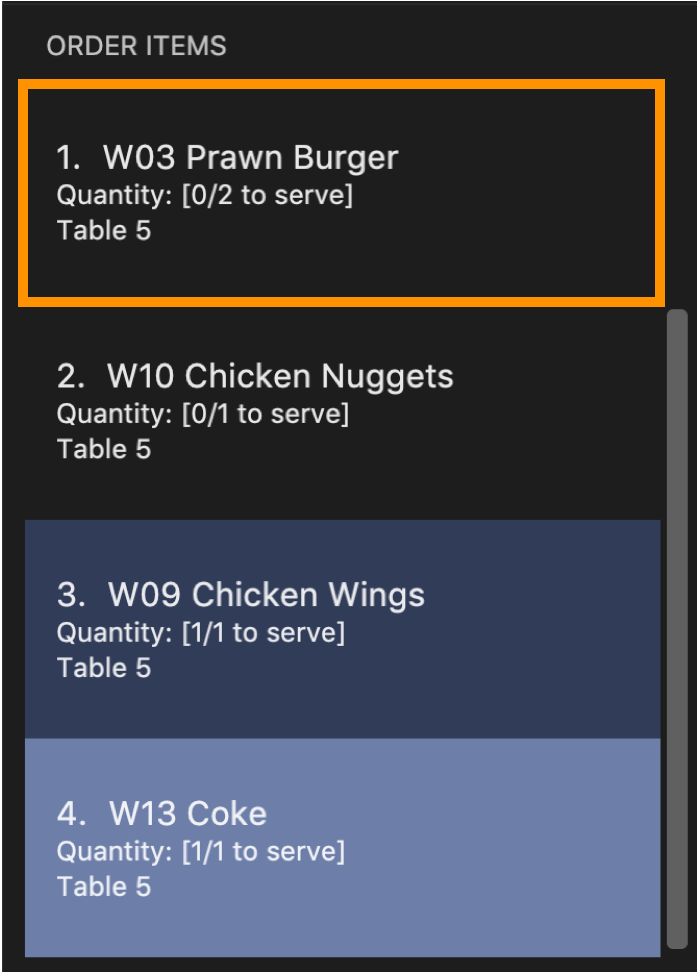
|
3.4.5. Calling the bill of an order : bill
Now that all the orders have been served and the customer is ready to pay for the meal, you can call the bill to obtain the customer’s receipt.
| This command is irreversible. Once the command is executed, the order will be cleared and the table’s occupancy will be reset to allow new customers to use the table. The money earned from the bill will automatically be added to RestOrRant’s revenue statistics. |
The bill can only be called when all order items have been served.
|
|
You will see a success message in the Results Display and the user interface will change its colour scheme and
display. |
As seen from the image below, Table 5 has 4 items in the Order Panel. Note that all items have been
served. 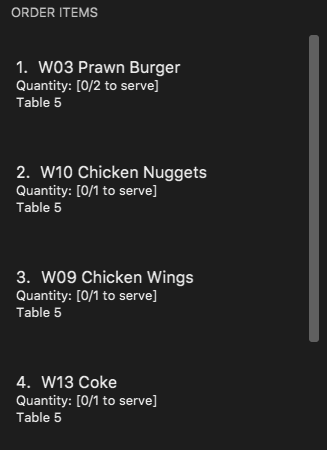
When 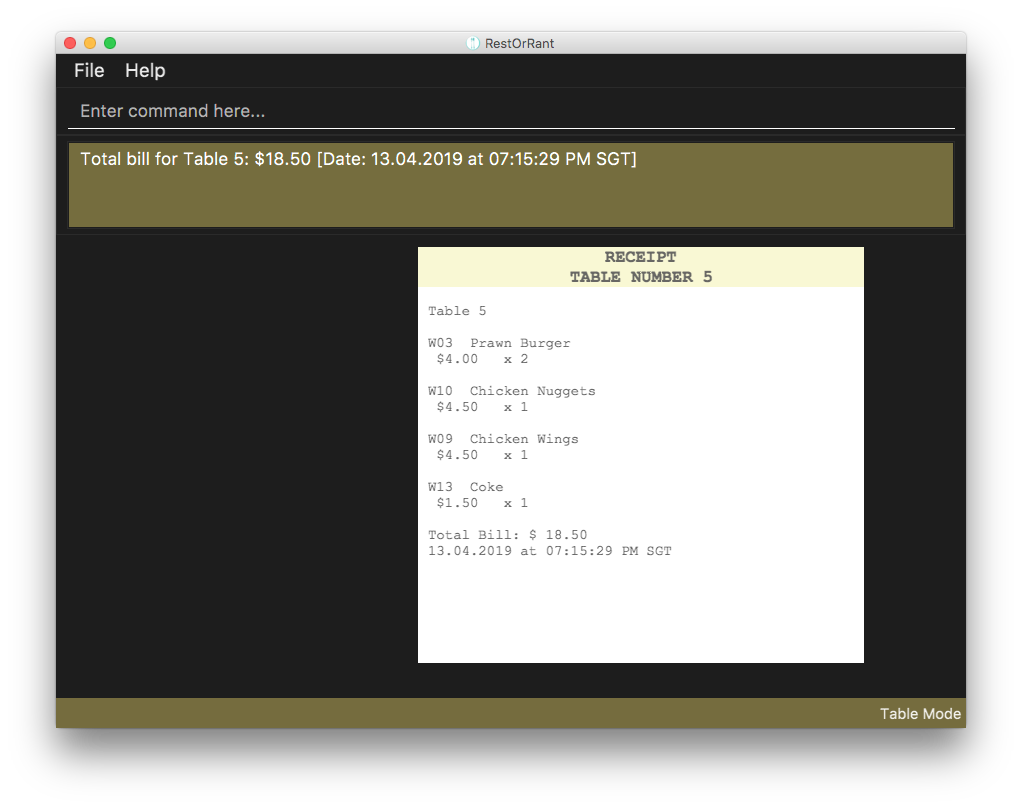
When you switch to Restaurant Mode using the 
|
3.4.6. Adding a note to an order item : addNote (Coming in v2.0)
Sometimes, customers may have special requests for their orders, such as reducing the level of spicyness or removing certain ingredients from their meal. You can easily add all these special requests and more to the order item with this command.
You can only add notes to item codes that have already been ordered by the table. You can add items to the order using the addToOrder command.
|
|
You will see a success message in the Results Display and the note will appear as a tag beside the item name in the Order Panel. |
For example, if the customers want their chicken wings to be less spicy, you can execute the |
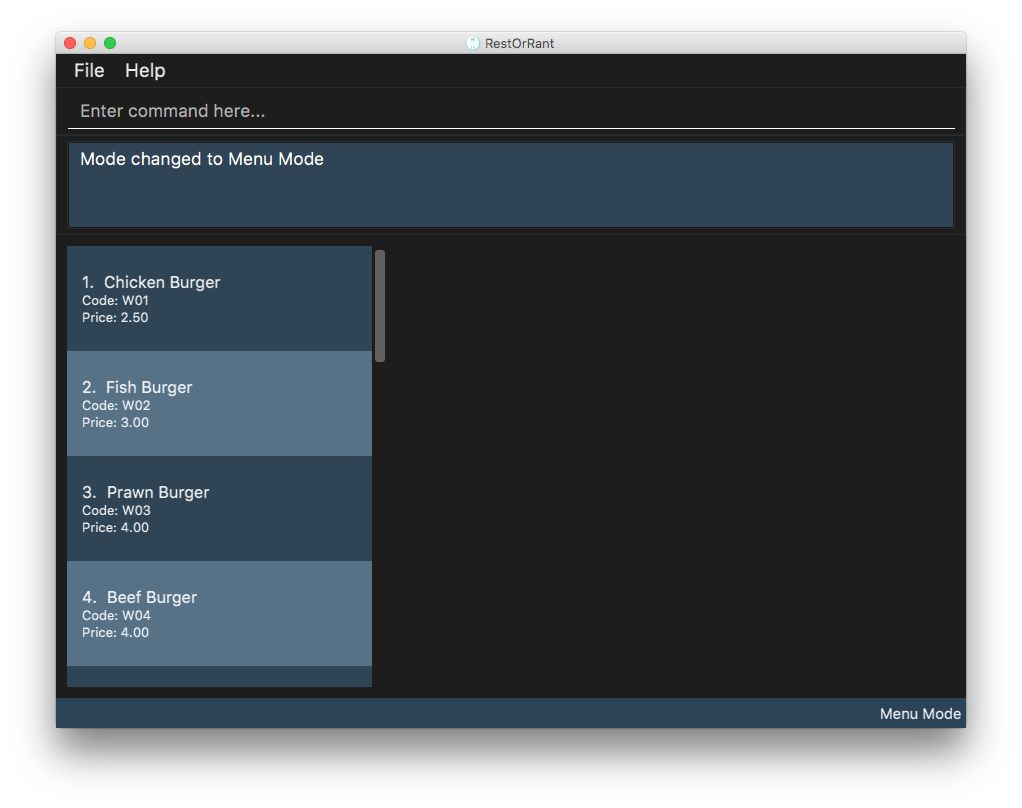
3.5. Menu Mode
In Menu Mode, you can track all updates to the menu, and RestOrRant will display the current items on the menu.
This mode only uses the side panel to avoid any confusion and for ease of use. The function is as follows:
-
Menu Panel: This panel displays the currently available items and their details on the menu.
Here are the commands that you can use in this mode to efficiently handle the menu in your restaurant.
3.5.1. Adding menu items to the menu : addToMenu
If your restaurant has a new dish you would like to make available for your customers, this command allows you to add that item to the menu by specifying the item code, name and price.
Order of the input parameters does not matter (i.e. any permutation of c/ITEM_CODE n/ITEM_NAME p/ITEM_PRICE can be
keyed in and the command will work as intended).
|
| RestOrRant does not allow you to add two items with the same item code as they are considered to be the same item. Make sure to have different item codes for all your available dishes! |
|
You will see a success message in the Results Display and the updated menu with the new item will be displayed in the Menu Panel. |
For example, the menu initially has 15 items as shown below. 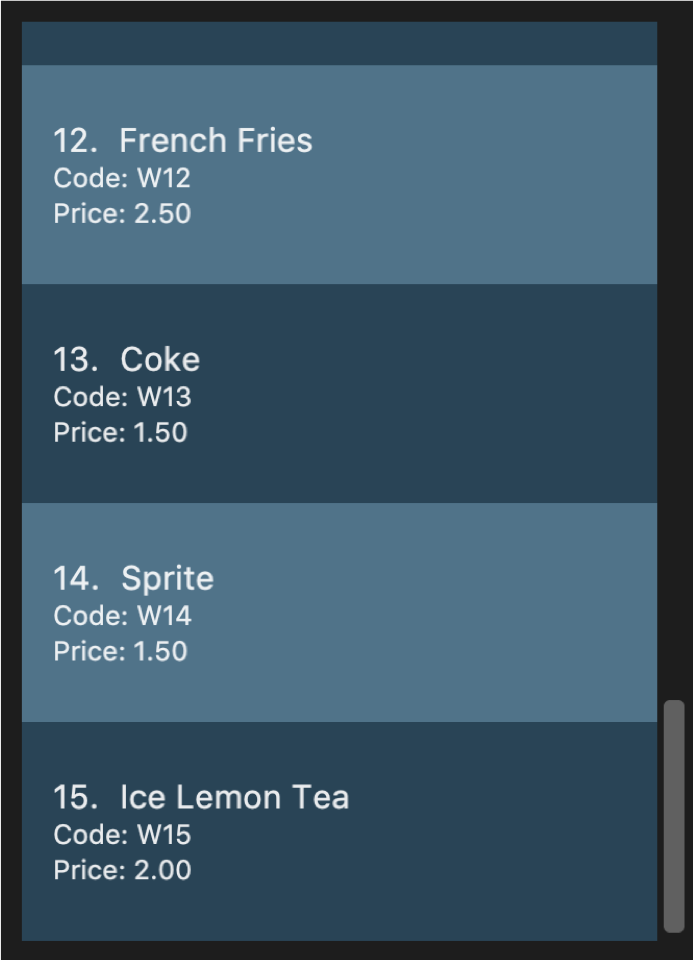
Suppose you would like to add a Chocolate Ice Cream to the menu. After executing 
The Menu Panel will also be updated and you will now see 16 items displayed. As seen in the image below, a new 16th item has been added to the menu. 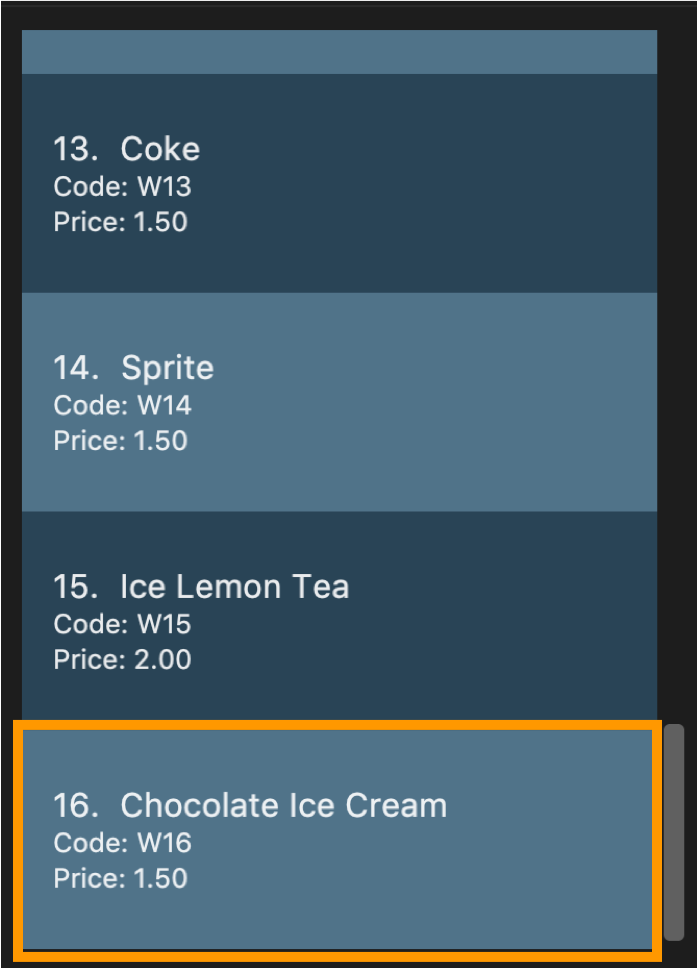
|
3.5.2. Deleting menu items from the menu : deleteFromMenu
Suppose you now decide you no longer want to sell a particular dish, and would like to make it unavailable for customers. You can do so by specifying the item code of the item you wish to remove.
| The restaurant must be empty (there should not be any occupied tables). |
You can only delete item codes that already exist in the menu. You can add items to the menu using the addToMenu command.
|
| Deleting an item from the menu would also erase the order statistics associated with that item, and this item will not show up on the Menu Panels in all modes. If you choose to add the same item to the menu again, the order statistics for the item will be reset to 0. |
|
You will see a success message in the Results Display and the displayed menu on the Menu Panel would have the specified item removed. |
For example, the menu initially has a few items as shown below. 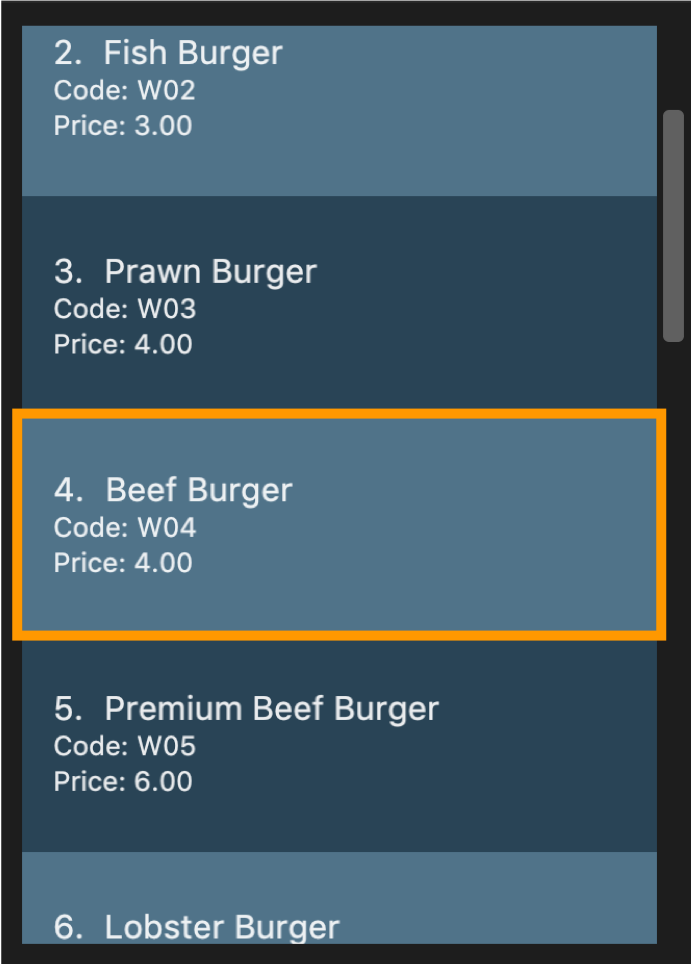
Suppose you would like to delete the Beef Burger from the menu. After executing 
The Menu Panel will also be updated and you will no longer see the Beef Burger, as seen in the image below. 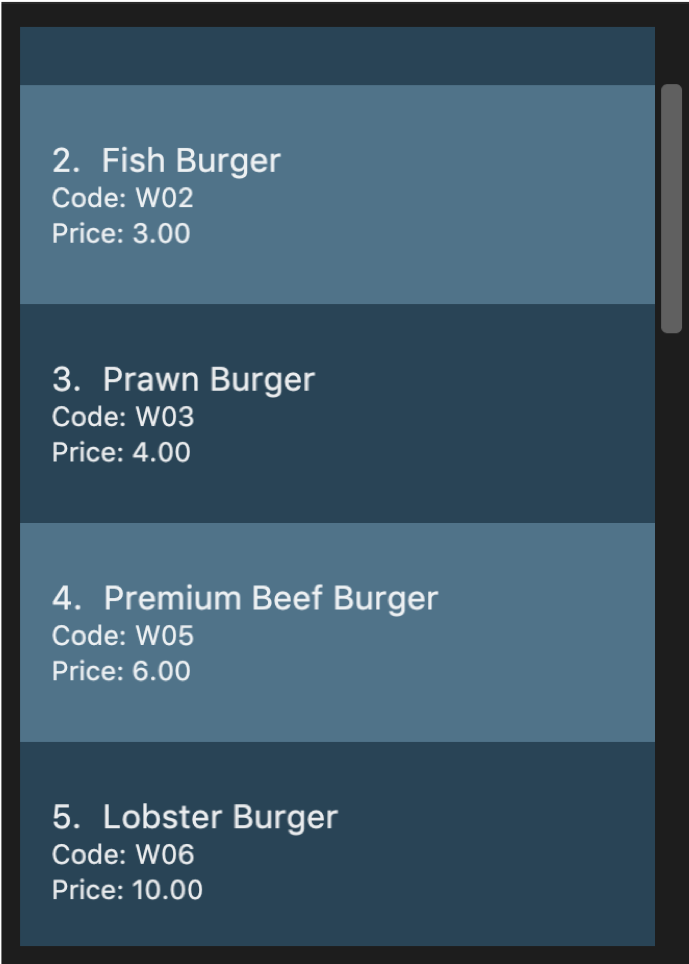
|
3.5.3. Clearing all the items in the menu : clearMenu
This command allows you to clear all the items from the menu, if you ever need to start afresh.
|
The menu must not be empty (one or more items should exist in the menu). The restaurant must be empty (there should not be any occupied tables). |
| This command is irreversible and will not save the menu under RestOrRant’s statistics. |
|
You will see a success message in the Results Display and the Menu Panel will be empty. |
For example, the menu initially has a few items as shown below. 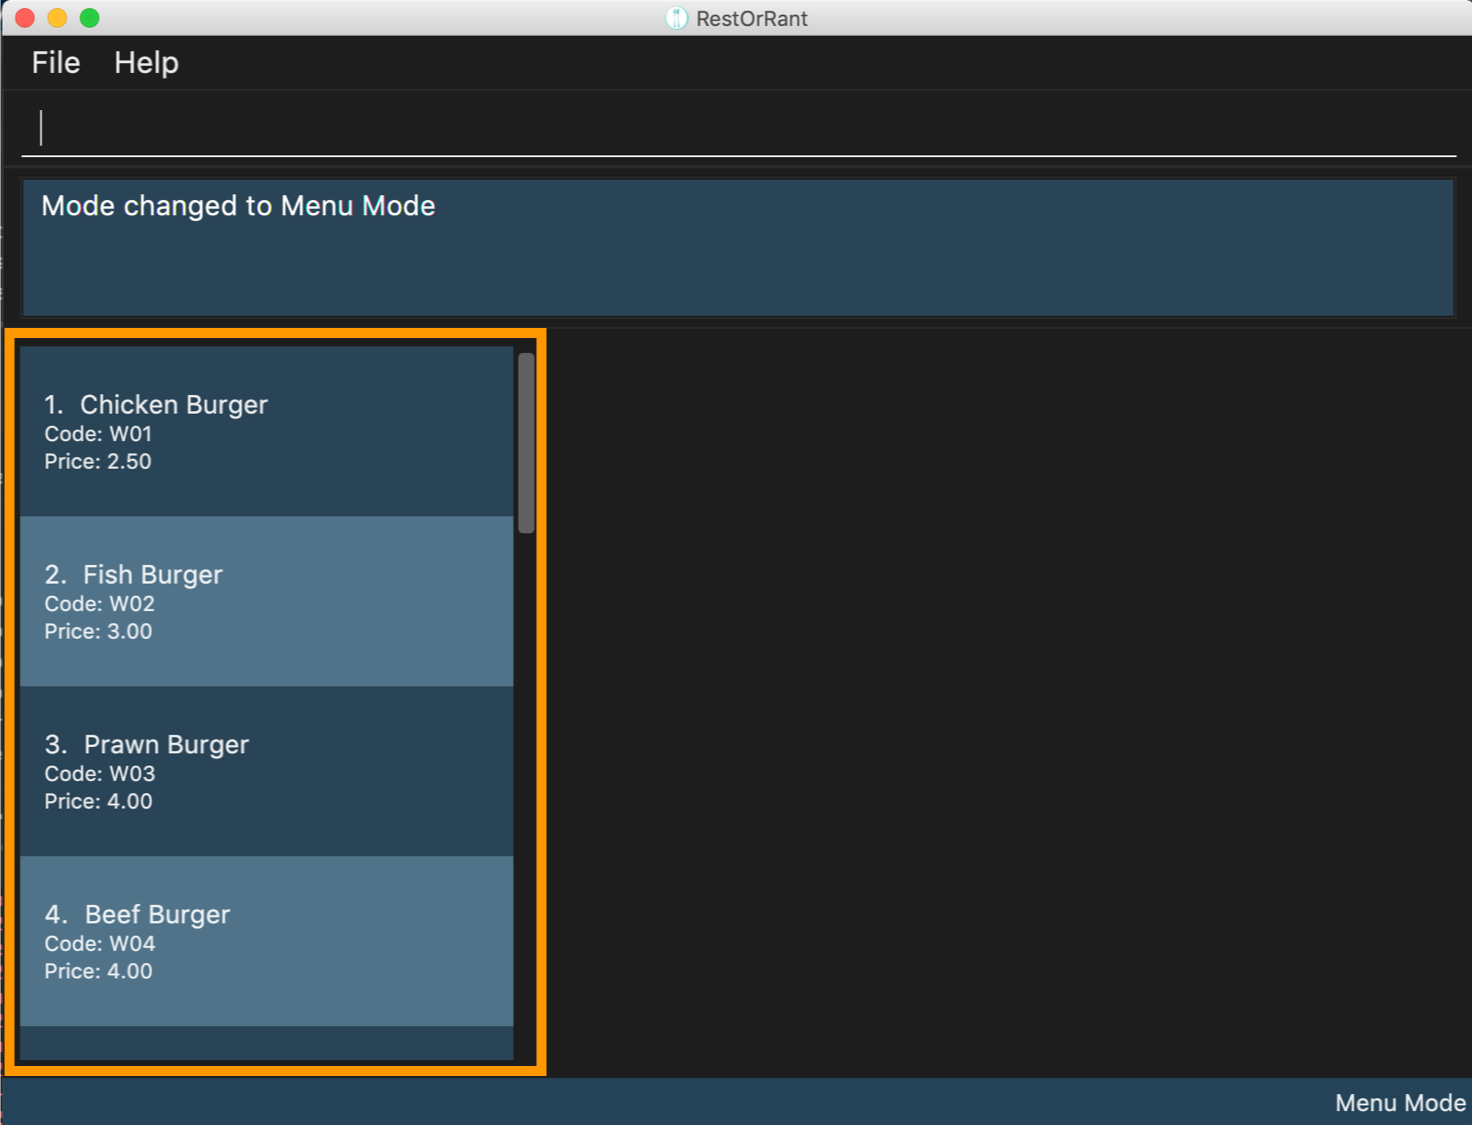
After executing 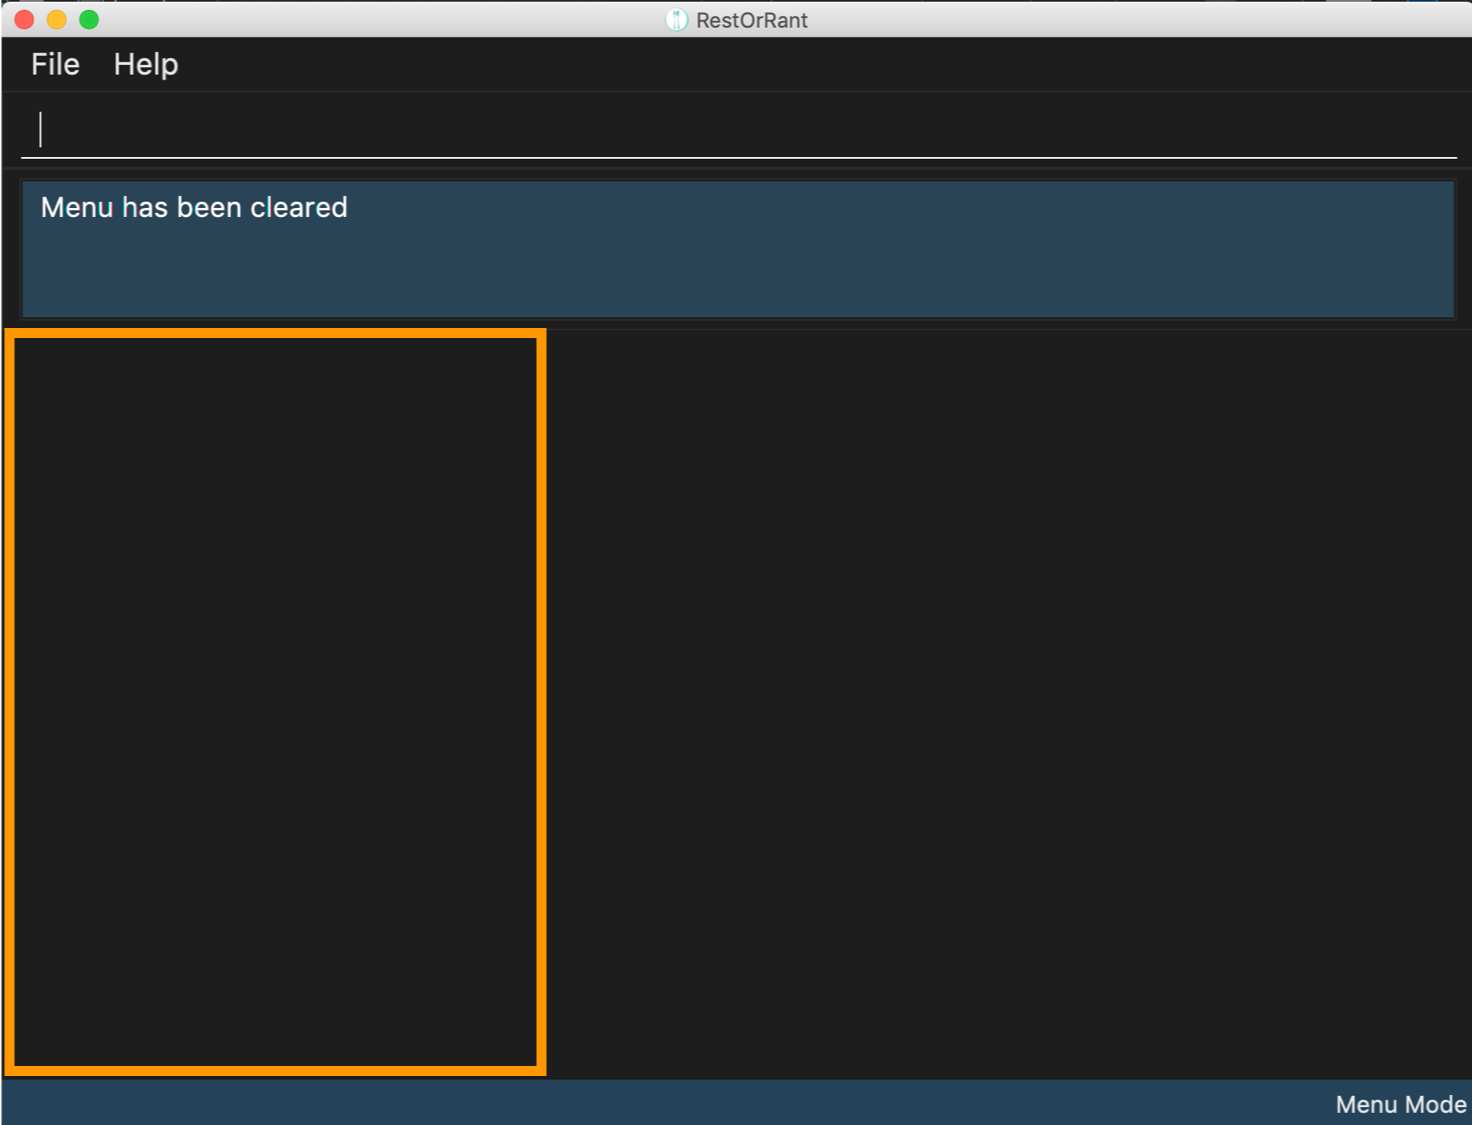
|
3.5.4. Changing an item’s availability : toggleAvailability (Coming in v2.0)
This command allows you to change an item’s availability by specifying the item code. Calling this command on an available item would mark the item as unavailable, whereas calling this command on an unavailable item would mark it as available again.
| All added menu items are available by default. |
| The specified item code should exist in the menu. |
|
You will see a success message in the Results Display and the background of the menu item would turn dark. |
Let’s say that the Lobster Burger has just become sold out. |
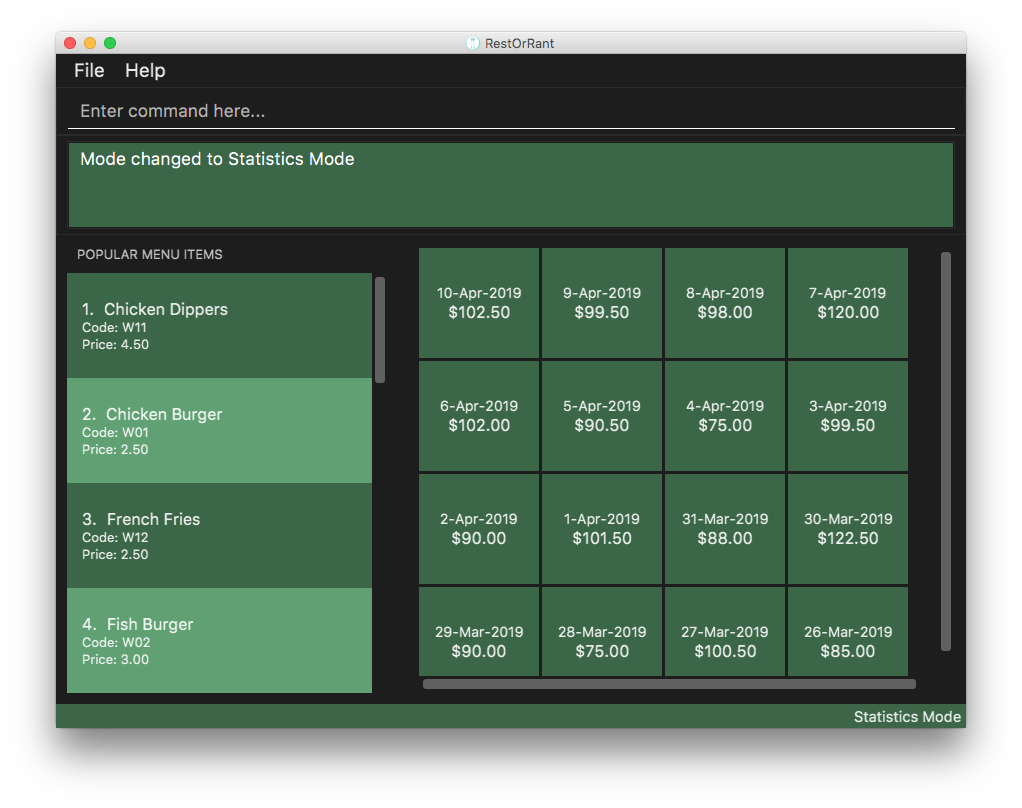
3.6. Statistics Mode
In Statistics Mode, you can obtain statistics related to your restaurant, such as the popularity of dishes and the revenue of a specified year, month or day.
The user interface for Statistics Mode is shown in the image below.
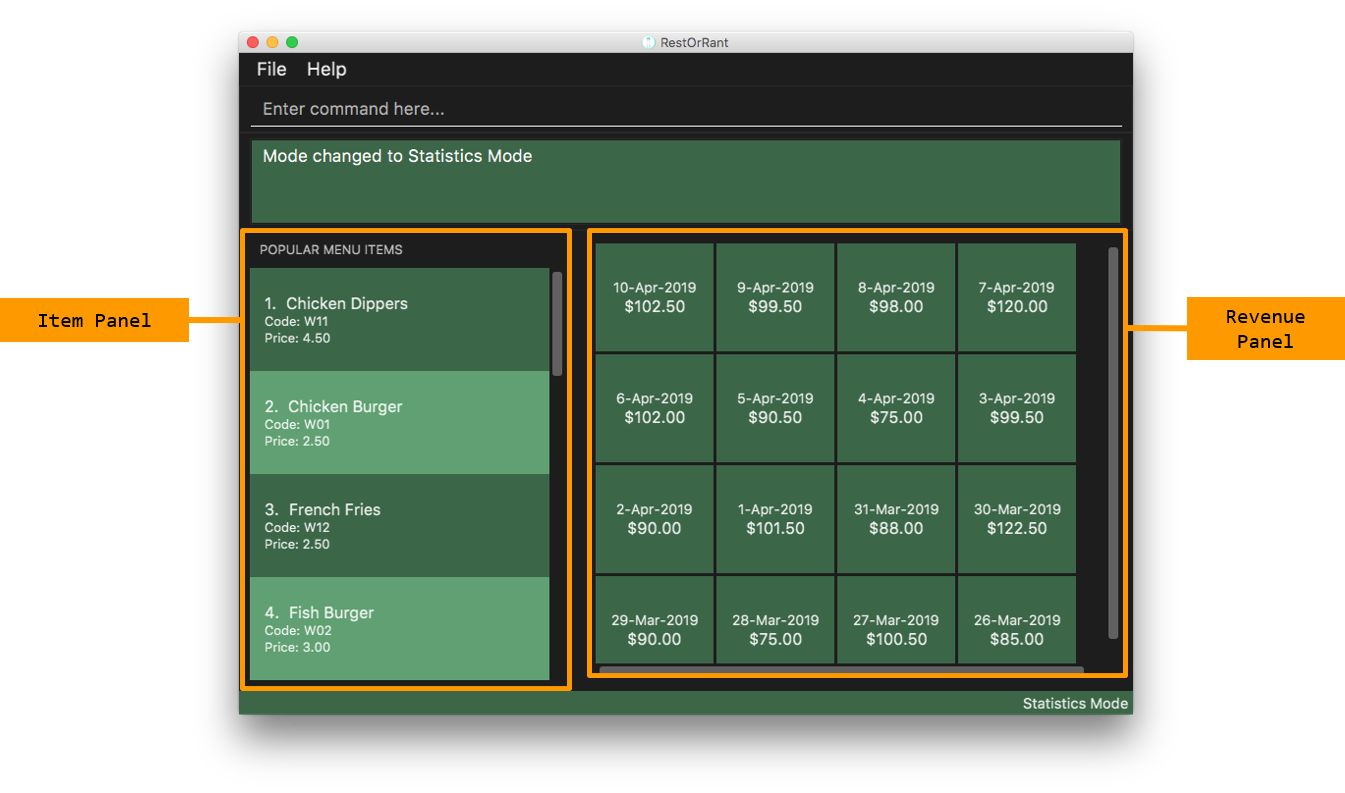
The function of the side and main panels are as follows:
-
Item Panel: This panel shows you the list of menu items sorted by its popularity. This is meant to help you decide what ingredients to order to cater to the demands of the popular dishes.
-
Revenue Panel: This panel displays the revenue from the recent years, months or days, depending on the view that you have selected. This allows you to study trends in your restaurant’s revenue.
By default the Statistics Mode displays revenue up to 30 days in the Revenue Panel unless you execute
yearly, monthly or daily commands to change its display.
Here are the commands that you can use in this mode to study the statistical data of your restaurant.
|
3.6.1. Changing the Revenue Panel to yearly view : yearly
This command changes the Revenue Panel to display the statistical yearly revenue for you to study its trends.
|
You will see a success message in the Results Display and the Revenue Panel changes to display the yearly revenue of up to the past 30 years, starting from the most recent record. |
Notice that the first revenue is the most recent year recorded. This saves you the trouble of scrolling through the rest of the record. 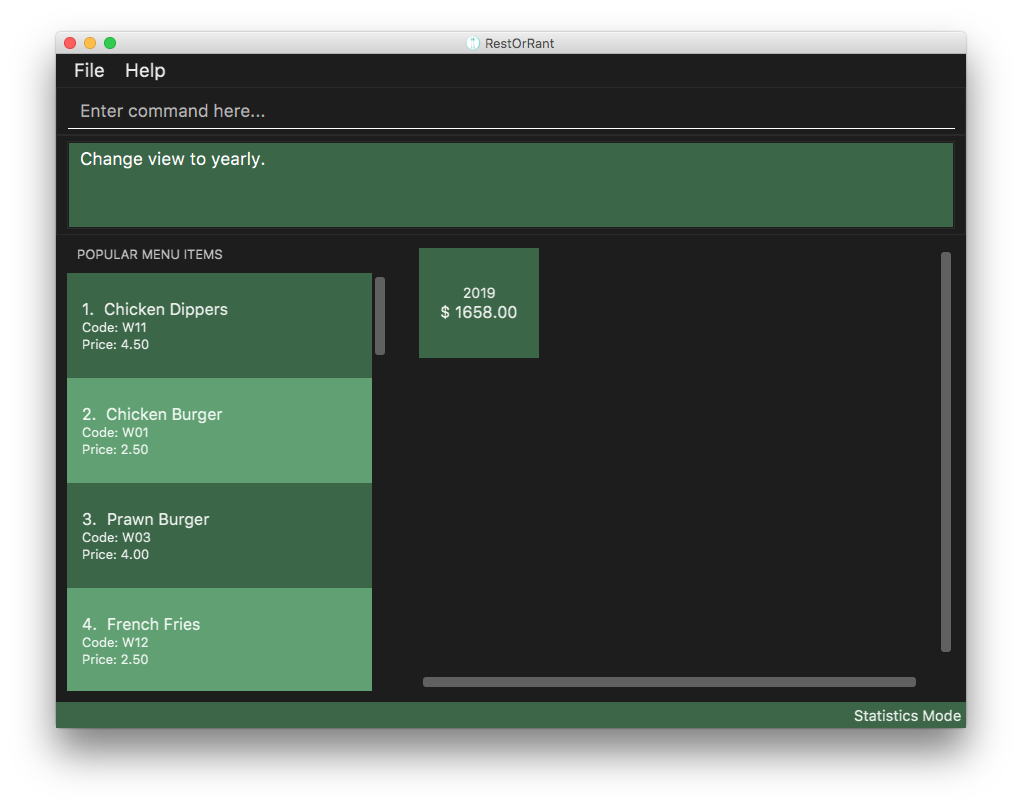
|
3.6.2. Changing the Revenue Panel to monthly view : monthly
This command changes the Revenue Panel to display the statistical monthly revenue for you to study its trends.
|
You will see a success message in the Results Display and the Revenue Panel changes to display the monthly revenue of up to the past 30 months, starting from the most recent record. |
Notice that the first revenue is the most recent month recorded. This saves you the trouble of scrolling through the rest of the record. 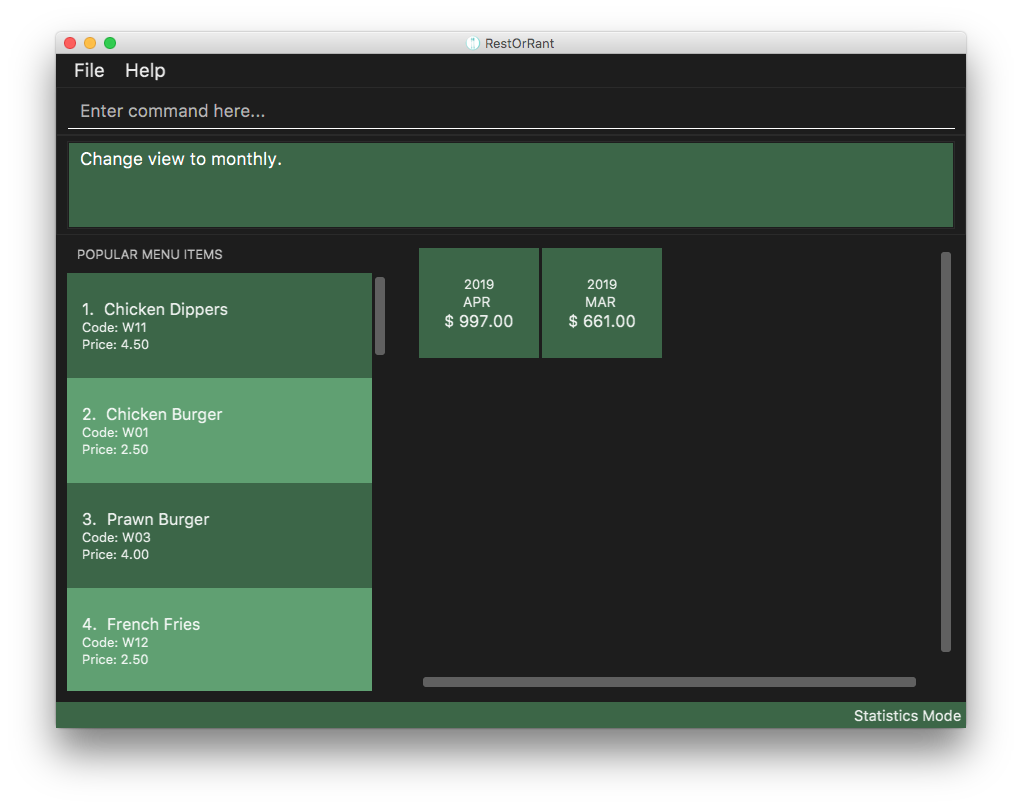
|
3.6.3. Changing the Revenue Panel to daily view : daily
This command helps you to change the Revenue Panel back to its default display of the statistical daily revenue
for you to study its trends.
|
You will see a success message in the Results Display and the Revenue Panel changes to display the daily revenue for up to the past 30 days, starting from the most recent record. |
Notice that the first revenue is the most recent day recorded. This saves you the trouble of scrolling through the rest of the record. 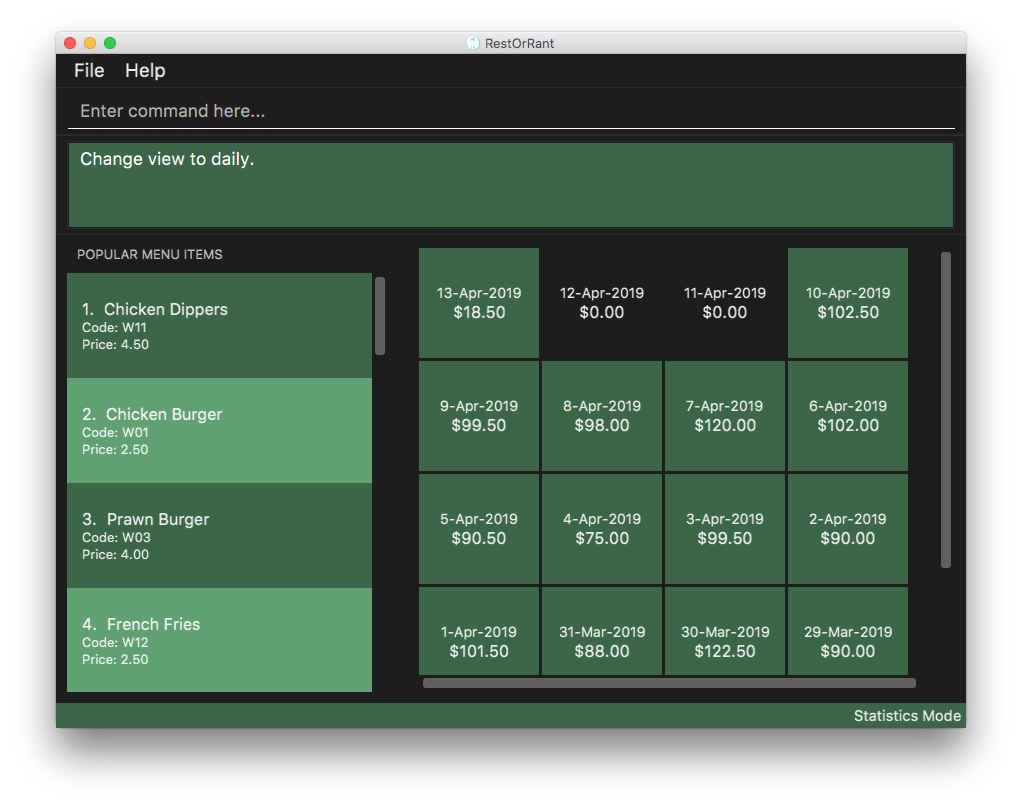
|
3.6.4. Getting the total revenue : revenue
If you want to obtain the revenue earned in a particular year, month or day, you can obtain it with this command.
|
Order of the parameters does not matter. For example, r y/2019 d/6 m/4 will still return the revenue earned on
6th April 2019.If no arguments are included, the revenue earned from the current day will be returned by default. |
|
If there are no records of the stated period, it will be returned as $0.00. Refer to commands to take note of the parameter restrictions of YEAR, MONTH and DAY.
|
|
You will see a success message and the revenue of the specified year, month or day in the Results Display. |


|
4. FAQ
Q: How do I transfer my data to another Computer?
A: Install the application in the other computer and copy over the data folder from your previous RestOrRant folder along with all the files inside.
| There should be 4 files in the data folder, menu.json, orders.json, statistics.json and tables.json. |
6. Command Summary
Here is our reference sheet so that you can have all of RestOrRant’s commands and features at your fingertips!
6.1. General
These commands can be used in any mode.
| Command | Shortcut | Usage | Example |
|---|---|---|---|
F1 |
|
Shows the User Guide |
|
|
|
Shows the past commands |
|
- |
|
Clears all the data in RestOrRant |
|
- |
|
Exits RestOrRant |
6.2. Changing Modes
These commands can be used in any mode unless you are already in the mode that you are trying to switch to.
| Command | Shortcut | Usage | Example |
|---|---|---|---|
|
|
Switches to Restaurant Mode |
|
|
|
|
|
|
|
Switches to Menu Mode |
|
|
|
Switches to Statistics Mode |
6.3. Restaurant Mode
These commands can only be used in Restaurant Mode.
| Command | Shortcut | Usage | Example |
|---|---|---|---|
|
|
|
|
- |
|
|
|
- |
|
|
|
|
|
Clears all the tables in RestOrRant |
|
- |
|
|
|
|
- |
|
|
6.4. Table Mode
These commands can only be used in Table Mode.
| Command | Shortcut | Usage | Example |
|---|---|---|---|
|
|
|
|
|
|
|
|
|
|
Clears all the items from the current table’s order |
|
|
|
|
|
|
|
Returns the bill for the current table’s order |
|
|
- |
|
|
6.5. Menu Mode
These commands can only be used in Menu Mode.
| Command | Shortcut | Usage | Example |
|---|---|---|---|
|
|
|
|
|
|
|
|
|
|
Clears all items from the menu |
|
|
|
|
|
6.6. Statistics Mode
These commands can only be used in Statistics Mode.
| Command | Shortcut | Usage | Example |
|---|---|---|---|
|
|
Displays the revenue from up to the past 30 years in the Revenue Panel |
|
|
|
Displays the revenue from up to the past 30 months in the Revenue Panel |
|
|
|
Displays the revenue from up to the past 30 days in the Revenue Panel |
|
|
|
|